
Adjustment of the handbrake is required in the following cases:
- handbrake pads replaced;
- brake drums replaced;
- the position of the adjustment device was changed;
- too much lever travel (more than 10 teeth).
Caution: The handbrake cables and all components must move freely.
Loosen one wheel bolt on each rear wheel.
Raise the car from behind.
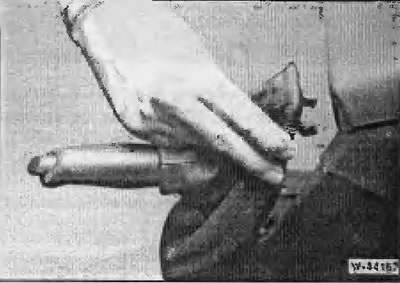
Unfasten the handbrake lever cover at the top and slide it forward onto the handle.
Note: The BMW-341030 device is used at the service station to adjust the handbrake. This is a combination socket wrench with different heads for the lock nut and the adjusting nut. If this device is not available, then the handbrake lever cover should be removed, and if necessary, the central console.
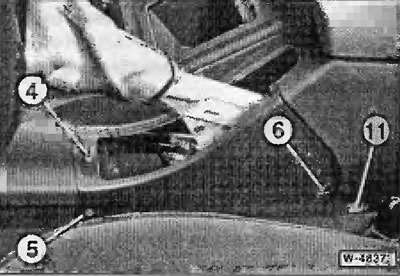
Remove the handbrake lever cover. To do this, unscrew screw "4". Press down the protective caps and unscrew screws "5" and "6". To unfasten the cover, its rear upper side part must be pulled toward the driver's seat. 11 - protective cap of the central console mounting screw.
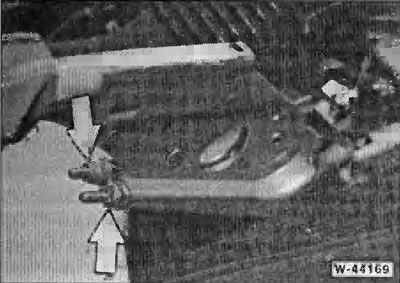
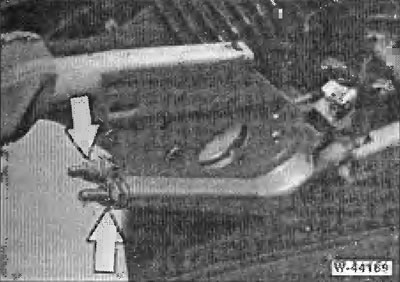
Loosen 2 lock nuts and 2 adjusting nuts of the handbrake cable "arrows". Loosen the cable rods completely.
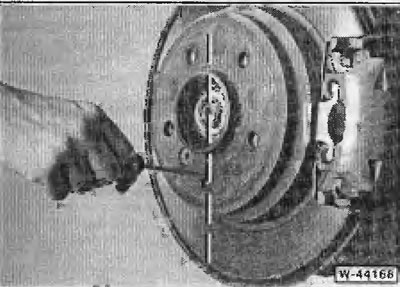
On each wheel, completely unscrew one wheel bolt. Place the threaded hole for the bolt in the lower position, coinciding with the vertical axis. Shine a flashlight into the threaded hole; the gear of the brake shoe adjuster should be visible in the hole.
Note: The wheel as shown in the picture does not need to be removed.
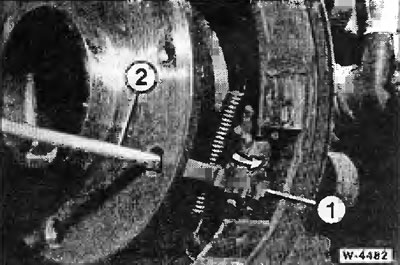
By turning gear "1" with screwdriver "2" spread the brake shoes so that the wheel can no longer be turned by hand. After this, turn the 6-tooth gear in the opposite direction. If the adjusting gear on the left side of the car turns in the direction of the arrow (see picture), then the brake shoes are moved towards the brake drum. On the right side of the car, to move the brake shoes, the adjusting gear must be rotated in the opposite direction.
After adjustment, check that the wheels rotate freely; if necessary, turn the adjustment gear a little more in the opposite direction.
Adjust the handbrake cable. To do this, tighten the handbrake lever by 4 teeth and tighten the adjusting nuts "arrows" so that the rear wheels on the left and right can still be turned evenly by hand. Release the handbrake lever and check whether the wheels rotate freely, if necessary, repeat the adjustment
Release the handbrake lever completely.
Turn on the ignition. When the lever is released, the handbrake indicator should not light.
Tighten the handbrake lever by 1 tooth. There should be no braking of the rear wheels, otherwise repeat the handbrake adjustment. In this position of the lever, the handbrake indicator may light up.
Tighten the handbrake lever by 2 teeth. In this position of the lever, the handbrake indicator should light, otherwise the switch contact on the lever should be bent accordingly.
Turn off the ignition.
Tighten the lock nuts. While doing this, hold the adjusting nuts from turning with a wrench.
Install and attach the handbrake lever side cover. Cover the mounting screws with protective caps.
Hang the handbrake lever cover at the bottom and secure it at the top.
Lower the car.
Screw the 2 wheel bolts into place on the rear wheels and tighten the bolts to a torque of 100 Nm. Install the wheel caps.