
Table of contents: Removal ↓ Installation ↓
- Home
- BMW 5 Series
- E39
- Chassis
- Brake system
- Removal and installation the front brake disc / brake caliper
Removal and installation the front brake disc / brake caliper (BMW 5 Series E39)
Note: If the brake caliper needs to be removed only to dismantle the brake disc, do not release the brake hose, otherwise the brake system will need to be bled after assembly. Hang the brake caliper on the body using a hook made from wire so that the brake hose is not twisted or stretched.
Removal
Mark the position of the front wheels relative to the hubs with paint. This will allow the balanced wheel to be installed in its original position. When unscrewing the wheel bolts, the car must stand on its wheels. Raise the car from the front and remove the front wheels.
Press the brake pedal lightly and fix it. To do this, insert a board between the pedal and the seat and move the seat forward or backward accordingly. This prevents fluid from leaking out of the expansion tank and air from entering the system after disconnecting the brake pipes.
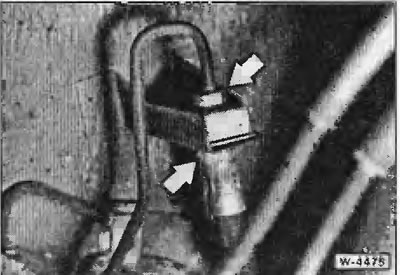
Unscrew the brake hose at the brake actuator coupling head. Otherwise, it is impossible to unscrew the brake hose from the caliper.
Caution: Some brake fluid may leak out. Collect the brake fluid in a bottle that is designed only for brake fluid.
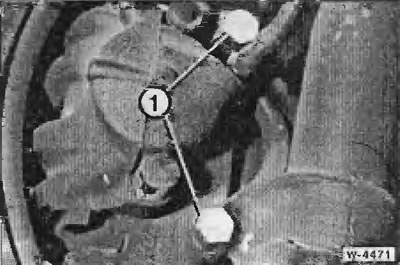
Unscrew the 2 bolts "1" securing the caliper and remove the caliper from the brake disc.
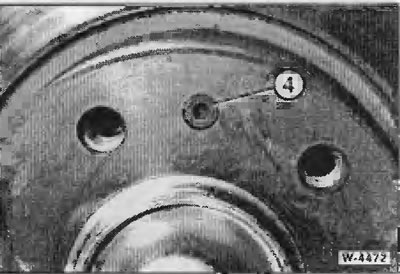
Unscrew the mounting bolt "4" using a 5 mm external Allen key.
Remove the brake disc.
Caution: Blown-in brake discs are balanced. Never remove or replace the balancing brackets on the inner diameter.
Installation
To ensure uniform braking on both sides, both brake discs must have identical surfaces in terms of wear pattern and unevenness depth. Therefore, both brake discs must be replaced or ground.
The brake discs can be checked for runout in the workshop. The maximum measured runout value of the brake surface of the installed disc should not exceed 0.2 mm
Measure the thickness of the disc.
If there is rust on the brake disc flange and front wheel hub, remove it with a wire brush.
Clean new brake discs from protective varnish with nitro solvent.
Place the brake disc on the wheel hub and secure it with a hexagonal socket head cap screw. First, turn the brake disc so that the holes for the bolt in the disc and hub match.
Place the brake shield with the caliper and installed brake pads.
Caution: If the brake hose has not been disconnected, make sure that it is not twisted or stretched. Check that the brake hose moves freely when the steering wheels are turned to the stop.
Screw the brake shield on with lightly lubricated bolts and tighten them to a torque of 110 Nm.
Set the vehicle wheels to the straight-ahead position. Attach the brake hose to the coupling head and secure with a union nut. Make sure that the brake hose does not twist. Check the freedom of movement of the brake hose when turning the steered wheels to the stop.
Bleed the brake system.
Tighten the front wheels. Do not lubricate the wheel bolts. Position the wheels so that the combed edges before removing the yoke coincide. Lower the car, tighten the wheel bolts crosswise to 100 Nm.
Turn the roller wheel left and right until it stops and weld it, it tracks all the movements of the wheel without touching any parts.
Caution: Press the brake pedal hard several times until you feel strong resistance. This will cause the brake pads to contact the discs and take the correct position for the operating conditions.
Check the brake fluid level in the expansion tank and, if necessary, top up the level to the MAX mark.
Attention: Perform a safety compliance check:
- Are the brake hoses tightened securely?
- Is the brake hose in the holder?
- Are the air bleed valves tightened?
- Is there enough fluid in the brake system?
- With the engine running, perform a leak test. To do this, apply a force of 200 to 300 N to the brake pedal for about 10 seconds (from 20 to 30 kg). Do not release the brake pedal. Weld all connections for leaks.
Note: Brake fluid must be disposed of as special waste.
This article is available at russian, bulgarian, belarusian, ukrainian, serbian, croatian, romanian, polish, slovak, hungarian
Article verified: Ilyinsky Matvey
Share information:
Previous articles
БМВ E39: Brake system
Next articles
Similar articles on other types of BMW cars:
Removal and installation of brake pads — disc brakes of the front… BMW 3 Series E30 (1982-1994)
Front Brake Caliper — Removal, Repair and Installation BMW 3 Series E46 (1998-2006, petrol)
Front brake pads — removal and installation BMW 7 Series E32 (1986-1994)
Removal and installation brake discs BMW 7 Series E38 (1994-2001)
Brake pads for front disc brakes BMW X3 E83 (2003-2010)
Removal and installation the parking brake lever BMW X5 E53 (1999-2006)
Link in different formats to this page
Visitor comments
No comments yet
- General information
- Governing bodies
- Manual
- Maintenance
- Power unit
- Engine repair
- Lubrication system
- Cooling system
- Ignition system
- Supply system
- Injection system (gasoline)
- Injection system (diesel)
- Exhaust system
- Transmission
- Clutch
- Car gearbox
- Front axle
- Rear axle
- Chassis
- Steering
- Brake system
- Wheels and tires
- Body
- Interior
- Exterior
- Heating system
- Electrical equipment
- Equipment and devices
- Power devices
- Windscreen wipers
- Electrical circuits
- General information
- Manual
- Maintenance
- Power unit
- Engine repair
- Ignition system
- Engine lubrication system
- Cooling system
- Fuel system (gasoline)
- Fuel system (diesel)
- Exhaust system
- Transmission
- Clutch
- Car gearbox
- Chassis
- Front and rear suspension
- Steering
- Brake system
- Body
- Exterior
- Interior
- Electrical equipment
- Heating system
- Equipment and devices
- Power devices
- Electrical circuits
- General information
- Manual
- Maintenance
- Power unit
- Engine in a car
- Engine overhaul
- Cooling system
- Supply system
- Ignition system
- Control system
- Transmission
- Clutch
- Manual gearbox
- Automatic gearbox
- Transmission line
- Chassis
- Steering
- Front suspension
- Rear suspension
- Brake system
- Body
- Body elements
- Car care and painting
- Electrical equipment
- Heater and air conditioner
- Equipment and devices
- Starter and generator
- Electrical circuits
- General information
- Operation and maintenance
- Specifications
- Power unit
- Engine repair
- Cooling and lubrication system
- Supply system
- Ecotronic power supply system
- Fuel injection system
- Ignition system
- Transmission
- Clutch
- Gearbox BMW 242/4
- Gearbox Getrag 262/8
- Gearbox Getrag 265/6
- Automatic gearbox
- Cardan gear
- Rear axle
- Chassis
- Steering
- Front suspension
- Rear suspension
- Brake system
- Electrical equipment
- Equipment and devices
- Electrical circuits