
Note. Before starting work, read the note at the beginning of paragraph 2 about the danger of brake fluid, as well as the warning at the beginning of paragraph 4 about the danger of asbestos dust.
If the piston cannot be pulled out by hand, it can be pushed out by connecting a compressed air hose instead of a brake hose. Use only low pressure, such as from a tire inflation pump. When pushing the piston out, make sure that your fingers do not get between the piston and the caliper.
Withdrawal
1. Apply the parking brake. Raise the rear of the car and place it on stands (cm. "Lifting and placing the car on supports"). Remove the relevant wheel.
2. Minimize fluid leakage. To do this, clamp the flexible hose with a clamp.
3. Clean the area where the hose connects to the caliper. Then loosen the brake hose nut on the caliper.
4. Remove the brake pads (see paragraph 4).
5. Turn away a support from a hose and remove it from the car.
Repair
6. Install the caliper on the workbench. Clean it from dust and dirt. Do not inhale the dust - it is hazardous to health.
7. Pull the piston out of the caliper. Remove the dust seal.
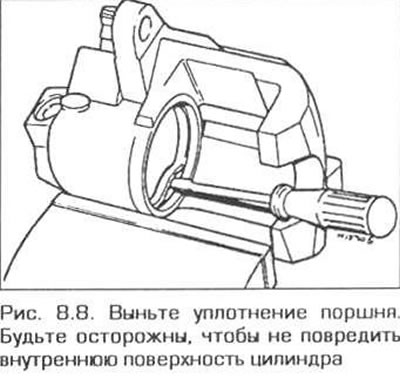
8. Use a small screwdriver to pry out the piston seal. not to damage the cylinder bore (pic. 8.8).
9. Thoroughly clean all parts. Use only methyl or isopropyl alcohol or clean brake fluid for this. Never use gasoline or kerosene based solvents as they corrode hydraulic system seals. Immediately after washing, dry the components with compressed air or a clean, lint-free cloth. Blow out the fluid passages with compressed air.
10. Check all components and replace those that are worn or damaged. Inspect, in particular, the bore of the cylinder and the piston. If they are scored, worn or corroded, replace them (this replaces the entire assembly). Also check the condition of the guide pins and their bushings. The fingers must not be damaged and both fingers must have a sufficiently tight fit in the bushings. If you are not sure about the health of any component, replace it.
11. If the assembly is serviceable, purchase an appropriate repair kit. These kits are available from dealers in different versions. All rubber seals must be replaced. They can never be reused.
12. Before assembly, make sure all parts are dry and clean.
13. Dip the piston and its cuff in clean brake fluid. Moisten the inside surface of the cylinder with clean brake fluid.
14. Insert the piston seal into the cylinder groove using only your hands (without tool).
15. Install a new dust seal on the piston. Press the outer edge of this seal into the groove of the caliper. Carefully insert the piston all the way into the cylinder, making rotational movements with the piston
Installation
16. Screw a support on a brake hose.
17. Install the brake pads (see paragraph 4).
18. Tighten the brake hose union nut securely.
19. Remove the clamp from the brake hose or remove the plastic film from under the cover of the master cylinder bank. Bleed the brake system (see paragraph 2). Keep in mind that if you have taken precautions to prevent air from entering the brake system. it is enough to pump only the corresponding brake cylinder of the front wheel.
20. Install the wheel, lower the vehicle to the ground and tighten the wheel bolts to the correct torque. Upon completion of work, check the level of brake fluid in the tank and bring it to the required level (cm. "Weekly checks").