
Models with ABS
1. On ABS models, removal of the master cylinder in a garage is not possible as this will disconnect the high pressure lines from the master cylinder to the hydraulic unit. Safe pumping of this line is possible only at a specialized service station (see paragraph 2). Thus, after installing the master cylinder, the car must be delivered by a tow truck to a service station for pumping the brake system.
All models
Withdrawal
Note 1. Before starting work, read the note at the beginning of paragraph 3 about the danger of brake fluid.
Note 2: You will need new master cylinder nuts during installation.
2. On left-hand drive models, to access the master cylinder, remove the air duct from the heating/ventilation system as follows.
- A) Turn the three 9CP fasteners counterclockwise and remove the filter cover from the rear of the engine compartment. Pull the filter forward and remove it.
- b) Disconnect the four clips and unhook the wire from the air duct.
- V) Remove the four mounting screws, slide the filter housing forward and remove it.
- G) Remove the two screws, lift the air duct up and out of the engine compartment.
3. Remove the cap from the master cylinder reservoir. Suck out the brake fluid from the reservoir with a syringe.
Note. Never suck out brake fluid with your mouth, as it is poisonous. Use a syringe. Another way is also possible. Unscrew one of the screws to bleed the system and gently rock the brake pedal to force the fluid through the screw, after pulling the tube on it (see paragraph 2). Disconnect the connector from the reservoir cap (s) electrical wiring (pic. 10.3).

4. Disconnect the hose (And) from the wall of the tank and plug the horses of the hose (hoses) to minimize leaks.
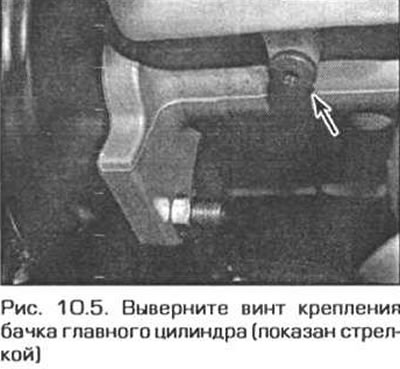
5. Turn out the screw of fastening of a tank (pic. 10.5).
6. Carefully remove the reservoir from the top of the master cylinder. Remove the reservoir seals and plug the cylinder bores to prevent dirt from entering them.
7. Wipe clean the surfaces around the brake line connections on the side of the master cylinder. Place rags under the pipe connections to soak up the escaping fluid. Remember the correct position of the connections. Then unscrew the connection nuts and carefully disconnect the tubes. Plug the ends of the master cylinder pipes and ports to minimize leaks and prevent dirt from entering the system. Wash off spilled liquid immediately with cold water.
8. Turn away two nuts and remove washers of fastening of the main cylinder to the vacuum amplifier, remove and remove the main cylinder from engine compartment. Remove the O-ring from the back of the cylinder. Discard the ring as you will need a new one during installation.
Repair
9. If the master cylinder is defective, it must be replaced. Repair kits are not sold for the master cylinder. The master cylinder rear seal and reservoir seals should be replaced regardless of their condition.
Installation
10. Remove all dirt from mating surfaces of master cylinder and vacuum booster. Install a new O-ring into the groove on the back of the master cylinder body.
11. Establish the main cylinder on the amplifier so that the pusher of the amplifier entered the main cylinder on the center. Install new master cylinder nuts and tighten to specified torque.
12. Wipe clean connections of brake pipelines. Then fit them to the master cylinder and tighten securely.
13. Insert the tank into the holes of the master cylinder and securely tighten the screw of its fastening. Connect a hose to the tank (And) and electrical wiring.
14. Fill the reservoir with new brake fluid and bleed the entire hydraulic system (see paragraph 2).