
- Home
- BMW 3 Series
- E46
- General information
- Maintenance
- Checking the condition of tires and pressure in them. Designation of tires and wheel disks
Checking the condition of tires and pressure in them. Designation of tires and wheel disks (BMW 3 Series E46)
Once every six months, or every 15,000 km.
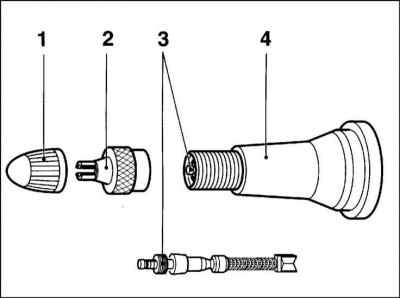
Tire valve
1 and 2 - rubber and metal caps
3 — valve
4 - valve body
Examination
1. Depending on the model and equipment, BMW may have tires and wheels of different sizes. All wheels have a pressing depth of 45 mm. The pressing depth is the distance from the center of the rim to the stop surface of the wheel on the brake disc or drum.
Wheel bolts for steel and alloy wheels are the same size.
Technology is constantly evolving. It may be that older models may have different tire pressure values. The dimensions specified in the vehicle documents are decisive.
2. For sporty driving, it is recommended to increase the pressure in the front and rear tires by 0.2 bar. When increasing the pressure, you should proceed from the basic value for different load conditions.
3. Winter tires usually have a pressure 0.2 bar higher than summer tires. The recommendations of winter tire manufacturers should be taken into account.
4. Since winter tires have a speed limit, a sign indicating the maximum speed must be mounted within the driver's field of vision.
Disc designation
Example: 6 J x 15:
6 rim width in inches.
J letter designation of the height and contour of the rim flange.
x designation of a one-piece deep rim.
15 disk diameter in inches.
BMW can be equipped with tires and wheels of different sizes. However, only wheels with a press-in depth of 45 mm are allowed. The press-in depth is the distance from the center of the rim to the stop surface of the wheel on the brake disc or drum.
Permissible lateral runout on the rim flange: 1.2 mm.
Permissible vertical runout on the rim seat: 0.8 mm.
Tyre designation
Example: 195/70 R14 89H
195 tire width in mm.
/70 height to width ratio (the height of the tire's cross-section is 70% of its width).
If individual information about the width to height ratio is not available (for example, 175 R 14), this means we are talking about a "normal" ratio. It is 82%.
R radial design.
14 rim size in inches.
89 load capacity parameter.
N speed class, H: up to 210 km/h (on new tires it is not always given).
The speed letter stands behind the tire size. Speed symbols apply to both summer and winter tires, refer to Specifications.
Date of tire manufacture
The date of manufacture of the tire is indicated on the tire in the manufacturer's code
Example: DOT CUL2 UM8 019 TUBELESS
DOT Departament of Transporation (US Department of Transportation).
CU abbreviation of the manufacturer's name.
L2 tire size.
UM8 tire performance.
01 date of manufacture - 01st working week of 1999.
TUBELESS tubeless (TUBETYPE - tire with tube).
5. Regularly checking your tires will help you avoid the hassle of being stopped on the road due to a flat tire. In addition, such checks provide valuable information about possible problems with the steering and suspension before serious damage occurs.
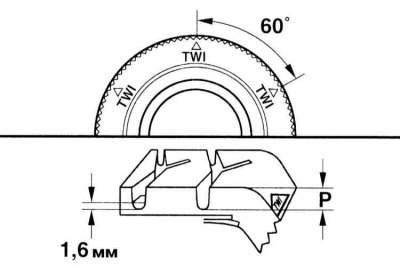
6. The tires are equipped with built-in tread wear indicator strips that become exposed when the tread depth decreases to 1.6 mm, after which the tires are considered worn. This value represents the minimum permissible tread depth; in most cases, it is recommended to replace tires with a tread depth of 2 mm or less. Tread depth can also be determined using a simple and inexpensive device known as a tread depth gauge.
7. Pay attention to any unusual tread wear. Tread defects such as cavities, bulges, flattening and more severe wear on one side indicate a violation of the front wheel alignment angles and/or wheel balancing. If any of these defects are detected, contact a tire repair shop to have them corrected.
8. Check the tire carefully for cuts, punctures, and stuck nails or tacks. Sometimes after a nail punctures the tire, it will hold pressure for a while or deflate very slowly.
If you suspect a "slow puncture," first check the valve nipple for leaks. Then inspect the tread for any foreign objects lodged in it or previously repaired punctures that have begun to leak air again. If you suspect a puncture, you can verify its presence by wetting the suspected area with soapy water. If there is a leak, the solution will begin to bubble. If the puncture is not too large, the tire can usually be repaired at any tire shop.
9. Carefully inspect the inside sidewalls of the tires for signs of brake fluid leakage. If any, have the brake system checked immediately.
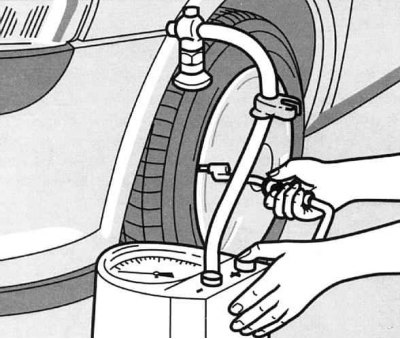
10. Maintaining the correct tire pressure increases their service life, helps save fuel and improves driving comfort. A special pressure gauge is required to check the pressure.
Always keep an accurate pressure gauge in your glove compartment. Gauges built into air hose nozzles at service stations are often inaccurate.
11. Always check tire pressure when tires are cold (i.e. before traveling by car). Checking the pressure on warm or hot tires will result in overestimation of the pressure gauge readings due to thermal expansion of the tires. In this case, you should never lower the pressure, because after the tire cools down, it will be lower than normal.
12. Unscrew the protective cap from the inflation valve protruding from the wheel rim or hub cap, then firmly press the nozzle of the pressure gauge onto the valve. Read the readings and compare them with those recommended in the Specifications. Remember to replace the protective cap to prevent dirt and moisture from entering the valve mechanism. Check the pressure in all four tires and inflate them to the recommended pressure if necessary.
13. Don't forget to maintain the required pressure in the spare tire.
Checking the air pressure in the tires
14. Checking the air pressure should only be done on cold tires.
15. Unscrew the valve cap.
16. The air pressure in the tires is checked once a month and also during maintenance (including spare tire).
17. In addition, air pressure should be checked before each long trip, since in this case the temperature load on the tires increases.
18. The required air pressure in the tires is indicated on the sticker located on the inside of the fuel tank cap.
When using winter tyres, the air pressure should be increased by 0.2 bar relative to the set value.
19. The air pressure of the narrow spare tires is indicated on the sidewall of the disc.
20. The car can be equipped tire pressure monitoring system (RDC - Reifen-Druck-Control). The system monitors the air pressure both when the vehicle is stationary and when moving, taking into account the speed and outside temperature. For this purpose, each wheel, including the spare, has a transmitting unit with a pressure and temperature sensor, which is powered by a lithium battery with a service life of five years. The transmitter transmits a signal to the receiving antenna in the wheel arch, which is connected to the on-board processor. Thanks to the presence of RDC, dangerous tire ruptures can be excluded, which occur due to the deformation of the tire as a result of low air pressure.
Checking the tire valve
The valve extensions used must be checked for damage and contamination that could lead to leaks. If necessary, the extensions must be replaced.
21. Unscrew the protective cap and extension.
22. Apply a small amount of soap solution or saliva to the valve. If an air bubble forms, tighten insert 3 with protective cap 2.
To tighten the valve, use only the protective cap 2. 1 rubber protective cap, 4 valve.
23. Check the valve again. If bubbles appear and the valve cannot be tightened, it should be replaced (work of the service station).
24. Be sure to reinstall the protective cap.
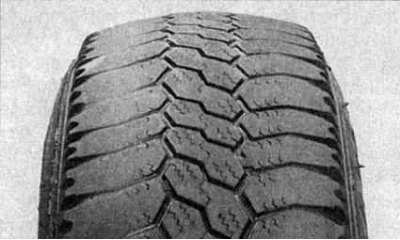
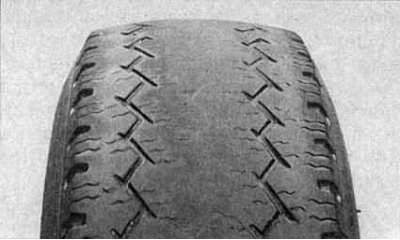
Examples of typical tire tread wear
Lateral wear
Underinflation causes the tire to overheat while driving due to excessive deflection, which means the tread is not pressed sufficiently against the road surface. This leads to loss of traction and excessive tread wear, not to mention the risk of tire failure due to overheating.
Check and adjust pressure.
Incorrect wheel alignment (wear on one side) - Repair or replace suspension parts.
Too sharp turns - Reduce speed!
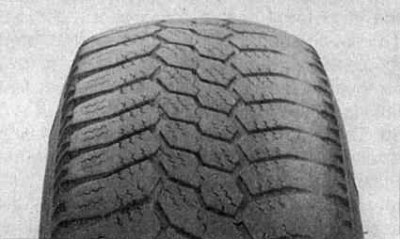
Central wear
Excessive pressure
Overinflation of a tire results in accelerated wear of the center tread, reduced traction, harsher ride and an increased risk of fatal tire damage.
Check and adjust pressure.
If you have had to inflate your tyres to the pressure specified in the Specifications for heavy loads, be sure to deflate them when returning to normal operation.
Uneven wear
The tires of the front wheels may wear out unevenly as a result of incorrect adjustment of the wheel alignment angles. You can check and adjust the installation angles for a reasonable fee in most tire repair shops.
Incorrect camber or runout - Repair or replace suspension components.
Suspension defect - Repair or replace suspension parts.
Wheels are out of balance - Balance the wheels.
Front wheel alignment is not set correctly - Adjust front wheel alignment angles.
This article is available at russian, bulgarian, belarusian, ukrainian, serbian, croatian, romanian, polish, slovak, hungarian
Article verified: Sevastyanov Nikolay
Share information:
Previous articles
БМВ E46: Maintenance
Next articles
Similar articles on other types of BMW cars:
Checking the condition of the tires and their pressure BMW 5 Series E28 (1981-1988)
Checking the technical condition of the cylinder head BMW 5 Series E12 (1972-1981)
Checking the condition of the tires and their inflation pressure BMW 7 Series E38 (1994-2001)
Wheels and tires. General information BMW 7 Series E32 (1986-1994)
Checking engine oil pressure BMW X3 E83 (2003-2010)
Checking the condition of the tires BMW X5 E53 (1999-2006)
Link in different formats to this page
Visitor comments
No comments yet
- General information
- Manual
- Maintenance
- Power unit
- Engine repair
- Cooling system
- Power system (gasoline)
- Injection system (gasoline)
- Fuel system (diesel)
- Exhaust system
- Ignition system
- Charge and launch systems
- Transmission
- Car gearbox
- Clutch and drive shafts
- Chassis
- Brake system
- Suspension front and rear
- Steering
- Body
- Body care and repair
- Exterior
- Interior
- Electrical equipment
- Troubleshooting
- Lighting and signaling
- Equipment and devices
- Heater and air conditioner
- Electrical circuits
- General information
- Manual
- Repair on the road
- Weekly checks
- Maintenance
- Troubleshooting
- Power unit
- 4 cylinder engines
- 6 cylinder engines
- Engine overhaul
- Cooling and heating
- Fuel and exhaust system
- Starting and charging system
- Ignition system
- Transmission
- Clutch
- Mechanical gearbox
- Automatic gearbox
- Cardan and drive shafts
- Chassis
- Brake system
- Wheel suspension
- Steering
- Body
- Exterior
- Interior
- Electrical equipment
- Equipment and devices
- Electrical circuits
- General information
- Maintenance
- Power unit
- Engine repair
- Cooling system
- Ignition system
- Supply system
- Fuel injection system
- Exhaust system
- Transmission
- Clutch
- Car gearbox
- Front and rear axle
- Chassis
- Steering
- Brake system
- Body
- Exterior
- Interior
- Electrical equipment
- Heating system
- Equipment and devices
- Power devices
- Electrical circuits
- Power unit
- M10/M20 engine
- M40 engine
- Ignition system
- Lubrication system
- Cooling system
- Supply system
- Fuel injection
- Exhaust system
- Transmission
- Clutch
- Manual gearbox
- Front axle
- Rear axle
- Chassis
- Steering
- Brake system
- Body
- Exterior
- Interior
- Electrical equipment
- Heating system
- Equipment and devices
- Electrical circuits
- General information
- Specifications
- Operation and maintenance
- 4-cylinder engine
- Engine repair
- Cooling and lubrication system
- Supply system
- Ignition system
- 6-cylinder engine
- Engine repair
- Cooling and lubrication system
- Supply system
- Fuel injection system
- Ignition system
- Transmission
- Clutch
- 4-speed manual gearbox
- 5-speed manual gearbox
- Automatic gearbox
- Cardan and rear axle
- Chassis
- Steering
- Front suspension
- Rear suspension
- Brake system
- Electrical equipment
- Equipment and devices
- Electrical circuits