
- Home
- BMW 5 Series
- E28
- General information
- Maintenance
- Checking the brake system
Checking the brake system (BMW 5 Series E28)
Annually or every 20,000 km.
Dust from lining wear that collects on brake components may contain asbestos, which is hazardous to health. Do not blow out this dust with compressed air or inhale it! Do not use gasoline-based solvents to remove dust. Dust should be washed off with a special brake system cleaner or methylated spirits into a drain container. After wiping the brake components with a damp cloth, keep the cloth and the contents of the drain container in a closed and labeled container. In the future, try to use asbestos-free components whenever possible.
In addition to checking at specified intervals, the brake system should be checked whenever the wheels are removed or when the system shows signs of malfunction. The following brake system checks are the most important of all the vehicle maintenance procedures you will perform to ensure safe driving.
Signs of a problem with the brake system
Disc brakes have built-in electrical indicators of friction lining wear, which cause a warning light on the instrument panel to turn on if the lining wear has reached a critical value. Once the warning light turns on, the linings should be replaced immediately, otherwise the brake discs will be damaged and will require expensive repairs.
Any of the following symptoms may indicate a potential brake system defect:
- When you press the brake pedal, the car "pulls" to one side
- The brakes make scraping or squealing sounds when braking
- The brake pedal has excessive travel
- The brake pedal is pulsating (this is normal only when the ABS system is working)
- Brake fluid leaks are observed (usually on the inside of a tire or wheel)
If you notice any of these signs, have your brake system inspected immediately.
Brake lines and hoses
The brake system uses mostly steel brake lines, with the exception of flexible reinforced hoses at the front wheels and as connections at the rear axle. Regular inspection of all these lines is very important.
1. Park the vehicle on a level surface and turn off the engine. Remove the wheel caps. Loosen, but do not remove, the lug nuts on all four wheels.
2. Jack up the vehicle and securely place it on axle stands.
3. Remove the wheels (see section Jacking, towing and changing wheels or your vehicle's owner's manual).
4. Check all brake lines and hoses for cracks, abrasions in their outer coating, leaks, bulges and deformations. Check the brake hoses at the front and rear of the vehicle for signs of softening, cracks, deformations or wear due to friction with other components. Check all fittings for signs of leaks and make sure that all bolts and clamps on the brake hoses are securely fastened.
5. If any fluid leaks or damage are found, repair them immediately. For a more detailed description of the brake system repair procedure, refer to Chapter Brake system.
Disc brakes
1. If it has not already been done, jack up the vehicle and support it securely on axle stands.
2. Now you can see the calipers of the disc brake mechanisms, inside which the pads are located. Each caliper has outer and inner pads - both should be checked.
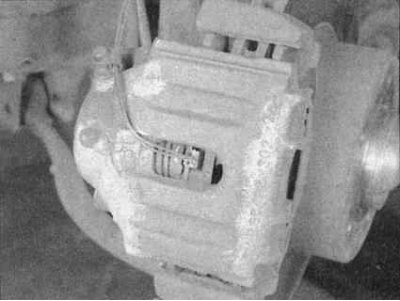
3. Check the thickness of the pads by looking through the inspection hole in the caliper body. If the thickness of the friction linings is 2.0 mm or less, or if they are worn more on one side than the other, the pads should be replaced (see chapter Brake system).
4. Remember that the friction linings are usually glued to the metal pad backing - its thickness should not be taken into account when measuring. Always replace the pads on both sides of the car (in a set on one bridge), even if only one of them is worn out, otherwise the braking process will be uneven.
5. Remove the calipers without disconnecting the brake hoses (see chapter Brake system).
6. Check the condition of the brake disc. Inspect it for grooves, deep scratches and overheated areas (they appear as blue or discolored spots). If signs of damage or wear are detected, the disc can be removed and machined in a mechanical workshop; if this is not possible, it should be replaced. In both cases, both disks should be replaced or sharpened, even if only one of them is worn out. The inspection and repair procedure is described in more detail in Chapter Brake system.
Drum brakes
1. Using the instructions in Chapter Brake system, remove the rear brake drums.
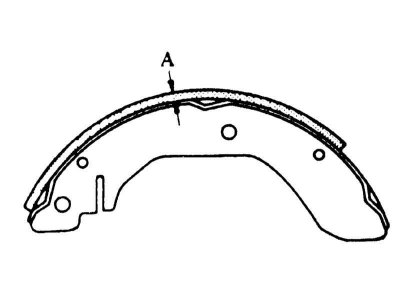
2. Measure the thickness of the friction linings on the rear brake shoes and inspect them for signs of contamination with brake fluid or grease. If the lining is within 2.0 mm of the rivet head or metal base, replace the shoes. Cracked, polished, or contaminated with brake fluid or grease shoes should also be replaced. The replacement procedure is described in Chapter Brake system.
3. If the pads are glued to the shoe base, their thickness is measured from the surface of the base as shown in Figure (A); if the pads are riveted to the shoe metal, the measurement is taken from the surface of the pad to the tops of the rivet heads
4. Check the condition of the shoe tension and retaining springs, as well as the adjusting mechanism. Make sure that all these components are correctly installed and in working order. Worn or deformed springs can cause premature wear of the friction linings.
5. Check the wheel cylinders for signs of leaks by carefully moving aside the protective rubber boots. The presence of minor traces of moisture under the boots is acceptable. However, if brake fluid is found under them or is leaking from the wheel cylinder, the cylinders should be overhauled or replaced (see chapter Brake system).
6. Check the drums for deep scratches, grooves, cracks and overheated areas that appear as discolored spots. If the defects found cannot be removed with sandpaper, the drum should be resurfaced in a workshop (see chapter Brake system for more detailed information).
7. Following the instructions of the Chapter Brake system, install the brake drums.
8. Install the wheels, but do not lower the vehicle yet.
Parking brake
The simplest, and perhaps most obvious, way to test the parking brake is to park the vehicle on a steep hill with the brakes applied and the transmission in neutral (you must be in the car during the check). If the parking brake does not prevent the vehicle from rolling, it should be adjusted as described in Chapter Brake system.
This article is available at russian, bulgarian, belarusian, ukrainian, serbian, croatian, romanian, polish, slovak, hungarian
Article verified: Zhuravleva Isolda
Share information:
Previous articles
БМВ E28: Maintenance
Next articles
Similar articles on other types of BMW cars:
Checking the tightness of the system BMW 3 Series E21 (1975-1983)
Diagnostics of brake system faults BMW 3 Series E30 (1982-1994)
Checking the brake system and clutch BMW 7 Series E38 (1994-2001)
Checking the cooling system for tightness BMW 7 Series E32 (1986-1994)
Bleeding the cooling system and checking it for leaks (M54, N46, N47,… BMW X3 E83 (2003-2010)
Checking the brake system BMW X5 E53 (1999-2006)
Checking the tightness of the system BMW 3 Series E21 (1975-1983)
Diagnostics of brake system faults BMW 3 Series E30 (1982-1994)
Checking the brake system and clutch BMW 7 Series E38 (1994-2001)
Checking the cooling system for tightness BMW 7 Series E32 (1986-1994)
Bleeding the cooling system and checking it for leaks (M54, N46, N47,… BMW X3 E83 (2003-2010)
Checking the brake system BMW X5 E53 (1999-2006)
Link in different formats to this page
Visitor comments
No comments yet
- General information
- Governing bodies
- Manual
- Maintenance
- Power unit
- Engine repair
- Lubrication system
- Cooling system
- Ignition system
- Supply system
- Injection system (gasoline)
- Injection system (diesel)
- Exhaust system
- Transmission
- Clutch
- Car gearbox
- Front axle
- Rear axle
- Chassis
- Steering
- Brake system
- Wheels and tires
- Body
- Interior
- Exterior
- Heating system
- Electrical equipment
- Equipment and devices
- Power devices
- Windscreen wipers
- Electrical circuits
- General information
- Manual
- Maintenance
- Power unit
- Engine repair
- Ignition system
- Engine lubrication system
- Cooling system
- Fuel system (gasoline)
- Fuel system (diesel)
- Exhaust system
- Transmission
- Clutch
- Car gearbox
- Chassis
- Front and rear suspension
- Steering
- Brake system
- Body
- Exterior
- Interior
- Electrical equipment
- Heating system
- Equipment and devices
- Power devices
- Electrical circuits
- General information
- Manual
- Maintenance
- Power unit
- Engine in a car
- Engine overhaul
- Cooling system
- Supply system
- Ignition system
- Control system
- Transmission
- Clutch
- Manual gearbox
- Automatic gearbox
- Transmission line
- Chassis
- Steering
- Front suspension
- Rear suspension
- Brake system
- Body
- Body elements
- Car care and painting
- Electrical equipment
- Heater and air conditioner
- Equipment and devices
- Starter and generator
- Electrical circuits
- General information
- Operation and maintenance
- Specifications
- Power unit
- Engine repair
- Cooling and lubrication system
- Supply system
- Ecotronic power supply system
- Fuel injection system
- Ignition system
- Transmission
- Clutch
- Gearbox BMW 242/4
- Gearbox Getrag 262/8
- Gearbox Getrag 265/6
- Automatic gearbox
- Cardan gear
- Rear axle
- Chassis
- Steering
- Front suspension
- Rear suspension
- Brake system
- Electrical equipment
- Equipment and devices
- Electrical circuits