
- Home
- BMW 5 Series
- E34
- General information
- Manual
- Heating and ventilation
Heating and ventilation (BMW 5 Series E34)
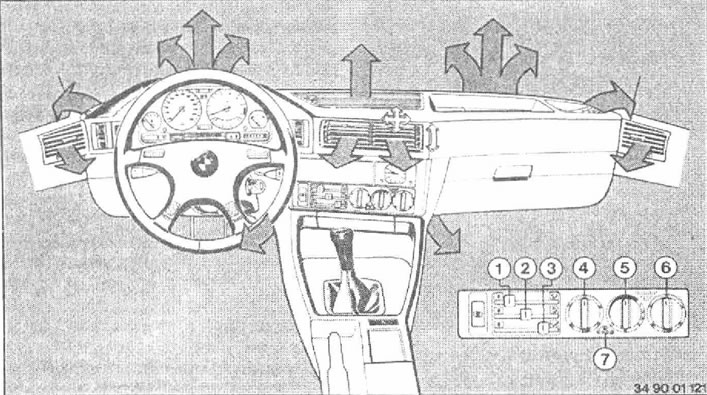
1 - Lever-regulator for air supply to the upper part of the cabin
2 - Outside air supply control lever
3 - Lever for regulating air supply to the lower part of the passenger compartment
4 - Rotary temperature controller (left side)
5 - Fan air supply intensity control switch
6 - Rotary temperature control (right side)
7 - Switches for setting the fast heating mode of the windows
Intake of heated air (levers 1 and 3)
Heated air is supplied through air supply nozzles to the windshield and side windows, as well as through outlets in the lower part of the cabin at the front and rear.
Outside air intake (lever 2)
Outside air enters through guides and metering grilles in the middle of the instrument panel and in the front doors, as well as through a metering grille on the upper side of the instrument panel.
Air supply to the rear seat*
Air flows through guides and metering grilles in the rear of the center console, regardless of the position of lever 2.
- 1 - Upper cabin air supply lever
- 3 - Lever for supplying air to the lower part of the cabin
You can smoothly adjust the air distribution.
- The extreme left position of the levers means that the air supply is blocked.
- The extreme right position of the levers means that the air supply is completely open.
Lever 3 - when there is no need to defrost the windows - always keep it open approximately halfway so that the temperature sensor of the heater regulator can work correctly.
4, 6 - Left and right side temperature rotary controls
The temperature in the cabin is set by turning the regulator to the desired position (the temperature in degrees Celsius is indicated on the circular scale). The set temperature is quickly reached after the engine is started and usually remains unchanged, as it is maintained by an electronic regulator.
To avoid large temperature fluctuations and excessive load on the heating system, turn the regulators gradually.
In the extreme right position of the regulator on the driver's side, automatic temperature control does not occur on either the left or right side, and the heater operates at full power. If the electronic temperature sensor fails, also set the regulator to this position.
2 - Outside air supply control lever
- The extreme left position of the lever means that the air supply is blocked. The extreme right position of the lever means that the air supply is completely open.
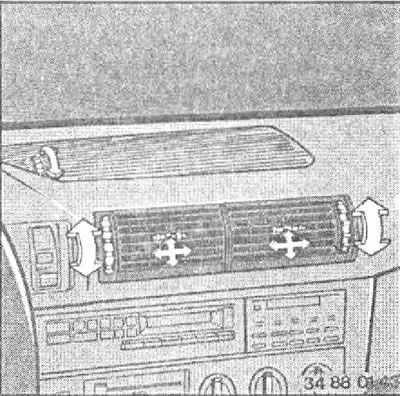
Each grille can be independently adjusted to the desired position, air flow is controlled by ribbed rollers. The grille on the upper side of the dashboard is adjusted for indirect moderate ventilation.
Ventilation of the rear part of the passenger compartment is carried out regardless of the position of lever 2.
Thanks to independent heating of the lower part of the passenger compartment, optimal temperature distribution by height is achieved: "warm feet - cool head".
5 - Fan control switch
Position "0": the fan is off, there is no forced air supply.
Turn the switch to the right (with output from a fixed position) includes low fan speed and minimum air flow.
Further turning to the right increases air flow slightly without significantly increasing fan speed.
When you turn the regulator from position "2" to position "4", the fan speed increases.
For the electronic temperature sensor-regulator to operate correctly, the fan regulator must be set to at least the vertical position ("12 o'clock").
Your car has a quick-defrost feature for the windows.
7 - Switches for setting the fast heating mode of the windows
The maximum effect is achieved only when the engine is warm.
Glass fogs up due to the difference in temperature between the outside and inside of the car or due to high humidity in the car interior (condensation forms). In this case, the only way to quickly eliminate condensation is by intensively supplying hot air directly to the glass.
[The original text of the article is available on the resource «BMWman.ru»]
This article is available at russian, bulgarian, belarusian, ukrainian, serbian, croatian, romanian, polish, slovak, hungarian
Article verified: Polikarpov Saveliy
Share information:
Previous articles
БМВ E34: Manual
Next articles
Similar articles on other types of BMW cars:
Heating and ventilation system elements — removal and installation BMW 3 Series E46 (1998-2006, petrol)
Heating system. General information BMW 3 Series E30 (1982-1994)
Automatic ventilation, heating and air conditioning (HVAC) system BMW 7 Series E38 (1994-2001)
Fuel filter heating system BMW 7 Series E32 (1986-1994)
Heating and air conditioning fan BMW X3 E83 (2003-2010)
Engine crankcase ventilation system BMW X5 E53 (1999-2006)
Link in different formats to this page
Visitor comments
No comments yet
- General information
- Governing bodies
- Manual
- Maintenance
- Power unit
- Engine repair
- Lubrication system
- Cooling system
- Ignition system
- Supply system
- Injection system (gasoline)
- Injection system (diesel)
- Exhaust system
- Transmission
- Clutch
- Car gearbox
- Front axle
- Rear axle
- Chassis
- Steering
- Brake system
- Wheels and tires
- Body
- Interior
- Exterior
- Heating system
- Electrical equipment
- Equipment and devices
- Power devices
- Windscreen wipers
- Electrical circuits
- General information
- Manual
- Maintenance
- Power unit
- Engine repair
- Ignition system
- Engine lubrication system
- Cooling system
- Fuel system (gasoline)
- Fuel system (diesel)
- Exhaust system
- Transmission
- Clutch
- Car gearbox
- Chassis
- Front and rear suspension
- Steering
- Brake system
- Body
- Exterior
- Interior
- Electrical equipment
- Heating system
- Equipment and devices
- Power devices
- Electrical circuits
- General information
- Manual
- Maintenance
- Power unit
- Engine in a car
- Engine overhaul
- Cooling system
- Supply system
- Ignition system
- Control system
- Transmission
- Clutch
- Manual gearbox
- Automatic gearbox
- Transmission line
- Chassis
- Steering
- Front suspension
- Rear suspension
- Brake system
- Body
- Body elements
- Car care and painting
- Electrical equipment
- Heater and air conditioner
- Equipment and devices
- Starter and generator
- Electrical circuits
- General information
- Operation and maintenance
- Specifications
- Power unit
- Engine repair
- Cooling and lubrication system
- Supply system
- Ecotronic power supply system
- Fuel injection system
- Ignition system
- Transmission
- Clutch
- Gearbox BMW 242/4
- Gearbox Getrag 262/8
- Gearbox Getrag 265/6
- Automatic gearbox
- Cardan gear
- Rear axle
- Chassis
- Steering
- Front suspension
- Rear suspension
- Brake system
- Electrical equipment
- Equipment and devices
- Electrical circuits