
- Home
- BMW 5 Series
- E39
- General information
- Manual
- Autonomous heating and ventilation systems
Autonomous heating and ventilation systems (BMW 5 Series E39)
Autonomous heating system
If your car has an autonomous heating system, then this also implies the presence of an autonomous ventilation system. However, it is also possible to install only an autonomous ventilation system. Both systems are controlled from the multi-information display or from the on-board monitor.
You can pre-program the switch-on time to be able to get into the car with the interior already warmed up, and it also makes it easier to remove snow and ice.
The autonomous heating system switches off automatically after 30 minutes of operation. It can also be switched on or off directly. Due to significant energy consumption, the system should not be switched on twice in a row, without giving the battery the opportunity to recharge on the go between switches. If the switch-on time of the autonomous heating system is pre-programmed, it is brought into working readiness at an outside air temperature below 16°C, and with direct switch-on - regardless of the temperature.
Heated air is automatically supplied to the windshield, side windows and feet. The heater operates at full power.
If the ignition key is in position 1, you can adjust the air temperature in the cabin, its supply, and also the air distribution mode. The system works for some time after it is turned off (when the control lamp has already gone out).
During the warm season, the system should be turned on and off approximately once a month for about 5 minutes.
Never use the system indoors. When refueling the vehicle, the system must be switched off.
Autonomous ventilation system
Use the heating/automatic air conditioning fan to ventilate the air temperature in the cabin.
The system can be programmed to turn on. The ventilation operates for 30 minutes. Direct switching on and off is also possible. Due to significant energy consumption, do not switch on the autonomous ventilation twice in a row, without giving the battery a chance to recharge on the go between switching on.
If the time for switching on the autonomous ventilation is pre-programmed, the system is brought into working readiness at an outside air temperature above 16°C, and with direct switching on regardless of the temperature. In this case, the car must not be moving.
Air is supplied through adjustable air vents at the top of the front panel, directing it towards the upper part of the body. Therefore, in order for the independent ventilation to work, these vents must be open.
When the ignition key is in position 1, you can adjust the air flow and its distribution mode in the same way as when using an autonomous heating system.
Remote control of autonomous heating system
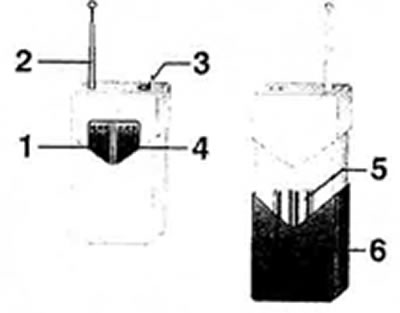
1. power key
2. antenna
3. control lamp
4. power button
5. batteries
6. battery compartment cover
Remote control allows you to turn on and off the autonomous heating system. The average range is about 350 meters. The remote control operation may be disrupted in some areas by other systems or devices using the same frequency.
Remote control allows you to control the autonomous heating system if it is not yet operating as a result of direct or programmed activation.
Turning on
1. Extend the antenna fully.
2. Press key 1. The indicator lamp will flash three times and then remain lit for the entire duration of the power-on period (maximum 30 minutes).
3. Completely retract the antenna, but not during the three-flash indicator light.
Shutdown
1. Extend the antenna fully.
2. Press key 4. The indicator lamp will flash three times and go out.
3. Remove the antenna completely.
Batteries
Replace the batteries if the indicator lamp does not flash when the independent heating system is turned on.
1. Remove battery compartment cover 6.
2. Install two batteries of the same type (LR 1). The type and correct position of the batteries are embossed on the bottom of the compartment.
3. Snap the lid shut.
Initializing the transmitter
If you are using a new transmitter, for example, as a replacement for a faulty one or want to use an additional transmitter, you must initialize them. It is allowed to use no more than two transmitters.
If any of the time periods specified below are not met, the initialization will fail and the process will have to be repeated.
1. Remove the fuse for the independent heating system from the mount (in the trunk on the right, refer to the materials Chapters 12) and after 10 seconds put it back in place.
2. Immediately after installing the fuse, press button 4 within 3 seconds.
3. Then press button 1 within 5 seconds.
4. After another 3 seconds the system is ready for operation.
(Read the original source on the website «BMWMAN»)
This article is available at russian, bulgarian, belarusian, ukrainian, serbian, croatian, romanian, polish, slovak, hungarian
Article verified: Ilyinsky Matvey
Share information:
Previous articles
БМВ E39: Manual
Next articles
Similar articles on other types of BMW cars:
Heating and ventilation system elements — removal and installation BMW 3 Series E46 (1998-2006, petrol)
Manually controlled heating/air conditioning systems BMW 3 Series E46 (1998-2006)
Removal and installation of deflectors for heating, ventilation and… BMW 7 Series E38 (1994-2001)
Ignition and injection systems — check BMW 7 Series E32 (1986-1994)
Heating and air conditioning fan BMW X3 E83 (2003-2010)
Checking electrical systems BMW X5 E53 (1999-2006)
Link in different formats to this page
Visitor comments
No comments yet
- General information
- Governing bodies
- Manual
- Maintenance
- Power unit
- Engine repair
- Lubrication system
- Cooling system
- Ignition system
- Supply system
- Injection system (gasoline)
- Injection system (diesel)
- Exhaust system
- Transmission
- Clutch
- Car gearbox
- Front axle
- Rear axle
- Chassis
- Steering
- Brake system
- Wheels and tires
- Body
- Interior
- Exterior
- Heating system
- Electrical equipment
- Equipment and devices
- Power devices
- Windscreen wipers
- Electrical circuits
- General information
- Manual
- Maintenance
- Power unit
- Engine repair
- Ignition system
- Engine lubrication system
- Cooling system
- Fuel system (gasoline)
- Fuel system (diesel)
- Exhaust system
- Transmission
- Clutch
- Car gearbox
- Chassis
- Front and rear suspension
- Steering
- Brake system
- Body
- Exterior
- Interior
- Electrical equipment
- Heating system
- Equipment and devices
- Power devices
- Electrical circuits
- General information
- Manual
- Maintenance
- Power unit
- Engine in a car
- Engine overhaul
- Cooling system
- Supply system
- Ignition system
- Control system
- Transmission
- Clutch
- Manual gearbox
- Automatic gearbox
- Transmission line
- Chassis
- Steering
- Front suspension
- Rear suspension
- Brake system
- Body
- Body elements
- Car care and painting
- Electrical equipment
- Heater and air conditioner
- Equipment and devices
- Starter and generator
- Electrical circuits
- General information
- Operation and maintenance
- Specifications
- Power unit
- Engine repair
- Cooling and lubrication system
- Supply system
- Ecotronic power supply system
- Fuel injection system
- Ignition system
- Transmission
- Clutch
- Gearbox BMW 242/4
- Gearbox Getrag 262/8
- Gearbox Getrag 265/6
- Automatic gearbox
- Cardan gear
- Rear axle
- Chassis
- Steering
- Front suspension
- Rear suspension
- Brake system
- Electrical equipment
- Equipment and devices
- Electrical circuits