
Table of contents: Digital watch ↓ Control of independent ventilation…↓ Trip computer ↓ Installing the code ↓
- Home
- BMW 7 Series
- E38
- General information
- Manual
- Multifunctional display
Multifunctional display (BMW 7 Series E38)
The multifunctional display acts as the main control unit and provides information on the status of the following vehicle systems:
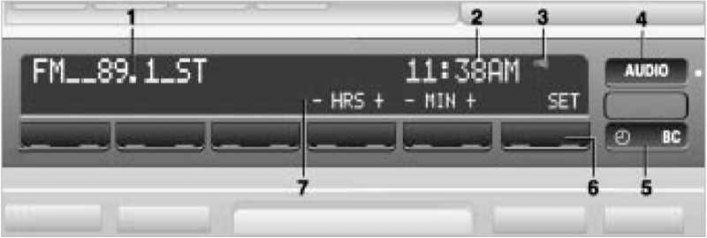
Multifunctional display
1 — Audio system display
2 - Date and time display or multifunctional display
3 — Active reminder indicator
4 — Button for selecting audio system functions
5 — Digital clock function selection button
6 — Data entry and selection keys
7 - Description of current key values 6
For instructions on how to use the multi-function display when operating the audio system and mobile phone, refer to the manual supplied with the specific equipment due to the variety of models. The following describes how to use the multi-function display when operating the digital clock and trip computer.
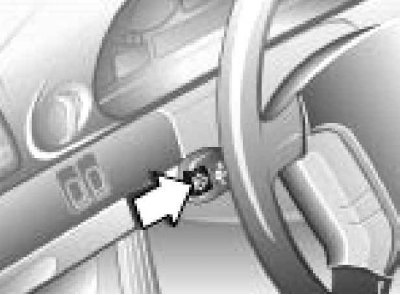
The digital clock and trip computer can be controlled using the button on the left steering column switch
1. To determine the sequence in which functions will be called when a key is pressed, press and hold the key until the indicator appears on the display "Prog 1".
2. Then press the multifunction display control keys (see illustration Multifunction display) in the required sequence - the program number changes on the display each time the information is saved.
3. Finally, press the key "SET".
4. To display all data on the display, press the button on the steering column switch one by one (until the indicator "Prog 1") and the key "SET".
5. To display individual data, press the button on the steering column switch briefly.
Starting from position "1" of the ignition switch, the following functions can be used:
1. Press the digital clock function selection button. If the ignition key is in the position "0" or removed from the ignition switch, time indication will turn on for 8 seconds and then turn off. If the key in the ignition switch is in the position from "1", the time display will be switched on in permanent mode.
2. To display date, when the time is displayed, press the "DATE" key. To return to the time display, press the digital clock function selection button.
3. For switching between 12- and 24-hour mode to display the time, press the digital clock function selection button and then press the key "12H/24H". When you select the 12-hour mode, an indicator appears to the right of the time display AM (before noon) or PM (afternoon).
4. For time settings press the digital clock function selection button and then press the key "SET" (the dots on the display will start flashing). Set the current time using the keys "- HRS" (watch) and "- MIN" (minutes) and confirm the entry by pressing the key "SET".
5. For date settings press the digital clock function selection button and then press the key "DATE" (dots and indicator "DATE" the display will start flashing). Set the current date using the keys "- DAY" (day), "- MONTH" (month) and "- YEAR" (year) and confirm your entry by pressing the key "SET".
6. For date and time settings after disconnecting the battery, press the digital clock function selection button (the dots on the display will start flashing) then enter the current time using the keys "- HRS" (watch) and "- MIN" (minutes), then enter the current date using the keys "- DAY" (day), "- MONTH" (month) and "- YEAR" (year) and confirm your entry by pressing the key "SET".
Press the digital clock function selection button. Press the key to turn on/off "MEMO ON/OFF". When the signal is active, the corresponding indicator appears on the display (see illustration Multifunctional display). The sound signal sounds 15 seconds before each full hour.
It is possible to preset two different activation times for the independent ventilation system
1. To enter first/second activation time, set the ignition key to position "1" and display the time.
2. Press the digital clock function selection button in sequence, on the corresponding side of the key "1 TIMER 2" and on the key "SET". The indicator on the display will start flashing "TIMER 1" or "TIMER 2".
3. Set the required time using the keys "- HRS" (watch) and "- MIN" (minutes) and confirm the entry by pressing the key "SET"after setting the time, a sign will appear behind the time display "*", and on the right side of the button "BC" the LED will light up, indicating system activity.
4. To change the activation time, repeat the above procedure from the beginning.
5. To call up the preset activation time, press the digital clock function selection button and then the corresponding side of the key "1 TIMER 2".
6. The system control is directly accessible when the position "1" ignition switch - press the button to select the digital clock functions, and then press the key "AIR ON" or "AIR OFF".
The trip computer operates in positions "1" and "2" ignition switch and is designed to display information about:
In order to ensure road safety, data should be entered into the trip computer when the vehicle is stationary. Calculations begin when the vehicle starts moving.
To select one of the computer functions, press the trip computer function selection button (see illustration Multifunction display), – this action is not mentioned in the further description of access to functions.
It is possible to calculate average fuel consumption for two different distances simultaneously (for example, for the entire trip and for a separate section of it).
1. To activate the calculation for distances 1 or 2 press the corresponding edge of the key "1 CONSUM 2" and confirm the input with the key "SET". Calculation begins at the start of movement.
2. To display the current fuel consumption data, press the corresponding edge of the key "1 CONSUM 2".
The calculation is based on average fuel consumption data for the last 30 km of travel. To display the calculated mileage data with the current fuel reserve, press the key "RANGE". If the fuel level is less than 50 km, the data is displayed on the text display in the instrument cluster, warning you of the need to refuel.
1. To activate the calculation for average speed press the key "SPEED" and confirm the input with the key "SET". Calculation begins at the start of movement.
2. To display the average speed data, press the key "SPEED". The calculation is deactivated when the engine is turned off.
1. To use these functions, you must enter the total distance to your destination before you start your journey. Press the keys one by one "DIST" and "SET" – the distance display will start flashing.
2. Enter the distance to the destination using the keys from "0" to "9" and confirm the input with the key "SET".
3. To delete the last digit, press the key "CLR".
4. To display the remaining distance, press the key "DIST"; and to call up the remaining time - press the key "ARR". If the trip distance exceeds the previously entered one, then when calling up the remaining distance, it will be displayed with a "-" sign.
Exceeding the set speed limit is accompanied by an audible signal and the message "LIMIT" on the text display in the instrument cluster. A second warning can only be issued after the vehicle speed has decreased by 5 km/h relative to the set speed.
1. To ask speed threshold press the keys one by one "LIMIT" and "SET" – the speed display will start flashing.
2. Enter the speed value using the keys from "0" to "9" and confirm the input with the key "SET". To confirm the activation of the signal, an indicator appears on the right side of the display "LIMIT".
3. To delete the last digit, press the key "CLR".
4. To ask threshold speed at the level of the current speed of movement press the keys one by one "LIMIT" and twice - "SET".
5. For cancellations signal about exceeding the speed, press the "LIMIT" button twice. Indicator "LIMIT" on the right side of the display goes out, but the threshold speed value remains in the computer's memory and can be recalled again.
To prevent unauthorized engine start and damage to the vehicle, it is possible to enter a code into the trip computer. However, until the required code is entered, the engine will not start.
1. To set the code, set the key in the ignition switch to position "1" and press the button "CODE" – a message will appear on the display "CODE - - - -".
2. Enter the code using the keys from "0" to "9" and confirm the input with the key "SET".
3. Turn the key to the position "0" or remove it from the ignition switch. If you now press any button on the trip computer or turn on the ignition, the entered code will be erased. Therefore, the code should be entered every time you arm the car.
4. If a mistake was made while entering the code, press the key to delete the last digit of the code "CLR".
5. To cancel the code and start the engine, turn the ignition key to position "1" or "2" - sound signal and message "CODE - - - -" the display will indicate the need to enter a code.
6. Enter the code and press the key "SET". If the code is not entered or if the wrong code is entered, the engine will not start. When the correct code is entered, the current time appears on the display. If the wrong code is entered three times in a row, the anti-theft alarm is activated for 30 seconds.
- audio system,
- digital watch,
- trip computer
- mobile phone (with appropriate equipment).
Multifunctional display
1 — Audio system display
2 - Date and time display or multifunctional display
3 — Active reminder indicator
4 — Button for selecting audio system functions
5 — Digital clock function selection button
6 — Data entry and selection keys
7 - Description of current key values 6
For instructions on how to use the multi-function display when operating the audio system and mobile phone, refer to the manual supplied with the specific equipment due to the variety of models. The following describes how to use the multi-function display when operating the digital clock and trip computer.
The digital clock and trip computer can be controlled using the button on the left steering column switch
1. To determine the sequence in which functions will be called when a key is pressed, press and hold the key until the indicator appears on the display "Prog 1".
2. Then press the multifunction display control keys (see illustration Multifunction display) in the required sequence - the program number changes on the display each time the information is saved.
3. Finally, press the key "SET".
4. To display all data on the display, press the button on the steering column switch one by one (until the indicator "Prog 1") and the key "SET".
5. To display individual data, press the button on the steering column switch briefly.
Digital watch
Starting from position "1" of the ignition switch, the following functions can be used:
- Display date and time;
- Programming an hourly reminder;
- Control of independent ventilation system.
Displaying and setting date and time
1. Press the digital clock function selection button. If the ignition key is in the position "0" or removed from the ignition switch, time indication will turn on for 8 seconds and then turn off. If the key in the ignition switch is in the position from "1", the time display will be switched on in permanent mode.
2. To display date, when the time is displayed, press the "DATE" key. To return to the time display, press the digital clock function selection button.
3. For switching between 12- and 24-hour mode to display the time, press the digital clock function selection button and then press the key "12H/24H". When you select the 12-hour mode, an indicator appears to the right of the time display AM (before noon) or PM (afternoon).
4. For time settings press the digital clock function selection button and then press the key "SET" (the dots on the display will start flashing). Set the current time using the keys "- HRS" (watch) and "- MIN" (minutes) and confirm the entry by pressing the key "SET".
5. For date settings press the digital clock function selection button and then press the key "DATE" (dots and indicator "DATE" the display will start flashing). Set the current date using the keys "- DAY" (day), "- MONTH" (month) and "- YEAR" (year) and confirm your entry by pressing the key "SET".
Leap years are programmed into the watch, so no date adjustment is required.
6. For date and time settings after disconnecting the battery, press the digital clock function selection button (the dots on the display will start flashing) then enter the current time using the keys "- HRS" (watch) and "- MIN" (minutes), then enter the current date using the keys "- DAY" (day), "- MONTH" (month) and "- YEAR" (year) and confirm your entry by pressing the key "SET".
Programming the hourly signal
Press the digital clock function selection button. Press the key to turn on/off "MEMO ON/OFF". When the signal is active, the corresponding indicator appears on the display (see illustration Multifunctional display). The sound signal sounds 15 seconds before each full hour.
Control of independent ventilation system
It is possible to preset two different activation times for the independent ventilation system
The independent ventilation system, with a preset activation time, will only operate when the outside temperature is above 16°C, or when switched on manually; the system does not turn on when the vehicle is moving and turns off automatically after 30 minutes.
1. To enter first/second activation time, set the ignition key to position "1" and display the time.
2. Press the digital clock function selection button in sequence, on the corresponding side of the key "1 TIMER 2" and on the key "SET". The indicator on the display will start flashing "TIMER 1" or "TIMER 2".
3. Set the required time using the keys "- HRS" (watch) and "- MIN" (minutes) and confirm the entry by pressing the key "SET"after setting the time, a sign will appear behind the time display "*", and on the right side of the button "BC" the LED will light up, indicating system activity.
4. To change the activation time, repeat the above procedure from the beginning.
5. To call up the preset activation time, press the digital clock function selection button and then the corresponding side of the key "1 TIMER 2".
6. The system control is directly accessible when the position "1" ignition switch - press the button to select the digital clock functions, and then press the key "AIR ON" or "AIR OFF".
Trip computer
The trip computer operates in positions "1" and "2" ignition switch and is designed to display information about:
- Average fuel consumption;
- Estimated mileage with current fuel supply;
- Average speed;
- The remaining distance to the destination;
- Remaining time until arrival at destination;
- Exceeding the specified speed limit.
In order to ensure road safety, data should be entered into the trip computer when the vehicle is stationary. Calculations begin when the vehicle starts moving.
To select one of the computer functions, press the trip computer function selection button (see illustration Multifunction display), – this action is not mentioned in the further description of access to functions.
Average fuel consumption
It is possible to calculate average fuel consumption for two different distances simultaneously (for example, for the entire trip and for a separate section of it).
1. To activate the calculation for distances 1 or 2 press the corresponding edge of the key "1 CONSUM 2" and confirm the input with the key "SET". Calculation begins at the start of movement.
2. To display the current fuel consumption data, press the corresponding edge of the key "1 CONSUM 2".
Estimated mileage with current fuel supply
The calculation is based on average fuel consumption data for the last 30 km of travel. To display the calculated mileage data with the current fuel reserve, press the key "RANGE". If the fuel level is less than 50 km, the data is displayed on the text display in the instrument cluster, warning you of the need to refuel.
Average speed
1. To activate the calculation for average speed press the key "SPEED" and confirm the input with the key "SET". Calculation begins at the start of movement.
2. To display the average speed data, press the key "SPEED". The calculation is deactivated when the engine is turned off.
Remaining distance and time until arrival at destination
1. To use these functions, you must enter the total distance to your destination before you start your journey. Press the keys one by one "DIST" and "SET" – the distance display will start flashing.
2. Enter the distance to the destination using the keys from "0" to "9" and confirm the input with the key "SET".
3. To delete the last digit, press the key "CLR".
4. To display the remaining distance, press the key "DIST"; and to call up the remaining time - press the key "ARR". If the trip distance exceeds the previously entered one, then when calling up the remaining distance, it will be displayed with a "-" sign.
Signal about exceeding the specified speed limit
Exceeding the set speed limit is accompanied by an audible signal and the message "LIMIT" on the text display in the instrument cluster. A second warning can only be issued after the vehicle speed has decreased by 5 km/h relative to the set speed.
1. To ask speed threshold press the keys one by one "LIMIT" and "SET" – the speed display will start flashing.
2. Enter the speed value using the keys from "0" to "9" and confirm the input with the key "SET". To confirm the activation of the signal, an indicator appears on the right side of the display "LIMIT".
3. To delete the last digit, press the key "CLR".
4. To ask threshold speed at the level of the current speed of movement press the keys one by one "LIMIT" and twice - "SET".
5. For cancellations signal about exceeding the speed, press the "LIMIT" button twice. Indicator "LIMIT" on the right side of the display goes out, but the threshold speed value remains in the computer's memory and can be recalled again.
Installing the code
To prevent unauthorized engine start and damage to the vehicle, it is possible to enter a code into the trip computer. However, until the required code is entered, the engine will not start.
1. To set the code, set the key in the ignition switch to position "1" and press the button "CODE" – a message will appear on the display "CODE - - - -".
2. Enter the code using the keys from "0" to "9" and confirm the input with the key "SET".
3. Turn the key to the position "0" or remove it from the ignition switch. If you now press any button on the trip computer or turn on the ignition, the entered code will be erased. Therefore, the code should be entered every time you arm the car.
4. If a mistake was made while entering the code, press the key to delete the last digit of the code "CLR".
5. To cancel the code and start the engine, turn the ignition key to position "1" or "2" - sound signal and message "CODE - - - -" the display will indicate the need to enter a code.
6. Enter the code and press the key "SET". If the code is not entered or if the wrong code is entered, the engine will not start. When the correct code is entered, the current time appears on the display. If the wrong code is entered three times in a row, the anti-theft alarm is activated for 30 seconds.
This article is available at russian, bulgarian, belarusian, ukrainian, serbian, croatian, romanian, polish, slovak, hungarian
Article verified: Polikarpov Saveliy
Share information:
Previous articles
БМВ E38: Manual
Next articles
Similar articles on other types of BMW cars:
Resetting the Service Interval Display BMW 3 Series E46 (1998-2006, petrol)
Outside temperature display and digital clock BMW 5 Series E34 (1988-1996)
Self-diagnosis display BMW 5 Series E28 (1981-1988)
Virtual display BMW X3 E83 (2003-2010)
Multifunctional steering wheel BMW X5 E53 (1999-2006)
Resetting the Service Interval Display BMW 3 Series E46 (1998-2006, petrol)
Outside temperature display and digital clock BMW 5 Series E34 (1988-1996)
Self-diagnosis display BMW 5 Series E28 (1981-1988)
Virtual display BMW X3 E83 (2003-2010)
Multifunctional steering wheel BMW X5 E53 (1999-2006)
Link in different formats to this page
Visitor comments
No comments yet
- General information
- Introduction to guide
- Manual
- Maintenance
- Power unit
- Engine M60/1, M60/2 (petrol)
- M62 engine (petrol)
- M57 engine (diesel)
- M67 engine (diesel)
- Cooling system
- Fuel system (petrol)
- Fuel system (diesel)
- Exhaust system
- Ignition and control systems
- Charge and launch systems
- Transmission
- Clutch
- Mechanical gearbox
- Automatic gearbox
- Cardan and drive shafts
- Chassis
- Brake system
- Front suspension
- Rear suspension
- Steering
- Body
- Exterior
- Interior
- Electrical equipment
- Equipment and devices
- Lighting
- Heating and air conditioning
- Electrical circuits
- General information
- Care and maintenance
- Power unit
- Minor engine repair
- Engine overhaul
- Lubrication system
- Cooling system
- Ignition system
- Supply system
- Injection system (petrol)
- Injection system (diesel)
- Exhaust system
- Transmission
- Clutch
- Manual gearbox
- Automatic gearbox
- Cardan gear
- Rear axle and shafts
- Chassis
- Front suspension
- Rear suspension
- Steering
- Wheels and tires
- Brake system
- Body
- Body elements
- Electrical equipment
- Equipment and devices
- Electrical circuits