
Cars Mazda Cars Mitsubishi Cars Toyota Cars Chevrolet Cars AvtoVAZ Cars Kia Cars Nissan
English Русский
Български
Беларускі
Український
Српски
Hrvatski
Română
Polski
Slovenský
Magyar
| Articles | Contacts | Sitemap |   
BMWman.ru


3 series   5 series   7 series   BMW X3   BMW X5   BMW X6

E53 (1999-2006)
  • Home
  • BMW X5
  • E53
  • M54 petrol engine
  • Engine repair
  • Replacing valves

Replacing valves (BMW X5 E53)

            0

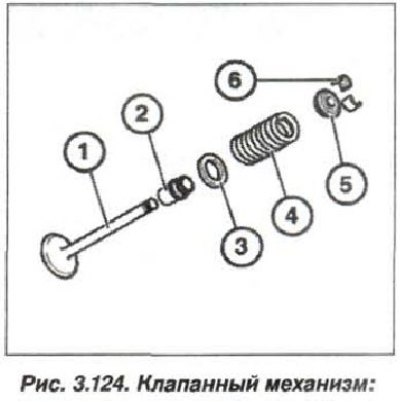
The design of the valve mechanism is shown in Fig. 3.124.

1 - valve; 2 - oil seal; 3 - lower spring plate; 4 - valve spring; 5 - upper spring plate; 6 -…

1 - valve; 2 - oil seal; 3 - lower spring plate; 4 - valve spring; 5 - upper spring plate; 6 - crackers


Attention! All parts removed from the engine cylinder head must be marked and arranged according to the cylinder numbering.


The valve must be removed in the following order. Remove the cylinder head and camshafts. Mark and remove the hydraulic tappets. Remove with special pliers - device "11.1.480" (fig. 3.125) oil scraper caps from valve guide bushings.
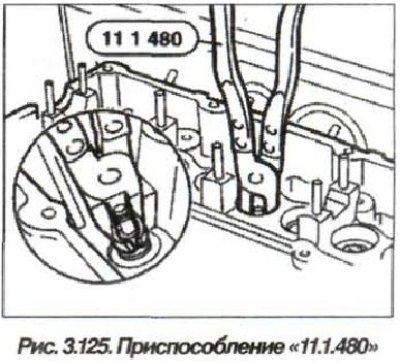
The valve must be removed in the following order. Remove the cylinder head and camshafts. Mark and…


Press the valve spring using special pliers or a standard device (see fig. 3.129) and take out the crackers.
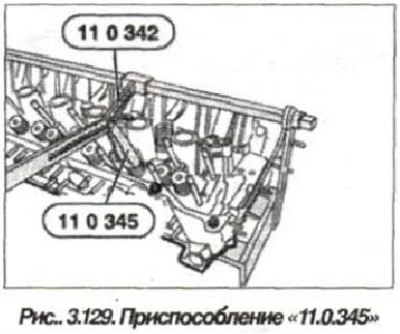
Press the valve spring using special pliers or a standard device (see fig. 3.129) and take out the…


Remove the top plate (5, see Fig. 3.124) valve springs.
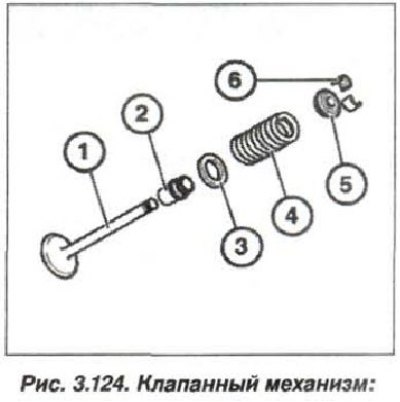


1 - valve; 2 - oil seal; 3 - lower spring plate; 4 - valve spring; 5 - upper spring plate; 6 -…

1 - valve; 2 - oil seal; 3 - lower spring plate; 4 - valve spring; 5 - upper spring plate; 6 - crackers


Remove the valve spring (4). Remove the valve (1) from the combustion chamber side of the cylinder head. Remove the lower valve plate (3). Remove all valves in sequence.

The valves should be installed in the reverse order, while checking the clearance (see fig. 3.7) valve stem/guide bushing and, if necessary, restore the tightness of the valve guide bushings by processing them with a reamer (see fig. 3.70).
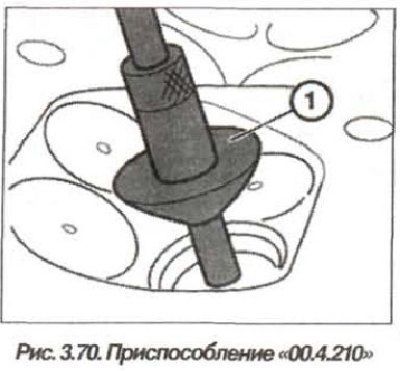
The valves should be installed in the reverse order, while checking the clearance (see fig. 3.7)…


Install (temporarily) the valve and check and, if necessary, restore the tightness of the valve fit to its seat by lapping (see fig. 3.6).
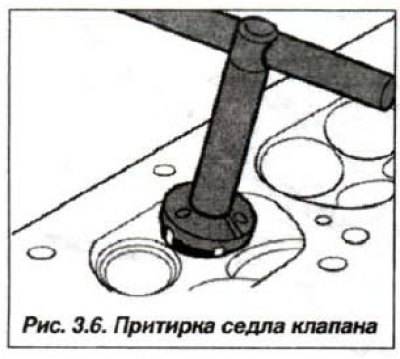
Install (temporarily) the valve and check and, if necessary, restore the tightness of the valve fit…


Remove the valve being installed and remove traces of the process of restoring the tightness of its seat.


Caution: If new valve spring retainers have sharp inner edges, they must be removed before installing the retainer on the engine cylinder head.


Remove sharp edges from the grooves of the valve stem under the crackers. Install the valve, having previously lubricated its stem and guide with engine oil. Install a new valve stem seal.

Install the lower valve plate and its spring. The upper and lower valve spring plates are different, because the spring has a conical shape. The spring rests on the cylinder head with its larger diameter.

Install the upper valve spring plate. Press (compress) the valve spring with special pliers and install the crackers so that they fully enter the grooves on the valve stem. Smoothly release the pliers, strictly monitoring the position of the crackers.

Install the remaining valves in the same way. Do not mix up the inlet and outlet valves and their installation locations.

Lubricate the hydraulic tappets with engine oil and install them in their original locations according to the markings.

Install the camshafts. Check the axial clearance of the camshafts; the principle of measuring it is shown in Fig. 3.87.
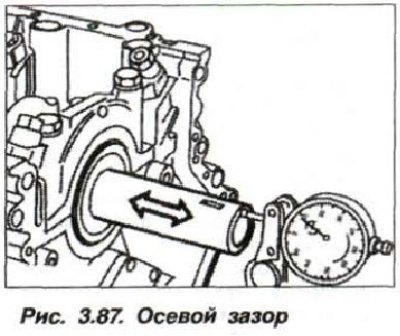
Install the camshafts. Check the axial clearance of the camshafts; the principle of measuring it is…


Replace the cylinder head gasket with a new one. Assemble the engine.

This article is available at russian, bulgarian, belarusian, ukrainian, serbian, croatian, romanian, polish, slovak, hungarian
Article verified: Zhuravleva Isolda

Share information:
Previous articles
БМВ E53: Engine repair
Next articles

Replacing the chain tensioner plunger
Adjusting the engine valve timing
Checking the valve timing
Replacing the camshaft
Replacing piston rings
Replacing valve stem seals
Replacing all valve springs
Replacing the actuator unit of the D-VANOS system
Checking hydraulic tappets
Replacing the electromagnetic valves of the D-VANOS system


Similar articles on other types of BMW cars:
Checking the level and replacing the oil in the automatic transmission BMW 3 Series E21 (1975-1983)
Replacing the coolant BMW 5 Series E12 (1972-1981)
Replacing the oil filter (center bolt design) BMW 7 Series E32 (1986-1994)
Replacing the cabin filter (ventilation system) BMW 7 Series E38 (1994-2001)
Replacing the intake camshaft BMW X3 E83 (2003-2010)
Link in different formats to this page


Visitor comments

No comments yet


How much 45 + 44 =


BMW E53 (1999-2006) 
  • General information
  • Manual
  • Maintenance
  • M54 petrol engine
  • Engine repair
  • Lubrication system
  • Cooling system
  • Supply system
  • Injection system
  • Exhaust system
  • Engine electrics
  • M62 petrol engine
  • Engine repair
  • Lubrication system
  • Cooling system
  • Supply system
  • Exhaust system
  • Engine electrics
  • N62 petrol engine
  • Engine repair
  • Cooling and lubrication system
  • Power and exhaust system
  • Engine electrics
  • Diesel engine M57
  • Engine repair
  • Lubrication system
  • Cooling system
  • Power and exhaust system
  • Engine electrics
  • Turbocharging system
  • Transmission
  • Clutch
  • Mechanical gearbox
  • Automatic gearbox
  • Transfer case and cardan
  • Chassis
  • Brake system
  • Steering
  • Front suspension
  • Rear suspension
  • Wheels and tires
  • Body
  • Exterior
  • Interior
  • Doors and windows
  • Repair and maintenance
  • Heater and air conditioner
  • Electrical equipment
  • Equipment and devices
  • Levers and switches
  • Electrical circuits
BMWman.ru © 2017-2026 · Mobile version · News and articles · Sitemap: EN BG BY UA RS HR RO PL SK HU · Feedback · Site search
3er E21 · 3er E30 · 3er E36 · 3er E46 [petrol] · 3er E46 · 5er E12 · 5er E28 · 5er E34 · 5er E39 · 7er E32 · 7er E38 · X3 E83 · X5 E53 ·
This site uses cookies 🍪, without them some features simply would not work.