
Table of contents: Removal ↓ Installation ↓
- Home
- BMW 3 Series
- E30
- Power unit
- M10/M20 engine
- Removal and installation valves
Removal and installation valves (BMW 3 Series E30)
Caution: On 316i, 318i models, the exhaust valves are sodium filled to improve heat dissipation. They cannot be melted down or used as a tool (for example, as punches). Explosive! Also, these valves should not be simply thrown away. To dispose of them, saw the valve with a hacksaw in the middle of the valve stem into 2 parts. Do not allow the valve to come into contact with water. Then throw the sawed parts of the valve into a bucket of water and step aside.
Caution: When sodium comes into contact with water, a rapid chemical reaction occurs, during which the sodium burns.
Removal
Caution: When reinstalling the valve drive parts, they must be installed in their original positions. To do this, when removing the parts, they must be folded in the order of installation.
Remove the rocker arms (see section "Removal and installation rocker arms")
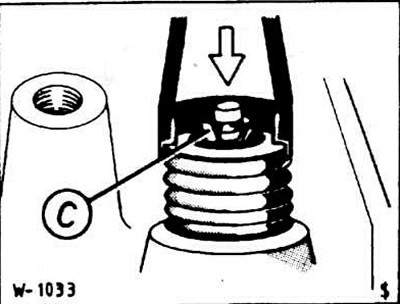
Compress the valve springs using the BMW 111040 tool and remove the valve crackers "C".
Note: A standard valve compression tool can also be used to compress the springs. Depending on the tool used, it may be necessary to remove the intake or exhaust manifold.
Unload the springs and remove the upper spring cup, valve spring, and lower spring cup.
Remove the valve stem seals with a special tool. The best tools for this are the valve stem seal pliers 791-5 or the inertial puller 791-2 from HAZET.
Pull the valve out of the cylinder head towards the combustion chamber.
Remove the next valve.
Installation
Before installing the valves, check the valve guides and possibly lap the valve seats.
Caution: When installing a new valve, lapping the valve seat is mandatory.
Remove burrs from the contact surface of the valve stem with crackers.
Lightly lubricate the valve stem and guide with engine oil and insert the valve.
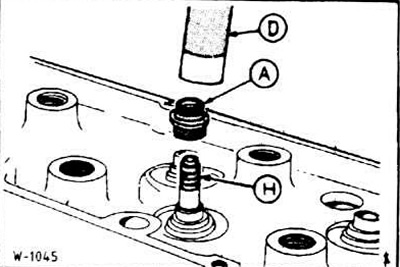
Lightly lubricate with engine oil and fit the oil deflector ring "A" using the appropriate tool "D" until it stops.
Caution: To avoid damaging the oil deflector ring, place the mounting sleeve "H" on the valve stem before installing it. If the mounting sleeve is missing, cover the contact surfaces of the valve crackers with smooth adhesive tape. Remove the adhesive tape after installing the oil deflector ring.
Insert the lower valve spring cup.
Insert the spring and the upper valve spring cup. Install only springs with the same length, manufacturer's marking and wire thickness.
Note: Since September 1982, springs with a length of 38±1 mm are installed (previously, springs with a length of 37±1 mm were installed). When installing a new cylinder head on an engine produced before September 1982 and simultaneously replacing the old valve springs, it is necessary to place a 1 mm thick spacer washer under the valve head. Cylinder heads of later production are marked with the letter "5" on the inlet and outlet valve sides.
Compress the valve spring and insert the crackers. Slowly release the valve spring, ensuring that the crackers are seated correctly.
Install the next valve. Be careful not to confuse the inlet and outlet valves.
Install the rocker arms (see section "Removal and installation rocker arms").
This article is available at russian, bulgarian, belarusian, ukrainian, serbian, croatian, romanian, polish, slovak, hungarian
Article verified: Polikarpov Saveliy
Share information:
Previous articles
БМВ E30: M10/M20 engine
Next articles
Similar articles on other types of BMW cars:
Removal and installation valves BMW 5 Series E34 (1988-1996)
Removal and installation the oil pan BMW 5 Series E12 (1972-1981)
Removal and installation of electromagnetic valves, regulators and… BMW 7 Series E38 (1994-2001)
Cylinder Head Cover — Removal and Installation BMW 7 Series E32 (1986-1994)
Pistons — removal and installation BMW X3 E83 (2003-2010)
Removal and installation the engine BMW X5 E53 (1999-2006)
Link in different formats to this page
Visitor comments
No comments yet
- General information
- Manual
- Maintenance
- Power unit
- Engine repair
- Cooling system
- Power system (gasoline)
- Injection system (gasoline)
- Fuel system (diesel)
- Exhaust system
- Ignition system
- Charge and launch systems
- Transmission
- Car gearbox
- Clutch and drive shafts
- Chassis
- Brake system
- Suspension front and rear
- Steering
- Body
- Body care and repair
- Exterior
- Interior
- Electrical equipment
- Troubleshooting
- Lighting and signaling
- Equipment and devices
- Heater and air conditioner
- Electrical circuits
- General information
- Manual
- Repair on the road
- Weekly checks
- Maintenance
- Troubleshooting
- Power unit
- 4 cylinder engines
- 6 cylinder engines
- Engine overhaul
- Cooling and heating
- Fuel and exhaust system
- Starting and charging system
- Ignition system
- Transmission
- Clutch
- Mechanical gearbox
- Automatic gearbox
- Cardan and drive shafts
- Chassis
- Brake system
- Wheel suspension
- Steering
- Body
- Exterior
- Interior
- Electrical equipment
- Equipment and devices
- Electrical circuits
- General information
- Maintenance
- Power unit
- Engine repair
- Cooling system
- Ignition system
- Supply system
- Fuel injection system
- Exhaust system
- Transmission
- Clutch
- Car gearbox
- Front and rear axle
- Chassis
- Steering
- Brake system
- Body
- Exterior
- Interior
- Electrical equipment
- Heating system
- Equipment and devices
- Power devices
- Electrical circuits
- Power unit
- M10/M20 engine
- M40 engine
- Ignition system
- Lubrication system
- Cooling system
- Supply system
- Fuel injection
- Exhaust system
- Transmission
- Clutch
- Manual gearbox
- Front axle
- Rear axle
- Chassis
- Steering
- Brake system
- Body
- Exterior
- Interior
- Electrical equipment
- Heating system
- Equipment and devices
- Electrical circuits
- General information
- Specifications
- Operation and maintenance
- 4-cylinder engine
- Engine repair
- Cooling and lubrication system
- Supply system
- Ignition system
- 6-cylinder engine
- Engine repair
- Cooling and lubrication system
- Supply system
- Fuel injection system
- Ignition system
- Transmission
- Clutch
- 4-speed manual gearbox
- 5-speed manual gearbox
- Automatic gearbox
- Cardan and rear axle
- Chassis
- Steering
- Front suspension
- Rear suspension
- Brake system
- Electrical equipment
- Equipment and devices
- Electrical circuits