



2. If the valves appear satisfactory at this point in the inspection, use a micrometer to measure the valve stem diameter at several points. Any noticeable difference in the reading on the micrometer indicates valve stem wear. If any of these conditions occur, the valve(s) should be replaced.
3. If the valves are in good condition, they should be lapped in their respective seats to ensure tightness. If the seat has minor dents or has already been bored, they should be lapped with a fine polishing paste. Coarse polishing paste is usually not used unless the seat has severe burnouts or deep dents. In this case, the cylinder head and valves should be checked by a specialist to decide whether to bore the seat or even replace the valve or seat.
4. The valves are ground in as follows: Turn the head over and place it on a workbench, placing wooden blocks on both sides to provide clearance with the valve stems.
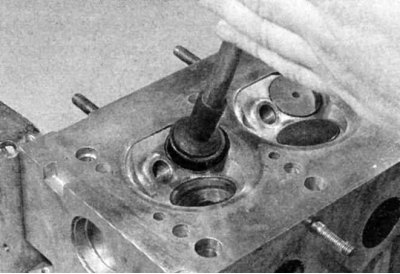
5. Apply a small amount of polishing paste of the appropriate grain size to the chamfer of the valve seat and attach the suction cup of the polishing tool to the valve head. Rub the valve head to the seat with reciprocating and rotating movements, periodically lifting the valve to redistribute the polishing paste. Do not overdo it.
If a loose spring is installed under the valve head, the grinding operation will be noticeably easier.
6. If coarse polishing paste is used, lapping should be carried out until smooth matte surfaces are achieved on the seat and valve, then the paste should be removed and the process repeated with fine polishing paste. The lapping operation is complete when smooth light gray matte surfaces without breaks are achieved on the valve and seat. Do not lap the valves more than necessary.
7. After lapping all valves, thoroughly wash off all traces of lapping paste using kerosene or a suitable solvent before assembling the cylinder head.
[The original text of the article is available on the resource BMWman.ru]