
1. Lay out the piston/connecting rod assemblies and new ring sets so that they match the same pistons and cylinders that their end clearances were measured against and into which they will be installed when the engine is assembled.

2. Insert the top ring into the first cylinder and set it perpendicular to the cylinder wall, pushing it with the bottom of the piston. The ring should be at the bottom of the cylinder at the bottom of the ring engine.

3. To measure the end gap, insert a feeler gauge between its ends, the thickness of which is equal to the width of the gap. The feeler gauge should pass between the ends of the ring with slight resistance. Compare the measurement result with the requirements Size charts and adjustment data at the end of the manual. If the gap is more or less than required, double check that you have purchased the correct rings before proceeding.
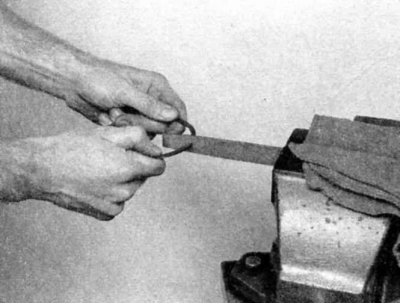
4. If the gap is too small, it should be increased, otherwise the ends of the ring will come together when the engine is running, which can cause serious damage to the engine. The gap can be increased by filing it very carefully with a fine file. Clamp the file in a vice with elastic jaws, put the ring on the file so that the ends of the ring rest on its surfaces and slowly move the ring to remove material. When doing this, move the ring only from the end of the file to the beginning.
5. Too much clearance is not critical if it does not exceed 1.0 mm. Check again whether the rings are correct.
6. Repeat the procedure for each ring of the first cylinder and for each ring of the remaining cylinders. Do not forget about the correspondence of rings, pistons and cylinders.
7. Once the clearances between the ends of the rings have been adjusted/corrected, the rings can be installed on the pistons.
8. Usually the oil scraper ring is installed first (the lowest on the piston). Typically, it consists of three separate components. Install the radial/axial expander into the groove. If there is an anti-rotation tab, make sure it is inserted into the hole drilled in the groove.
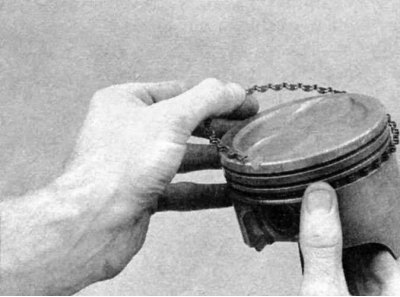
9. Next install the lower disc. When installing the oil scraper ring discs, do not use a piston ring installer as they may be damaged. Instead, position one end of the disc in the groove between the radial/axial expander and the groove wall, hold it firmly in place and run the ring around the piston, guiding the disc into the groove. Then install the upper disc in the same manner.
10. After installing the three components of the oil scraper ring, check that the upper and lower discs move freely in the groove.
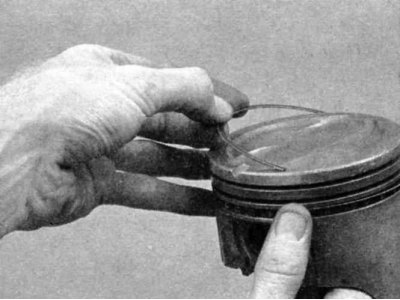
11. The middle ring is installed next. It usually has a mark on it that should face up, towards the bottom of the piston.
Always follow the instructions printed on the ring packaging or box - different manufacturers may have different requirements. Do not mix up the top and bottom rings, as they have different cross-sections.
12. Make sure that the identification mark faces the piston bottom, then install the ring into the middle groove of the piston (see drawing). Do not spread the ring more than necessary to fit it onto the piston. Use a quality ring installation tool if available; to prevent rings from getting into empty grooves, you can use old flat feeler gauges.
13. Install the top ring in the same way. Make sure the mark is facing up. Be careful not to confuse the top and middle rings.
14. Repeat the procedure for the remaining pistons and rings.
(This article is based on information from the website «www.bmwman.ru»)