
Table of contents: Checking the lubrication clearances…↓ Final installation of the crankshaft ↓
- Home
- BMW 5 Series
- E28
- Power unit
- Engine overhaul
- Installing the crankshaft and checking the main bearing lubrication clearances
Installing the crankshaft and checking the main bearing lubrication clearances (BMW 5 Series E28)
Installing the crankshaft is the first important step in engine assembly. This step assumes that the cylinder block and crankshaft have been cleaned, inspected, and repaired or ground.
1. Place the block upside down.
2. Remove the main bearing cap bolts and remove the caps. Lay them out in the correct order to ensure proper assembly.
3. Remove the bearing shells from the block and main bearing caps, if they are still there. Wipe the bearing surfaces of the block and caps with a clean, lint-free cloth. They must be spotlessly clean.
1. Clean the backs of the new bearing shells and install them in each bearing seat of the block. If one of the shells of each pair has a wide groove, make sure that the shell with the groove is installed in the block. Install the remaining shells of each pair in their respective main bearing caps. Make sure that the ridge on the shell aligns with the recess in the block or cap.
2. The thrust bearing with flange must be installed in cover and seat No.3 on the M10 engine, in cover and seat No.6 on the M20 engine, in cover and seat No.4 on the M30 engine and only in seat No.4 on the M40 engine.
3. Wipe the bearing surfaces in the block and the crankshaft main bearing journals with a clean, lint-free cloth.
4. Check or clean the crankshaft oil holes, as dirt from them will inevitably get directly into the new bearings.
5. When you are sure that the crankshaft is clean, carefully place it on the main bearings.
6. Before final installation of the crankshaft, it is necessary to check the clearances for lubrication of the main bearings.
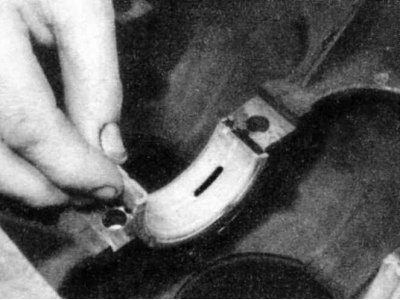
7. Cut several pieces of plastic calibrated wire to the appropriate length (slightly shorter than the width of the main bearings) and place one piece on the crankshaft journal of each main bearing, parallel to the crankshaft axis.
8. Clean the bearing surfaces in the caps and install the caps in the appropriate places (don't mix them up), the arrows should point towards the front of the engine. Do not move the pieces of plastic wire.
9. Starting from the central main bearing and moving towards the outer ones, tighten the main bearing cap bolts in stages to the force given in Table of sizes and adjustment data at the end of the manual. On M10, M20 and M30 engines, tighten the bolts in three stages. On M40 engines, first tighten the bolts to stage 1 torque, then tighten the bolts further by the angle given in Table of sizes and adjustment data at the end of the Manual. Tighten the bolt to a certain angle in one motion. Do not turn the crankshaft while tightening the bolts.
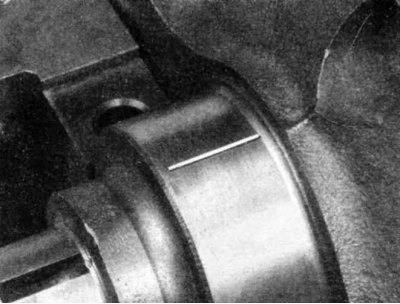
10. Loosen the bolts and carefully remove the main bearing caps. Save the main bearing caps. Keep them in good condition. Do not touch the plastic wire or turn the crankshaft. If any of the main bearing caps are difficult to remove, tap them on both sides with a mallet with a flexible head.
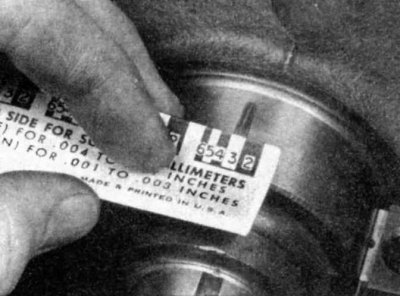
11. Compare the flattened wire width of each journal with the scale printed on the plastic wire package to obtain the main bearing grease clearance value. Check Table of sizes and adjustment data at the end of the Guide their correctness.
12. If the clearance does not meet the requirements, the bearing shells can be of the appropriate size (this means that others are needed). Before deciding whether to purchase different bearing shells, make sure that no dirt or oil was caught between the bearing shells and the caps or block when measuring the clearance. If the wire width is not uniform along its length, the journal may be tapered (see section Checking the condition of the crankshaft).
13. Carefully remove all traces of wire material from the bearing journals and/or bearing surfaces. Do this with your fingernail or the edge of a plastic credit card to ensure that no nicks or scratches are left on the bearing surfaces.
1. Carefully remove the crankshaft from the engine.
2. Clean the bearing surfaces of the block, then apply a thin, even coat of molybdenum disulphide grease or engine oil to both surfaces. Be sure to lubricate the thrust surfaces as well as the thrust bearing journal surface.
3. Make sure the crankshaft journals are clean, then reinstall the crankshaft into the block.
4. Wipe the bearing surfaces in the caps, then lubricate them with engine oil.
5. Install the covers in their places, with the arrows facing the front of the engine.
6. Tighten the bolts by hand.
7. Lightly tap the ends of the crankshaft with a lead or bronze hammer to align the main bearing surfaces and the crankshaft thrust surfaces.
8. Tighten the bearing cap bolts to the specified torque, working from the center outward. On M10, M20 and M30 engines, tighten the bolts to final torque in three stages, skipping the thrust bearing cap bolts. On M40 engines, tighten all bolts in the two stages specified in Table of sizes and adjustment data at the end of the Guide.
9. On M10, M20 and M30 engines, tighten to the required torque given in Table of sizes and adjustment data at the end of the manual, thrust bearing cap bolts.
10. On manual transmission models, install a new auxiliary bearing onto the end of the crankshaft (see chapter Clutch).
11. Turn the crankshaft by hand several times to check for obvious binding.
12. The final step is to check the crankshaft axial play using a feeler gauge or dial indicator as described in Section Removal the crankshaft. If the crankshaft thrust surfaces are not worn or damaged and new bearings are installed, the axial clearance should be normal.
13. Install the new oil seal, then tighten the bolts securing the oil seal housing to the block (see section Installing the rear crankshaft oil seal).
1. Place the block upside down.
2. Remove the main bearing cap bolts and remove the caps. Lay them out in the correct order to ensure proper assembly.
3. Remove the bearing shells from the block and main bearing caps, if they are still there. Wipe the bearing surfaces of the block and caps with a clean, lint-free cloth. They must be spotlessly clean.
Checking the lubrication clearances of the main bearings
1. Clean the backs of the new bearing shells and install them in each bearing seat of the block. If one of the shells of each pair has a wide groove, make sure that the shell with the groove is installed in the block. Install the remaining shells of each pair in their respective main bearing caps. Make sure that the ridge on the shell aligns with the recess in the block or cap.
The lubrication holes in the block should match the lubrication holes in the bearings. Do not hammer the bearing into place and protect the surfaces from nicks and scratches. Do not lubricate anything at this stage.
2. The thrust bearing with flange must be installed in cover and seat No.3 on the M10 engine, in cover and seat No.6 on the M20 engine, in cover and seat No.4 on the M30 engine and only in seat No.4 on the M40 engine.
3. Wipe the bearing surfaces in the block and the crankshaft main bearing journals with a clean, lint-free cloth.
4. Check or clean the crankshaft oil holes, as dirt from them will inevitably get directly into the new bearings.
5. When you are sure that the crankshaft is clean, carefully place it on the main bearings.
6. Before final installation of the crankshaft, it is necessary to check the clearances for lubrication of the main bearings.
7. Cut several pieces of plastic calibrated wire to the appropriate length (slightly shorter than the width of the main bearings) and place one piece on the crankshaft journal of each main bearing, parallel to the crankshaft axis.
8. Clean the bearing surfaces in the caps and install the caps in the appropriate places (don't mix them up), the arrows should point towards the front of the engine. Do not move the pieces of plastic wire.
9. Starting from the central main bearing and moving towards the outer ones, tighten the main bearing cap bolts in stages to the force given in Table of sizes and adjustment data at the end of the manual. On M10, M20 and M30 engines, tighten the bolts in three stages. On M40 engines, first tighten the bolts to stage 1 torque, then tighten the bolts further by the angle given in Table of sizes and adjustment data at the end of the Manual. Tighten the bolt to a certain angle in one motion. Do not turn the crankshaft while tightening the bolts.
10. Loosen the bolts and carefully remove the main bearing caps. Save the main bearing caps. Keep them in good condition. Do not touch the plastic wire or turn the crankshaft. If any of the main bearing caps are difficult to remove, tap them on both sides with a mallet with a flexible head.
11. Compare the flattened wire width of each journal with the scale printed on the plastic wire package to obtain the main bearing grease clearance value. Check Table of sizes and adjustment data at the end of the Guide their correctness.
12. If the clearance does not meet the requirements, the bearing shells can be of the appropriate size (this means that others are needed). Before deciding whether to purchase different bearing shells, make sure that no dirt or oil was caught between the bearing shells and the caps or block when measuring the clearance. If the wire width is not uniform along its length, the journal may be tapered (see section Checking the condition of the crankshaft).
13. Carefully remove all traces of wire material from the bearing journals and/or bearing surfaces. Do this with your fingernail or the edge of a plastic credit card to ensure that no nicks or scratches are left on the bearing surfaces.
Final installation of the crankshaft
1. Carefully remove the crankshaft from the engine.
2. Clean the bearing surfaces of the block, then apply a thin, even coat of molybdenum disulphide grease or engine oil to both surfaces. Be sure to lubricate the thrust surfaces as well as the thrust bearing journal surface.
3. Make sure the crankshaft journals are clean, then reinstall the crankshaft into the block.
4. Wipe the bearing surfaces in the caps, then lubricate them with engine oil.
5. Install the covers in their places, with the arrows facing the front of the engine.
6. Tighten the bolts by hand.
7. Lightly tap the ends of the crankshaft with a lead or bronze hammer to align the main bearing surfaces and the crankshaft thrust surfaces.
8. Tighten the bearing cap bolts to the specified torque, working from the center outward. On M10, M20 and M30 engines, tighten the bolts to final torque in three stages, skipping the thrust bearing cap bolts. On M40 engines, tighten all bolts in the two stages specified in Table of sizes and adjustment data at the end of the Guide.
9. On M10, M20 and M30 engines, tighten to the required torque given in Table of sizes and adjustment data at the end of the manual, thrust bearing cap bolts.
10. On manual transmission models, install a new auxiliary bearing onto the end of the crankshaft (see chapter Clutch).
11. Turn the crankshaft by hand several times to check for obvious binding.
12. The final step is to check the crankshaft axial play using a feeler gauge or dial indicator as described in Section Removal the crankshaft. If the crankshaft thrust surfaces are not worn or damaged and new bearings are installed, the axial clearance should be normal.
13. Install the new oil seal, then tighten the bolts securing the oil seal housing to the block (see section Installing the rear crankshaft oil seal).
This article is available at russian, bulgarian, belarusian, ukrainian, serbian, croatian, romanian, polish, slovak, hungarian
Article verified: Zhuravleva Isolda
Share information:
Previous articles
БМВ E28: Engine overhaul
Next articles
Similar articles on other types of BMW cars:
Checking the clearance between the bearing shells and the main… BMW 3 Series E21 (1975-1983)
Checking the front wheel bearing play BMW 3 Series E36 (1990-2000)
Crankshaft — Installation and Checking of Main Bearing Oil Clearance BMW 7 Series E32 (1986-1994)
Bleeding the cooling system and checking it for leaks (M54, N46, N47,… BMW X3 E83 (2003-2010)
Replacing the crankshaft main bearing shells BMW X5 E53 (1999-2006)
Link in different formats to this page
Visitor comments
No comments yet
- General information
- Governing bodies
- Manual
- Maintenance
- Power unit
- Engine repair
- Lubrication system
- Cooling system
- Ignition system
- Supply system
- Injection system (gasoline)
- Injection system (diesel)
- Exhaust system
- Transmission
- Clutch
- Car gearbox
- Front axle
- Rear axle
- Chassis
- Steering
- Brake system
- Wheels and tires
- Body
- Interior
- Exterior
- Heating system
- Electrical equipment
- Equipment and devices
- Power devices
- Windscreen wipers
- Electrical circuits
- General information
- Manual
- Maintenance
- Power unit
- Engine repair
- Ignition system
- Engine lubrication system
- Cooling system
- Fuel system (gasoline)
- Fuel system (diesel)
- Exhaust system
- Transmission
- Clutch
- Car gearbox
- Chassis
- Front and rear suspension
- Steering
- Brake system
- Body
- Exterior
- Interior
- Electrical equipment
- Heating system
- Equipment and devices
- Power devices
- Electrical circuits
- General information
- Manual
- Maintenance
- Power unit
- Engine in a car
- Engine overhaul
- Cooling system
- Supply system
- Ignition system
- Control system
- Transmission
- Clutch
- Manual gearbox
- Automatic gearbox
- Transmission line
- Chassis
- Steering
- Front suspension
- Rear suspension
- Brake system
- Body
- Body elements
- Car care and painting
- Electrical equipment
- Heater and air conditioner
- Equipment and devices
- Starter and generator
- Electrical circuits
- General information
- Operation and maintenance
- Specifications
- Power unit
- Engine repair
- Cooling and lubrication system
- Supply system
- Ecotronic power supply system
- Fuel injection system
- Ignition system
- Transmission
- Clutch
- Gearbox BMW 242/4
- Gearbox Getrag 262/8
- Gearbox Getrag 265/6
- Automatic gearbox
- Cardan gear
- Rear axle
- Chassis
- Steering
- Front suspension
- Rear suspension
- Brake system
- Electrical equipment
- Equipment and devices
- Electrical circuits