
- Home
- BMW 5 Series
- E34
- Power unit
- Engine repair
- Removal and installation the cylinder head — M50 engine (models 520i, 525i produced since May 1990)
Removal and installation the cylinder head — M50 engine (models 520i, 525i produced since May 1990) (BMW 5 Series E34)
The cylinder head is removed on a cold engine. The intake and exhaust manifolds do not unscrew.
Signs of a defective cylinder head gasket are:
Disconnect the ground wire from the battery.
Raise the car.
Unscrew the front muffler pipe from the exhaust manifold.
Drain the coolant from the engine by unscrewing the drain plug on the side of the engine block under the exhaust manifold. After draining, immediately screw the plug back on and tighten it.
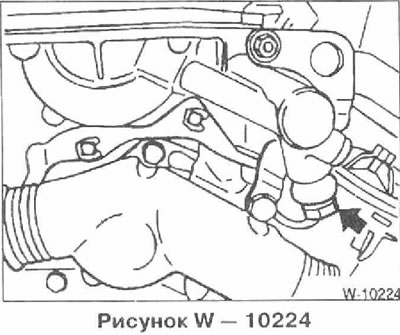
Disconnect the water hoses from the thermostat, after loosening the clamps.
Disconnect the throttle cable from the throttle lever.
Remove the oil filler cap.
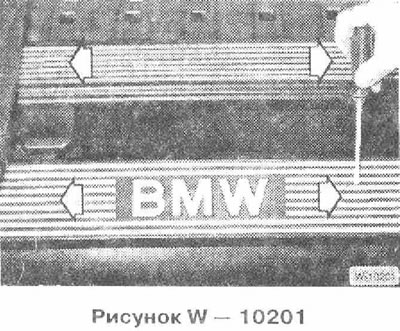
Use a screwdriver to pry up the small "arrow" plugs and unscrew the bolts located underneath. Remove 2 plastic covers from the cylinder head.
Unscrew the ground jumper from the front side of the cylinder head.
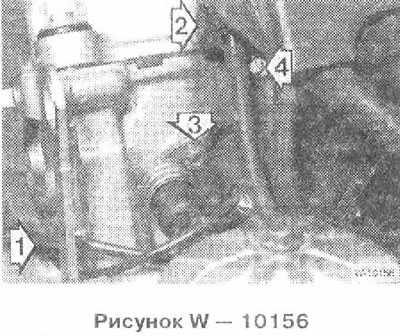
Disconnect the ventilation nipple 2 of the cylinder head, while lifting the bar on the nipple with a screwdriver.
Unscrew bolt 3 and remove the sensor from the cylinder head.
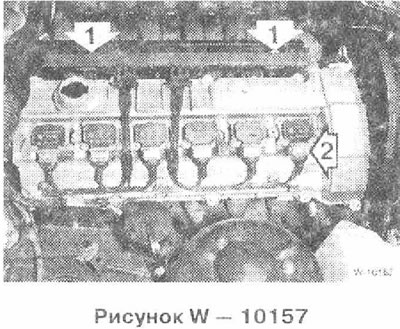
Unscrew 2 bolts 1 and pull the connector block upwards. Note the position of the rubber gaskets for subsequent installation.
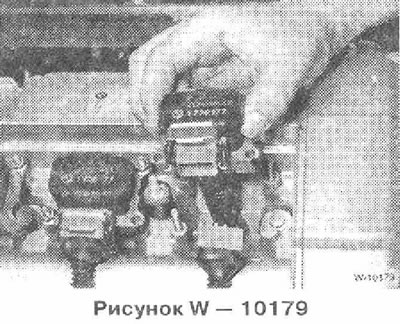
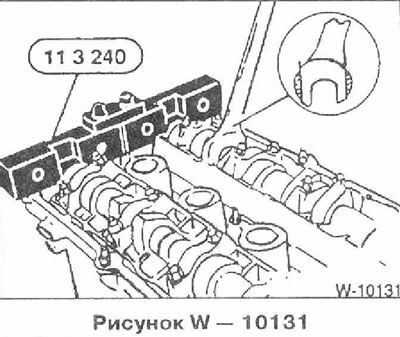
On each ignition coil, pull up the metal bracket 2 and disconnect the connector, see the figure. Remove the connector block together with the wires.
Unscrew the ignition coils and remove them from the cylinder head. Note the position of the ground jumpers for subsequent installation.
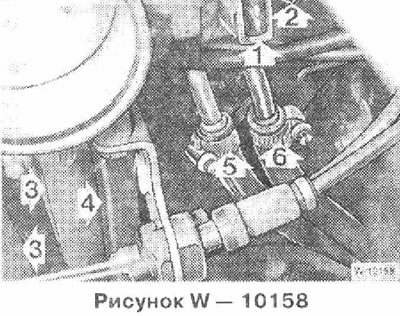
Disconnect the following hoses and connectors from the throttle valve pipe. It is advisable to mark the hoses and wires and their connection points before disconnecting, so as not to mix them up during subsequent installation. Loosen the hose clamps, squeeze the connector locking clips. 1 throttle switch connector, 2 air temperature sensor connector, 3 throttle valve heating water hoses, 4 fuel tank ventilation hose, 6 fuel supply hose (white nipple), 7 return fuel hose (black nipple).
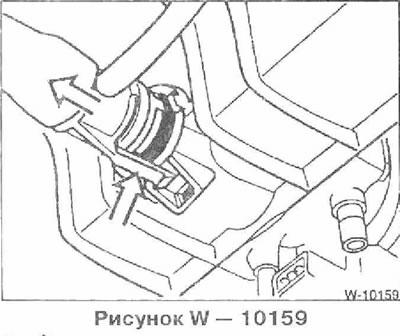
Disconnect the idle air control valve hose from the bottom of the intake manifold.
Unscrew the intake pipe support.
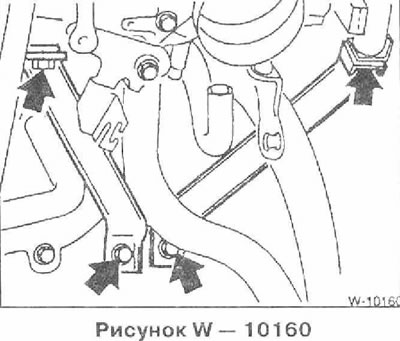
Unscrew the intake manifold from the cylinder head.
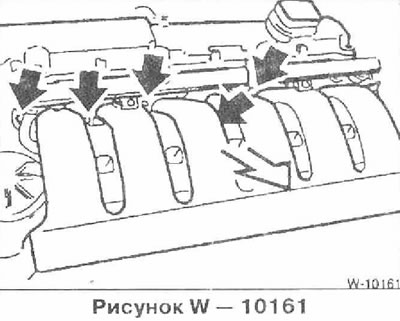
While pressing the wire clamps, disconnect the connectors. 1 temperature sensor, 2 temperature gauge sensor, 3 oil pressure switch, 4 idle speed control valve.

Unscrew the cylinder head cover.
Remove the cable channel from the front of the thermostat by pulling back the side clips.
Remove the casing.
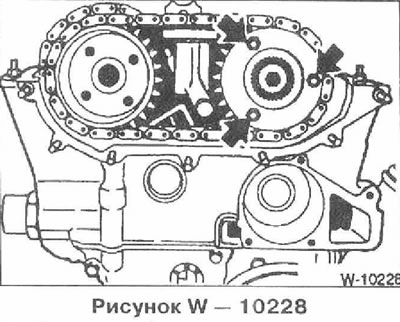
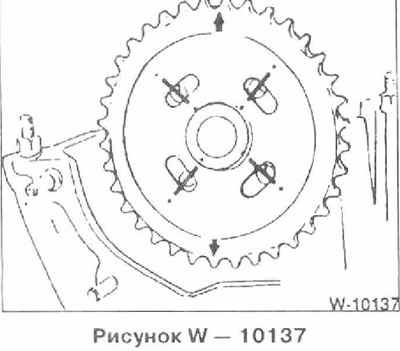
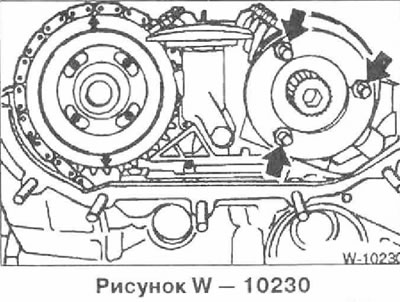
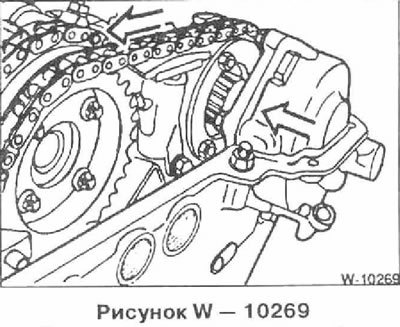
Set the engine to the top dead center position of cylinder 1. To do this, engage 5th gear and move the car forward on a level surface or turn the crankshaft pulley in the direction of engine rotation to a position in which the camshaft cams of the intake and exhaust valves of the first cylinder (from the drive chain side)will be directed towards each other. In this case, the arrows on the sprockets of both camshafts should be facing upwards.
Fix the crankshaft in the top dead center position using the BMW 11 2 300 or other suitable rod. To do this, insert the rod through the hole in the engine block into the hole in the flywheel.
Remove the lifting eye and the upper gearbox cover. Note the position of the centering bushings of both outer bolts for subsequent installation. Remove the gasket, which must be replaced.
Loosen both valve cover mounting bolts.
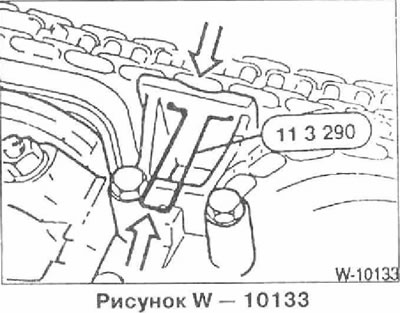
Press the upper chain tensioner and secure it in this position using the special BMW tool.
Unscrew the chain sprockets and remove them together with the chain.
Unscrew the oil pipe of the VANOS actuator and close it with a clean plug.
Disconnect the VANOS actuator solenoid valve connector.

Unscrew the plugs from the actuator.
Loosen the bolts of the exhaust camshaft sprocket.
Press the upper chain tensioner and secure it in this position using the special BMW tool.
Loosen the nuts and remove the VANOS actuator.
Loosen the bolts of the intake camshaft sprocket. Remove the spacer washer from the sprocket.
Remove both sprockets from the camshaft together with the chain.
Remove the upper chain tensioner bracket.
Unscrew the tensioner from the cylinder head.
Remove the chain guide, then remove the exhaust camshaft sprocket.

Unscrew the 2 arrow bolts.
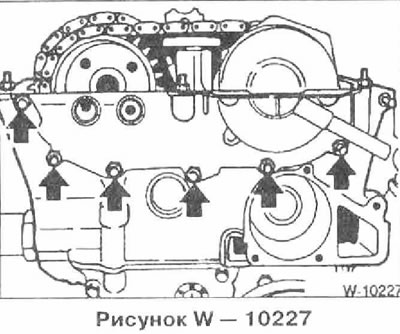
Loosen the cylinder head bolts in several passes from the inside outwards. A special key is required to loosen the bolts, such as the BMW 11 2 250.
Before installation, clean the cylinder head and cylinder block from the remains of the old seal. Do not allow the remains of the seal to get into the cylinder holes.
Check the integrity and correct installation of the centering bushings "arrows". There should be no oil in the threaded holes.
Check the cylinder head for cracks and scratches on its surface.
Measure the flatness of the cylinder head and engine block with a steel ruler in the longitudinal and transverse directions and, if necessary, mill it (work at a service station). The maximum permissible flatness is 0.03 mm.
Thoroughly clean the cylinder head holes from oil and other objects.
It is essential to replace the cylinder head gasket. Apply the new gasket without sealing compound so that the holes are not blocked.
Secure the camshafts in the correct position using the BMW tool shown. If necessary, turn the camshafts using the 24 mm Allen keys.
In this case, the camshaft should be such that the valves of the 1st and 6th cylinders move, to do this, first turn the crankshaft approximately 30° from the top dead center position and only then turn the camshaft back, due to this, contact of the valves with the pistons is prevented.
Table 1

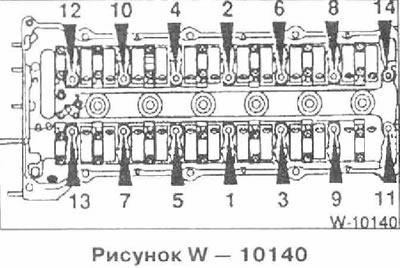
Tighten the cylinder head bolts in three passes each time in sequence 1 through 14:
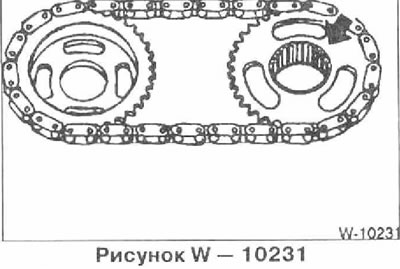
Place the sprocket on the camshaft flange. The arrow on the sprocket should point upwards. The threaded holes should be on the left side of the slots, as the sprocket should turn to the left when installing the tensioner.
Install the chain guide and upper chain tensioner.
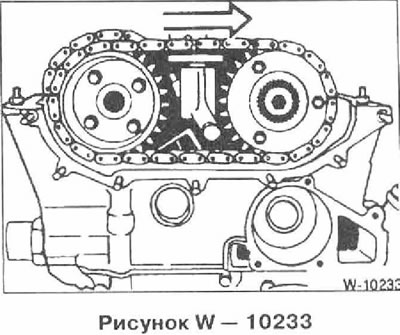
Models produced since August 1992: Install the top chain with sprockets, arrows on sprockets should point upwards. Do not tighten sprocket bolts yet.
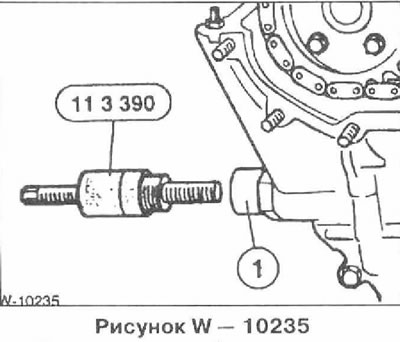
Screw the BMW 11 3 390 device into the tensioner thread. This device presses on the chain and slightly tightens it so that the camshaft sprockets are positioned in the middle of the slots. With some experience, you can make such a device yourself. Without the device, correct installation of the chain is impossible.
Insert the spacer washer and tighten the bolts to 20 Nm.
Install the top chain with sprockets, ensuring that it is positioned correctly: the flat side of the intake camshaft sprocket should be facing outward, and the lug towards the camshaft.

The arrow on the exhaust camshaft sprocket should point upwards. The bolts should be positioned in the middle of the slots.
Place the spacer washer on the intake camshaft and tighten.
Screw on the exhaust camshaft sprocket without tightening the bolts.
Before installing the VANOS adjustment unit, turn both sprockets in the slots to the right as far as they will go.
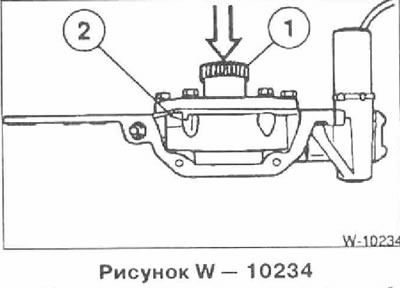
Before installation, press back the VANOS toothed shaft with hydraulic piston 1 until it stops in the direction of housing 2.
Install the VANOS adjustment unit, whereby the toothed shaft engages with the sprocket. If necessary, turn the sprocket slightly counterclockwise so that the toothed shaft engages. Move the VANIS adjustment unit toward the cylinder head, whereby the sprocket turns to the left. Help this movement by pushing the sprocket with your hand.
Screw on the VANQS actuator. Coat the joint surfaces between the cylinder head and the VANOS actuator with liquid sealant "Drei Bond 1209".
Unload the upper tensioner by removing tool 11 3 290.
Tighten the tensioning device by turning the tensioning bolt of the device with a tensioning torque of 1.3 Nm.
In this position, tighten the exhaust camshaft sprocket bolts evenly in two passes to a torque of 20 Nm.
Remove the camshaft locking and chain tensioning tools.
Screw on the VANOS oil pipe with new gaskets. Connect the electrical connector.
Screw in the lower tensioner with a new ring with a tightening torque of 35 Nm. Observe the installation position. The slot on the piston must be located vertically. When installing, relieve the upper tensioner.
Models produced before August 1992: Now tighten the sprocket bolts crosswise to 20 Nm.
Install the upper gearbox cover with a new gasket. Tighten the M6 bolts to 10 Nm and the M8 bolts to 22 Nm, and do not forget to put bushings on both outer bolts.
Screw in 2 valve cover bolts.
Remove the camshaft retaining device.
Install the cylinder head cover and intake manifold in the reverse order. Replace damaged gaskets. When applying the outer cylinder head cover gasket, pay particular attention to the correct position of the cutouts on the front side of the cylinder head.
Tighten the cylinder head cover bolts evenly to 10 Nm.
Insert the ignition coils with paper gaskets and tighten.
Connect the ignition coil connectors and secure them with metal clamps.
Connect the throttle cable to the throttle lever.
Connect all water, fuel and vacuum hoses and secure them with clamps.
Connect the electrical wires.
Screw on the cylinder head housings.
Bolt the front muffler pipe to the exhaust manifold.
Fill with coolant.
Check the engine oil level, top up if necessary. If the cylinder head was removed to replace a blown cylinder head gasket, it is recommended to change the oil and replace the oil filter, as coolant may have gotten into the oil.
Signs of a defective cylinder head gasket are:
- loss of engine power
- decrease in coolant level, white smoke from exhaust gases when the engine is warm
- coolant in engine oil. Oil level does not decrease, but on the contrary increases. Gray color of oil in the engine, foam on the oil dipstick. Oil dilution.
- engine oil in coolant, loss of oil.
Attention: In this case, after carrying out repairs, it is necessary to remove the radiator and flush it with "Solvethane", to remove any remaining oil from the radiator.
- strong bubbling of coolant.
- lack of compression in two adjacent cylinders.
Removal
Disconnect the ground wire from the battery.
Caution: When the battery is disconnected, the information in the electronic memory devices, such as the engine fault memory or the radio security code memory, is erased. When disconnecting the battery, follow the instructions in the section "Removing and installing the battery".
Raise the car.
Unscrew the front muffler pipe from the exhaust manifold.
Drain the coolant from the engine by unscrewing the drain plug on the side of the engine block under the exhaust manifold. After draining, immediately screw the plug back on and tighten it.
Disconnect the water hoses from the thermostat, after loosening the clamps.
Disconnect the throttle cable from the throttle lever.
Remove the oil filler cap.
Use a screwdriver to pry up the small "arrow" plugs and unscrew the bolts located underneath. Remove 2 plastic covers from the cylinder head.
Unscrew the ground jumper from the front side of the cylinder head.
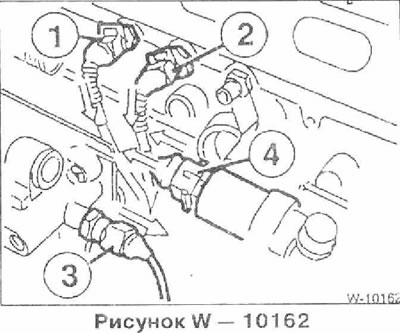
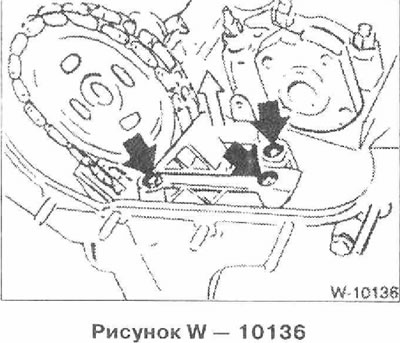
Disconnect the ventilation nipple 2 of the cylinder head, while lifting the bar on the nipple with a screwdriver.
Unscrew bolt 3 and remove the sensor from the cylinder head.
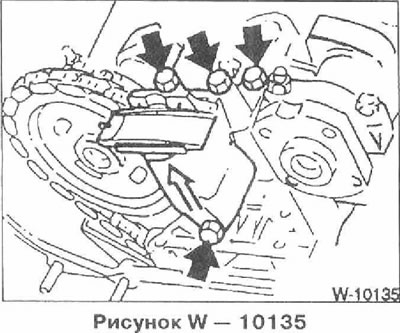
Unscrew 2 bolts 1 and pull the connector block upwards. Note the position of the rubber gaskets for subsequent installation.
On each ignition coil, pull up the metal bracket 2 and disconnect the connector, see the figure. Remove the connector block together with the wires.
Unscrew the ignition coils and remove them from the cylinder head. Note the position of the ground jumpers for subsequent installation.
Disconnect the following hoses and connectors from the throttle valve pipe. It is advisable to mark the hoses and wires and their connection points before disconnecting, so as not to mix them up during subsequent installation. Loosen the hose clamps, squeeze the connector locking clips. 1 throttle switch connector, 2 air temperature sensor connector, 3 throttle valve heating water hoses, 4 fuel tank ventilation hose, 6 fuel supply hose (white nipple), 7 return fuel hose (black nipple).
Warning: Fire hazard, no smoking. Wipe up any spilled fuel with a cloth.
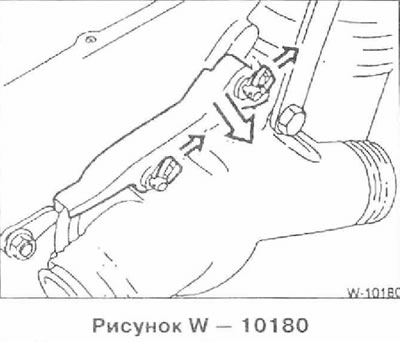
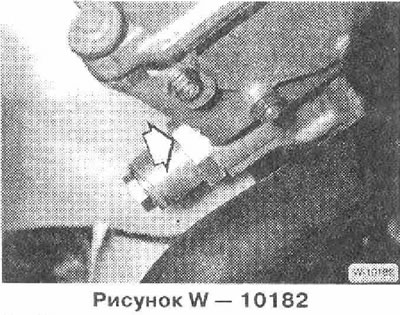
Disconnect the idle air control valve hose from the bottom of the intake manifold.
Note: The locking tabs are easily broken. The connection point is not visible from above, the picture shows the view of the intake pipe from below.
Unscrew the intake pipe support.
Unscrew the intake manifold from the cylinder head.
Caution: Do not allow any objects to enter the intake duct. Failure to remove objects may cause severe engine damage.
While pressing the wire clamps, disconnect the connectors. 1 temperature sensor, 2 temperature gauge sensor, 3 oil pressure switch, 4 idle speed control valve.
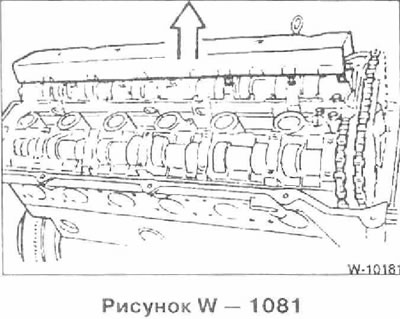
Unscrew the cylinder head cover.
Note: Pay attention to the location of the rubber pads under the bolts for subsequent installation.
Remove the cable channel from the front of the thermostat by pulling back the side clips.
Remove the casing.
Set the engine to the top dead center position of cylinder 1. To do this, engage 5th gear and move the car forward on a level surface or turn the crankshaft pulley in the direction of engine rotation to a position in which the camshaft cams of the intake and exhaust valves of the first cylinder (from the drive chain side)will be directed towards each other. In this case, the arrows on the sprockets of both camshafts should be facing upwards.
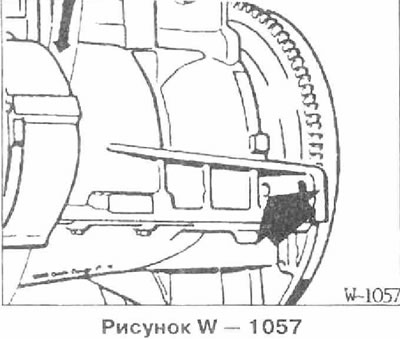
Fix the crankshaft in the top dead center position using the BMW 11 2 300 or other suitable rod. To do this, insert the rod through the hole in the engine block into the hole in the flywheel.
Models produced before August 1992.
Remove the lifting eye and the upper gearbox cover. Note the position of the centering bushings of both outer bolts for subsequent installation. Remove the gasket, which must be replaced.
Loosen both valve cover mounting bolts.
Press the upper chain tensioner and secure it in this position using the special BMW tool.
Unscrew the chain sprockets and remove them together with the chain.
Models produced since September 1992 (with VANOS)
Unscrew the oil pipe of the VANOS actuator and close it with a clean plug.
Disconnect the VANOS actuator solenoid valve connector.
Unscrew the plugs from the actuator.
Loosen the bolts of the exhaust camshaft sprocket.
Press the upper chain tensioner and secure it in this position using the special BMW tool.
Loosen the nuts and remove the VANOS actuator.
Loosen the bolts of the intake camshaft sprocket. Remove the spacer washer from the sprocket.
Remove both sprockets from the camshaft together with the chain.
Remove the upper chain tensioner bracket.
Unscrew the tensioner from the cylinder head.
Caution: Hold the tensioner, it is under the action of the spring.
Remove the chain guide, then remove the exhaust camshaft sprocket.
Caution: Secure the chain to the wire hook to prevent it from falling down.
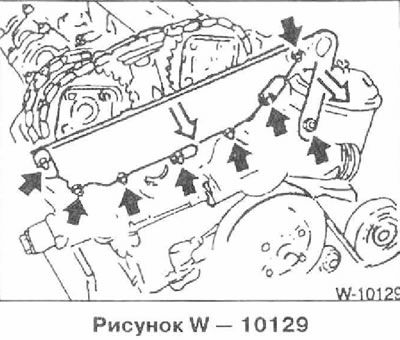
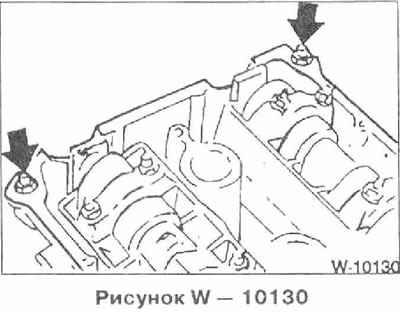
Unscrew the 2 arrow bolts.
Loosen the cylinder head bolts in several passes from the inside outwards. A special key is required to loosen the bolts, such as the BMW 11 2 250.
Caution: Do not place the cylinder head on the contact surface after removal, otherwise the fully open valves may be damaged. Therefore, the cylinder head should be placed on 2 wooden pads.
Installation
Before installation, clean the cylinder head and cylinder block from the remains of the old seal. Do not allow the remains of the seal to get into the cylinder holes.
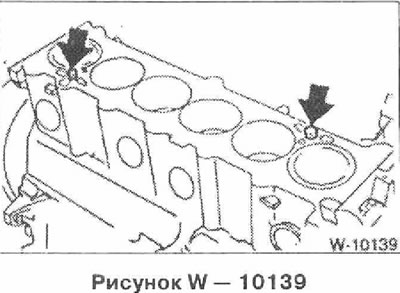
Check the integrity and correct installation of the centering bushings "arrows". There should be no oil in the threaded holes.
Caution: Always install new cylinder head bolts. The shim washers are not supplied in serial cylinder heads, as they are pressed in. When installing a new cylinder head, install the shim washers without pressing them in.
Check the cylinder head for cracks and scratches on its surface.
Measure the flatness of the cylinder head and engine block with a steel ruler in the longitudinal and transverse directions and, if necessary, mill it (work at a service station). The maximum permissible flatness is 0.03 mm.
Note: With a milled cylinder head, depending on the height of the cylinder head after machining, it is possible to install a cylinder head gasket of either the original thickness or one 0.3 mm thicker (See table 1). Installing a thicker gasket prevents the combustion chamber volume from being reduced.
Thoroughly clean the cylinder head holes from oil and other objects.
Caution: There should be no oil left in the blind holes, otherwise the bolts will not fully tighten the cylinder head, even though they are tightened to the correct torque. In addition, the engine block may crack.
It is essential to replace the cylinder head gasket. Apply the new gasket without sealing compound so that the holes are not blocked.
Secure the camshafts in the correct position using the BMW tool shown. If necessary, turn the camshafts using the 24 mm Allen keys.
Caution: Do not damage the camshafts. If necessary, grind the outer sides of the key to make it narrower.
In this case, the camshaft should be such that the valves of the 1st and 6th cylinders move, to do this, first turn the crankshaft approximately 30° from the top dead center position and only then turn the camshaft back, due to this, contact of the valves with the pistons is prevented.
Table 1
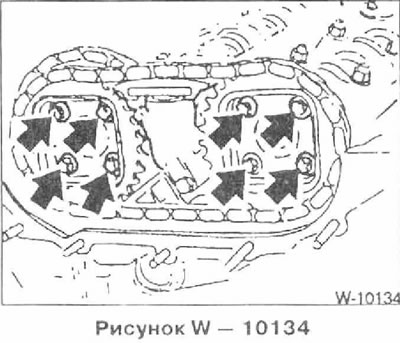
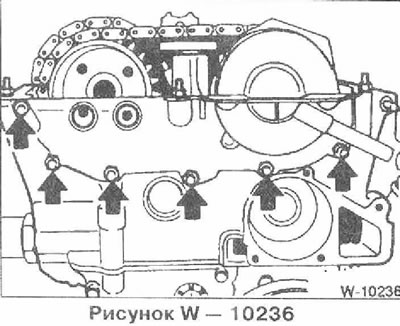
Tighten the cylinder head bolts in three passes each time in sequence 1 through 14:
- 1st pass: tighten the bolts in sequence 1 to 14 with a torque wrench to a tightening torque of 30 Nm.
- 2nd pass: tighten the bolts with a hard wrench to 90°.
- 3rd pass: tighten the bolts with a rigid wrench to 90°.
Caution: Tighten the cylinder head bolts very carefully. Before tightening the bolts, check the accuracy of the torque wrench. In addition, a protractor, such as the HAZET 6690, is required to tighten the cylinder head bolts. If you do not have a protractor, place the wrench on the bolt head, attach a square to the wrench handle and mark the desired angle with chalk. Then turn the wrench handle in one pass to the line marked with chalk.
Place the sprocket on the camshaft flange. The arrow on the sprocket should point upwards. The threaded holes should be on the left side of the slots, as the sprocket should turn to the left when installing the tensioner.
Install the chain guide and upper chain tensioner.
Models produced since August 1992: Install the top chain with sprockets, arrows on sprockets should point upwards. Do not tighten sprocket bolts yet.
Models produced since September 1992 (with VANOS)
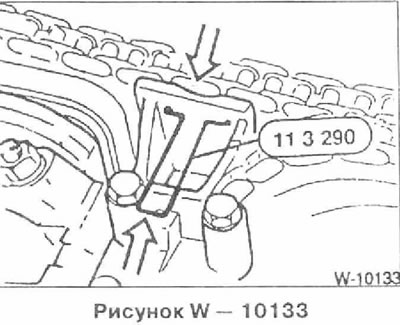
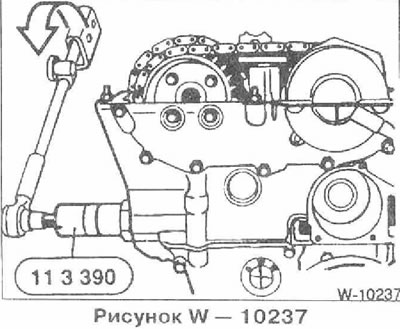
Screw the BMW 11 3 390 device into the tensioner thread. This device presses on the chain and slightly tightens it so that the camshaft sprockets are positioned in the middle of the slots. With some experience, you can make such a device yourself. Without the device, correct installation of the chain is impossible.
Insert the spacer washer and tighten the bolts to 20 Nm.
Install the top chain with sprockets, ensuring that it is positioned correctly: the flat side of the intake camshaft sprocket should be facing outward, and the lug towards the camshaft.
The arrow on the exhaust camshaft sprocket should point upwards. The bolts should be positioned in the middle of the slots.
Place the spacer washer on the intake camshaft and tighten.
Screw on the exhaust camshaft sprocket without tightening the bolts.
Before installing the VANOS adjustment unit, turn both sprockets in the slots to the right as far as they will go.
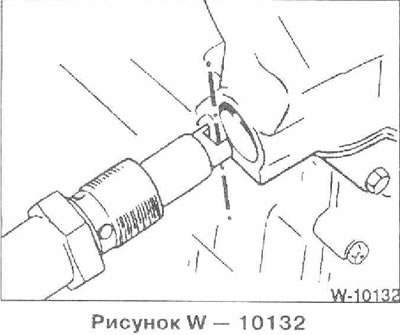
Before installation, press back the VANOS toothed shaft with hydraulic piston 1 until it stops in the direction of housing 2.
Install the VANOS adjustment unit, whereby the toothed shaft engages with the sprocket. If necessary, turn the sprocket slightly counterclockwise so that the toothed shaft engages. Move the VANIS adjustment unit toward the cylinder head, whereby the sprocket turns to the left. Help this movement by pushing the sprocket with your hand.
Screw on the VANQS actuator. Coat the joint surfaces between the cylinder head and the VANOS actuator with liquid sealant "Drei Bond 1209".
Unload the upper tensioner by removing tool 11 3 290.
Tighten the tensioning device by turning the tensioning bolt of the device with a tensioning torque of 1.3 Nm.
In this position, tighten the exhaust camshaft sprocket bolts evenly in two passes to a torque of 20 Nm.
Remove the camshaft locking and chain tensioning tools.
Note: BMW service stations will then perform a function check of the VANOS unit using special tools. If there are no complaints about the unit's operation after installation, this check may not be performed, otherwise you should contact a BMW service station.
Screw on the VANOS oil pipe with new gaskets. Connect the electrical connector.
Screw in the lower tensioner with a new ring with a tightening torque of 35 Nm. Observe the installation position. The slot on the piston must be located vertically. When installing, relieve the upper tensioner.
Models produced before August 1992: Now tighten the sprocket bolts crosswise to 20 Nm.
Install the upper gearbox cover with a new gasket. Tighten the M6 bolts to 10 Nm and the M8 bolts to 22 Nm, and do not forget to put bushings on both outer bolts.
Screw in 2 valve cover bolts.
Remove the camshaft retaining device.
Install the cylinder head cover and intake manifold in the reverse order. Replace damaged gaskets. When applying the outer cylinder head cover gasket, pay particular attention to the correct position of the cutouts on the front side of the cylinder head.
Tighten the cylinder head cover bolts evenly to 10 Nm.
Insert the ignition coils with paper gaskets and tighten.
Connect the ignition coil connectors and secure them with metal clamps.
Connect the throttle cable to the throttle lever.
Connect all water, fuel and vacuum hoses and secure them with clamps.
Connect the electrical wires.
Screw on the cylinder head housings.
Bolt the front muffler pipe to the exhaust manifold.
Caution: Pull out the locking rod to set top dead center.
Fill with coolant.
Check the engine oil level, top up if necessary. If the cylinder head was removed to replace a blown cylinder head gasket, it is recommended to change the oil and replace the oil filter, as coolant may have gotten into the oil.
This article is available at russian, bulgarian, belarusian, ukrainian, serbian, croatian, romanian, polish, slovak, hungarian
Article verified: Polikarpov Saveliy
Share information:
Previous articles
БМВ E34: Engine repair
Next articles
Similar articles on other types of BMW cars:
Removal and installation the cylinder head. Models 318tds/325td… BMW 3 Series E36 (1990-2000)
Removal and installation the cylinder head BMW 3 Series E30 (1982-1994)
Cylinder head of the M70 series gasoline engine — removal and… BMW 7 Series E32 (1986-1994)
Removal and installation cylinder head covers BMW 7 Series E38 (1994-2001)
Removal and installation the cylinder head BMW X3 E83 (2003-2010)
Removal and installation the engine BMW X5 E53 (1999-2006)
Link in different formats to this page
Visitor comments
No comments yet
- General information
- Governing bodies
- Manual
- Maintenance
- Power unit
- Engine repair
- Lubrication system
- Cooling system
- Ignition system
- Supply system
- Injection system (gasoline)
- Injection system (diesel)
- Exhaust system
- Transmission
- Clutch
- Car gearbox
- Front axle
- Rear axle
- Chassis
- Steering
- Brake system
- Wheels and tires
- Body
- Interior
- Exterior
- Heating system
- Electrical equipment
- Equipment and devices
- Power devices
- Windscreen wipers
- Electrical circuits
- General information
- Manual
- Maintenance
- Power unit
- Engine repair
- Ignition system
- Engine lubrication system
- Cooling system
- Fuel system (gasoline)
- Fuel system (diesel)
- Exhaust system
- Transmission
- Clutch
- Car gearbox
- Chassis
- Front and rear suspension
- Steering
- Brake system
- Body
- Exterior
- Interior
- Electrical equipment
- Heating system
- Equipment and devices
- Power devices
- Electrical circuits
- General information
- Manual
- Maintenance
- Power unit
- Engine in a car
- Engine overhaul
- Cooling system
- Supply system
- Ignition system
- Control system
- Transmission
- Clutch
- Manual gearbox
- Automatic gearbox
- Transmission line
- Chassis
- Steering
- Front suspension
- Rear suspension
- Brake system
- Body
- Body elements
- Car care and painting
- Electrical equipment
- Heater and air conditioner
- Equipment and devices
- Starter and generator
- Electrical circuits
- General information
- Operation and maintenance
- Specifications
- Power unit
- Engine repair
- Cooling and lubrication system
- Supply system
- Ecotronic power supply system
- Fuel injection system
- Ignition system
- Transmission
- Clutch
- Gearbox BMW 242/4
- Gearbox Getrag 262/8
- Gearbox Getrag 265/6
- Automatic gearbox
- Cardan gear
- Rear axle
- Chassis
- Steering
- Front suspension
- Rear suspension
- Brake system
- Electrical equipment
- Equipment and devices
- Electrical circuits