
Note: This chapter contains features specific to this series of engines. For general information on minor engine repairs, please refer to the previous chapters of this book.
The gearbox is not removed. Remove the coolant manifold between the cylinder heads at the rear.
Remove the intake manifold. Remove the ignition cables with the distributor cap.
Remove the cylinder head covers.
Remove the distributor rotor, adapter and distributor housing.
Turn the crankshaft to the TDC position of the piston of the first cylinder and lock it with a device to prevent it from turning.
Loosen the camshaft drive chain.
Remove the upper camshaft sprocket cover.
Remove the middle chain guide bar.
Loosen the left damper bar and remove it from the guide.
Remove the camshaft chain sprockets.
Remove the rear part of the upper camshaft sprocket box. Watch the released guides.
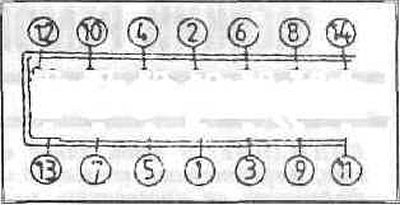
Loosen the cylinder head bolts from the outside in in the reverse order shown and remove the heads.
Place the heads on the sealing surfaces. The heads must lie like this, otherwise oil will leak out of the hydraulic tappets.
Installation
Degrease the gasket mating surfaces.
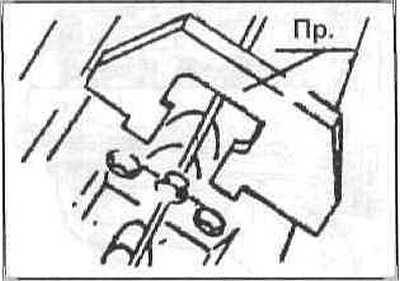
For precise installation, make guide pins from 4 old head bolts. To do this, cut off the heads of the bolts and cut slots for a screwdriver.
Screw the guide pins into the outer head holes (from the intake side).
Remove the head gaskets from the packaging and place them on the block.

Note: Both gaskets must be removed from the packaging immediately before installation. The coating of the gaskets oxidizes very quickly, which affects the safety of the gaskets.
Make sure that the crankshaft is in the TDC position of the piston of the first cylinder.
Install the head camshafts as shown in the figure. The dowel pins point inward.
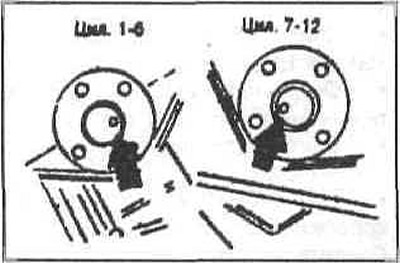
Bring the camshaft to the installation position.
In this position, install the heads and tighten the bolts by hand (clean and slightly lubricated).
Use bolts instead of guide pins.
Install the rear of the timing chain case with the guide bushings. Tighten the bolts by hand.
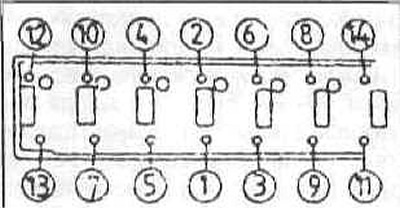
Tighten the cylinder head bolts in the sequence shown in the illustration.
- 1st step - with a force of 15 Nm, pause for 15 minutes.
- 2nd move - turn 120°.
Tighten the upper timing gear case to 10 Nm. First the vertical bolts, then the others. Install the camshaft chain with sprockets so that the chain can be adjusted in the area of the bolt splines. Tighten the bolts by hand.
Install the damper bars.
Adjust the chain tensioner:
- Loosen the set bolt completely.
- Turn the engine in the direction of travel one revolution.
- Measure size A.
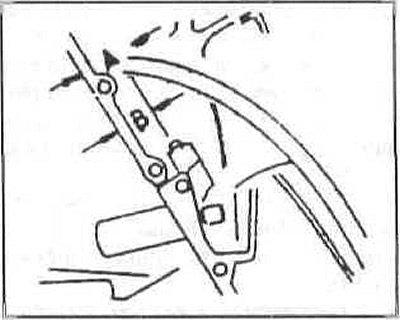
Press the tensioner bar all the way against the spring force.
Measure size B. The difference should be A-B = 6±0.5 mm.
Install the set bolt and tighten the lock nut.
Align the camshafts using a feeler gauge and tighten the chain sprockets to 10 Nm.
After turning the engine two more revolutions, check the installation position of the camshafts again. Correct if necessary.
Install the outer top cover of the timing chain case.
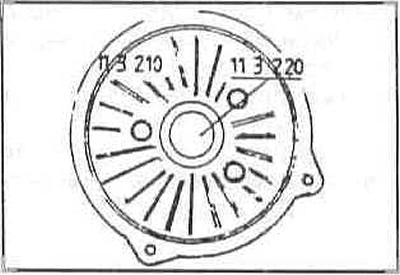
Center the distributor cap to the camshaft using tool 11 3 220.
Install the adapters and tighten to 24 Nm. Take into account the central pin.
Install the distributor runners. Tightening torque 6 Nm.
Install the distributor caps with spark plug wires.
Secure the exhaust manifold to the pipe.
Fill the cooling system and bleed air from it.
Check the engine operation while driving.