
Table of contents: Removal ↓ Installation ↓ Engine M20 (cylinder head bolts with…↓ Engine M30 ↓ Engine M21 ↓
- Home
- BMW 5 Series
- E34
- Power unit
- Engine repair
- Removal and installation of cylinder head — engines M20, M21, M30
Removal and installation of cylinder head — engines M20, M21, M30 (BMW 5 Series E34)
The cylinder head is removed on a cold engine. The intake and exhaust manifolds do not unscrew.
Signs of a defective cylinder head gasket are:
Remove the engine compartment hood.
Drain the coolant
Disconnect the wires from the battery.
Disconnect the cables from the throttle lever. Unscrew the bracket.
Disconnect the air inlet hose.
Disconnect the air flow meter and idle air control valve connectors.
Disconnect the water hoses from the thermostat.
Mark with masking tape and disconnect the fuel hoses.
If equipped, disconnect the connectors under the inlet pipe and remove the hose.
Unscrew the engine wiring harness and set it aside.
Remove the fan.
Disconnect the heater hose under the idle speed control valve, having first released and pulled back the clamps.
Remove the oil dipstick and unscrew the guide tube from the air manifold.
Remove the timing belt.
Disconnect the heater hose from the cylinder head.
Remove the cylinder head cover.
Press down, overcoming the spring force, the crankcase ventilation tube under the intake manifold and secure it with the BMW-111290 device. You can also use a suitable metal or wire clamp to secure it.
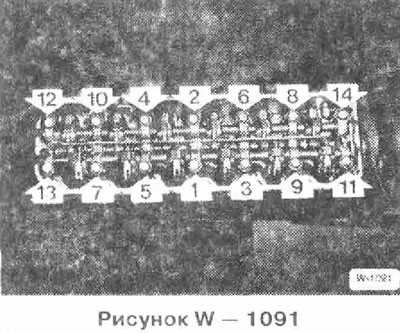
Loosen the cylinder head bolts in reverse order, i.e. from 14 to 1.
Remove the cylinder head.
Before installation, clean the cylinder head and cylinder block from the remains of the old seal. Do not allow the remains of the seal to get into the cylinder holes.
Cover the cylinder holes with rags.
Measure the flatness of the cylinder head and engine block with a steel ruler in the longitudinal and transverse directions and, if necessary, mill it (work at a service station). See table 1.
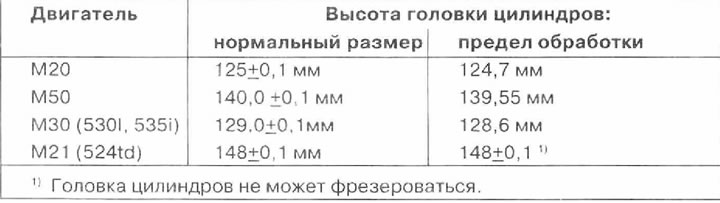
Check the cylinder head for cracks and its working surfaces for scratches.
Thoroughly clean the cylinder head bolt holes from oil and other objects.
Be sure to replace the cylinder head gasket.
Apply a new gasket without sealing compound so that it does not cover the holes.
Before installing the cylinder head, check that the camshaft is at top dead center.
Install the cylinder head. To guide the head, you can use 2 old cylinder head bolts, having previously sawed off their heads and sawed off slots for a screwdriver.
Be sure to replace and lightly lubricate the cylinder head bolts with engine oil.
Insert and tighten the cylinder head bolts by hand, lubricated with engine oil.
(Figure W-1091)
Check the ventilation tube for damage or cracking and replace it if necessary. Remove the BMW-111209 tool and ensure that the tube returns to its correct original position.
Install the timing belt.
Place the heater hose on the cylinder head and secure with a clamp.
Screw on the oil dipstick guide tube and insert the dipstick.
Install the heating hose.
Install the fan, ensuring that the fan housing is correctly positioned in the lower guide rails.
Install and screw the cable block.
Connect the round connector, tighten the knurled nut.
Connect the water hoses to the thermostat housing and secure them with clamps.
Install and tension the V-belt.
Connect all water, fuel and vacuum hoses and secure them with clamps.
Connect the electrical wires according to the markings.
Connect the throttle cables and screw on the bracket.
Bolt the front muffler pipe to the exhaust manifold.
Install the cylinder head cover.
Install the engine compartment hood.
Connect the wires to the battery.
Fill with coolant.
Check the engine oil level, top up if necessary. If the cylinder head was removed to replace a blown cylinder head gasket, it is recommended to change the oil and replace the oil filter, as coolant may have gotten into the oil.
Unscrew the intake manifold support.
See Figure W-1082
Unscrew the top cover 1 of the gearbox. Additionally shown parts:
Remove the chain tensioner piston.
Unscrew the chain sprocket from the camshaft. At the same time, insert the key and loosen the bolts with light blows on the handle of the key.
See figure W - 1030
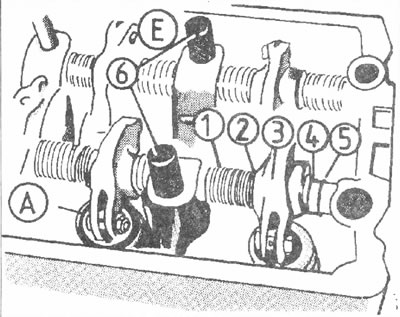
Insert the locking pins 6 (BMW 111063), so that when unscrewing the cylinder head bolts the rocker shafts do not turn. Additional parts shown:
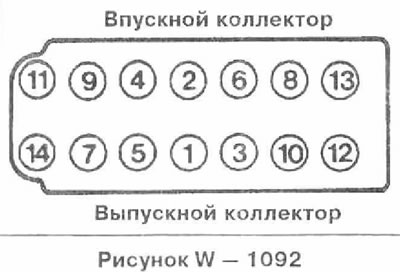
Ansaugkrummer — Intake manifold
Abgaskrummer — Intake manifold
In sequence 14 to 1, first loosen the cylinder head bolts ½ turn and then remove them.
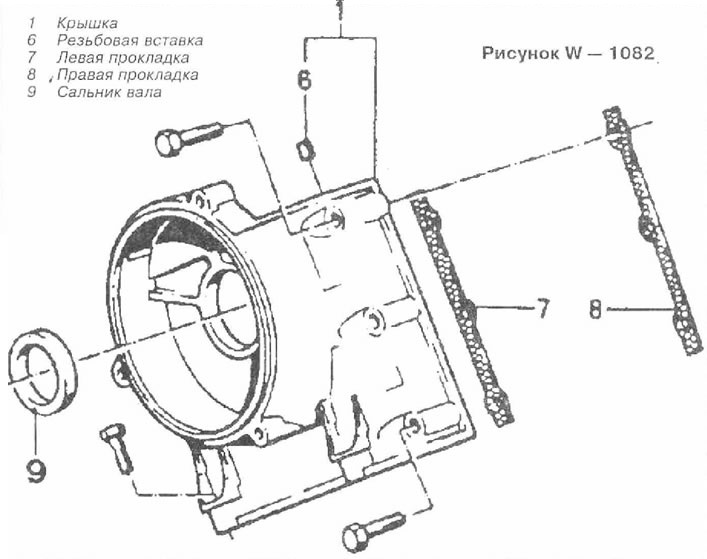
1 Lid
6 Threaded insert
7 Left gasket
8 Right gasket
9 Shaft seal
Secure the chain sprocket to the camshaft flange with a tightening torque of 7 Nm,
Install the tensioner piston. Tighten the M6 bolts with a tightening torque of 10 Nm, and the M8 bolts with a tightening torque of 22 Nm.
Tighten the intake manifold support.
Drain the oil from the engine.
Remove the expansion tank.
Remove the turbocharger.
Remove the support from the air collector and loosen the fastening on the engine block.
Unscrew the bracket from the cylinder head.
Disconnect the wires from the glow plugs.
Unscrew the oil separator.
Loosen the union nuts of the injection pipes on the injectors and remove the high-pressure fuel pump. This requires a special HAZET 4550 key.
Close the holes with protective caps.
Remove the cylinder head cover.
Set the engine to the top dead center position. To do this, shift the gearbox into neutral, tighten the handbrake. Turn the crankshaft pulley in the direction of engine rotation until the top dead center mark is set opposite the notch on the toothed belt cover. In this case, the valves of cylinder 6 should intersect. The cylinders are numbered from 1 to 6 from front to back. The valves intersect when the camshaft is in such a position that both cams corresponding to cylinder 6 are facing upwards.
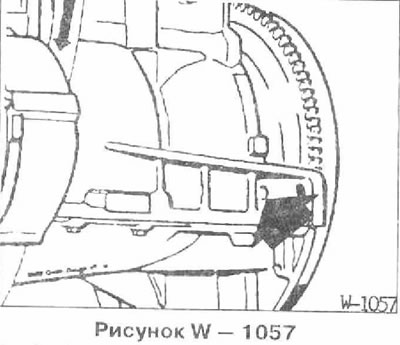
Fix the crankshaft in the top dead center position with the appropriate rod. To do this, insert the rod through the hole "arrow" in the engine block into the hole in the flywheel.
Unscrew the timing belt cover, having first removed the water hose.
Loosen the timing belt tension and remove it from the camshaft toothed pulley.
Loosen the camshaft timing pulley bolt.
Loosen the tensioner nut and bolt.
(Figure W 1097) In sequence 14 to 1, first loosen the cylinder head bolts ½ turn and then remove them.
Install a new cylinder head gasket.
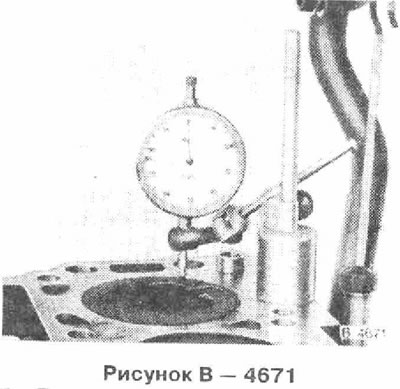
Check the pistons and valves for wear and replace them if necessary. If the signs of wear are small, it is enough to install a thicker gasket. To do this, measure the piston protrusions with a dial indicator.
Cylinder head thickness:
Adjust valve clearances.
Check the high pressure fuel pump feed timing.
Apply and tighten the timing belt.
Screw on the timing belt cover without tightening the bolts. Tighten the bolts only after installing the cylinder head cover.
Install the cylinder head cover.
Install the fuel pipes, tighten the union nuts to 20 Nm. If there are any leaks, tighten the nuts to 25 Nm.
Tighten the oil separator with a tightening torque of 17 Nm, after checking the integrity and replacing the sealing ring if necessary.
Screw the bracket to the cylinder head.
Attach the wires to the glow plugs.
Screw the support to the air collector and the engine block.
Install the turbocharger.
Install the expansion tank.
Fill the engine with oil.
Signs of a defective cylinder head gasket are:
- loss of engine power.
- decrease in coolant level, white smoke from exhaust gases when the engine is warm.
- coolant in engine oil. Oil level does not decrease, but on the contrary increases. Gray color of oil in the engine, foam on the oil dipstick. Oil dilution.
- engine oil in coolant, oil loss.
- strong bubbling of coolant.
- lack of compression in two adjacent cylinders.
Removal
Note: Some work is described in more detail in the section "Engine Removal and Installation", so it is recommended that you also read this section first. The description applies to the M20 engine. Additional instructions, as well as tightening torques for the M30 and M21 engines, are given at the end of the section.
Remove the engine compartment hood.
Drain the coolant
Disconnect the wires from the battery.
Disconnect the cables from the throttle lever. Unscrew the bracket.
Disconnect the air inlet hose.
Disconnect the air flow meter and idle air control valve connectors.
Disconnect the water hoses from the thermostat.
Mark with masking tape and disconnect the fuel hoses.
If equipped, disconnect the connectors under the inlet pipe and remove the hose.
Unscrew the engine wiring harness and set it aside.
Remove the fan.
Disconnect the heater hose under the idle speed control valve, having first released and pulled back the clamps.
Remove the oil dipstick and unscrew the guide tube from the air manifold.
Remove the timing belt.
Disconnect the heater hose from the cylinder head.
Remove the cylinder head cover.
Press down, overcoming the spring force, the crankcase ventilation tube under the intake manifold and secure it with the BMW-111290 device. You can also use a suitable metal or wire clamp to secure it.
Loosen the cylinder head bolts in reverse order, i.e. from 14 to 1.
Note: The cylinder head can also be secured with Torx head bolts.
Remove the cylinder head.
Caution: Do not place the cylinder head on the contact surface after removal, otherwise the fully open valves may be damaged. Therefore, the cylinder head should be placed on 2 wooden pads.
Installation
Before installation, clean the cylinder head and cylinder block from the remains of the old seal. Do not allow the remains of the seal to get into the cylinder holes.
Cover the cylinder holes with rags.
Measure the flatness of the cylinder head and engine block with a steel ruler in the longitudinal and transverse directions and, if necessary, mill it (work at a service station). See table 1.
Check the cylinder head for cracks and its working surfaces for scratches.
Thoroughly clean the cylinder head bolt holes from oil and other objects.
Caution: There must be no oil in the recesses, otherwise the bolts will not tighten the cylinder head completely, even though they are tightened to the required torque. In addition, the engine block may crack.
Be sure to replace the cylinder head gasket.
Apply a new gasket without sealing compound so that it does not cover the holes.
Note: With a milled cylinder head, a cylinder head gasket of normal thickness or one 0.3 mm thicker can be installed depending on the height of the modified cylinder head. Installing a thicker gasket prevents the combustion chamber volume from being reduced.
Before installing the cylinder head, check that the camshaft is at top dead center.
Install the cylinder head. To guide the head, you can use 2 old cylinder head bolts, having previously sawed off their heads and sawed off slots for a screwdriver.
Be sure to replace and lightly lubricate the cylinder head bolts with engine oil.
Please note: M20 engines may have been equipped with regular hex bolts, which must be replaced with socket head bolts.
Insert and tighten the cylinder head bolts by hand, lubricated with engine oil.
Attention: Tighten the cylinder head bolts very carefully. Before tightening the bolts, check the accuracy of the torque wrench. In addition, a protractor is required to tighten the cylinder head bolts, for example, the HAZET 6690. If you do not have a protractor, place the wrench on the bolt head, apply a square to the wrench handle and mark the desired angle with chalk. Then turn the wrench handle in one pass to the line marked with chalk.
Engine M20 (cylinder head bolts with torx heads)
(Figure W-1091)
- 1st pass: with a torque wrench to a tightening torque of 30 Nm.
- 2nd pass: with a rigid wrench at 90° (¼ turn).
- 3rd pass: with a rigid key at 90°.
Check the ventilation tube for damage or cracking and replace it if necessary. Remove the BMW-111209 tool and ensure that the tube returns to its correct original position.
Install the timing belt.
Place the heater hose on the cylinder head and secure with a clamp.
Screw on the oil dipstick guide tube and insert the dipstick.
Install the heating hose.
Install the fan, ensuring that the fan housing is correctly positioned in the lower guide rails.
Install and screw the cable block.
Connect the round connector, tighten the knurled nut.
Connect the water hoses to the thermostat housing and secure them with clamps.
Install and tension the V-belt.
Connect all water, fuel and vacuum hoses and secure them with clamps.
Connect the electrical wires according to the markings.
Connect the throttle cables and screw on the bracket.
Bolt the front muffler pipe to the exhaust manifold.
Install the cylinder head cover.
Install the engine compartment hood.
Connect the wires to the battery.
Fill with coolant.
Check the engine oil level, top up if necessary. If the cylinder head was removed to replace a blown cylinder head gasket, it is recommended to change the oil and replace the oil filter, as coolant may have gotten into the oil.
Caution: Do not tighten the cylinder head bolts.
Engine M30
Removal
Unscrew the intake manifold support.
See Figure W-1082
Unscrew the top cover 1 of the gearbox. Additionally shown parts:
Remove the chain tensioner piston.
Unscrew the chain sprocket from the camshaft. At the same time, insert the key and loosen the bolts with light blows on the handle of the key.
See figure W - 1030
Insert the locking pins 6 (BMW 111063), so that when unscrewing the cylinder head bolts the rocker shafts do not turn. Additional parts shown:
- 1 Spring
- 2 Washer
- 3 Rocker
- 4 Distance ring
- 5 Spacer ring
- A Exhaust valve rocker shaft
- E Intake valve rocker shaft
Ansaugkrummer — Intake manifold
Abgaskrummer — Intake manifold
In sequence 14 to 1, first loosen the cylinder head bolts ½ turn and then remove them.
1 Lid
6 Threaded insert
7 Left gasket
8 Right gasket
9 Shaft seal
Installation
Note: Cylinder head bolts are tightened in sequence 1 through 14 in several passes:
- 1st pass: tighten bolts 1 to 6 to 60 Nm: remove locking pins tighten bolts 7 to 14 to 60 Nm. Then wait 20 minutes.
- 2nd pass: tighten the bolts with a torque wrench to 80 Nm.
After 25 minutes of engine operation:
- 3rd pass: tighten with a rigid wrench to 35 degrees.
Secure the chain sprocket to the camshaft flange with a tightening torque of 7 Nm,
Note: Place the chain so that the centering pin on the sprocket is located at the bottom left with the threaded holes vertical.
Install the tensioner piston. Tighten the M6 bolts with a tightening torque of 10 Nm, and the M8 bolts with a tightening torque of 22 Nm.
Tighten the intake manifold support.
Engine M21
Removal
Drain the oil from the engine.
Remove the expansion tank.
Remove the turbocharger.
Remove the support from the air collector and loosen the fastening on the engine block.
Unscrew the bracket from the cylinder head.
Disconnect the wires from the glow plugs.
Unscrew the oil separator.
Loosen the union nuts of the injection pipes on the injectors and remove the high-pressure fuel pump. This requires a special HAZET 4550 key.
Close the holes with protective caps.
Remove the cylinder head cover.
Set the engine to the top dead center position. To do this, shift the gearbox into neutral, tighten the handbrake. Turn the crankshaft pulley in the direction of engine rotation until the top dead center mark is set opposite the notch on the toothed belt cover. In this case, the valves of cylinder 6 should intersect. The cylinders are numbered from 1 to 6 from front to back. The valves intersect when the camshaft is in such a position that both cams corresponding to cylinder 6 are facing upwards.
Fix the crankshaft in the top dead center position with the appropriate rod. To do this, insert the rod through the hole "arrow" in the engine block into the hole in the flywheel.
Unscrew the timing belt cover, having first removed the water hose.
Loosen the timing belt tension and remove it from the camshaft toothed pulley.
Loosen the camshaft timing pulley bolt.
Loosen the tensioner nut and bolt.
(Figure W 1097) In sequence 14 to 1, first loosen the cylinder head bolts ½ turn and then remove them.
Installation
Install a new cylinder head gasket.
Note: Depending on the height of the piston protrusions above the surface, three gaskets of different thicknesses are installed. When replacing a gasket, pay attention to its marking and install a new gasket only with the same marking. The marking holes serve as gasket markings.
Check the pistons and valves for wear and replace them if necessary. If the signs of wear are small, it is enough to install a thicker gasket. To do this, measure the piston protrusions with a dial indicator.
Cylinder head thickness:
- 1 hole thickness 1.55 mm
- 2 holes thickness 1.68 mm
- 3 holes thickness 1.87 mm
Caution: The cylinder head bolts are tightened in sequence 1 through 14 (Figure W - 1097) in three passes:
- 1st pass: tighten the bolts with a torque wrench to 50 Nm
- 2nd pass: tighten bolts 1 through 10 with a rigid wrench by 90°, bolts 11 through 14 by 73°.
After 15 minutes of engine operation:
- 3rd pass: tighten with a rigid wrench to 90 degrees.
Adjust valve clearances.
Check the high pressure fuel pump feed timing.
Apply and tighten the timing belt.
Screw on the timing belt cover without tightening the bolts. Tighten the bolts only after installing the cylinder head cover.
Install the cylinder head cover.
Caution: Pull out the locking rod.
Install the fuel pipes, tighten the union nuts to 20 Nm. If there are any leaks, tighten the nuts to 25 Nm.
Tighten the oil separator with a tightening torque of 17 Nm, after checking the integrity and replacing the sealing ring if necessary.
Screw the bracket to the cylinder head.
Attach the wires to the glow plugs.
Screw the support to the air collector and the engine block.
Install the turbocharger.
Install the expansion tank.
Fill the engine with oil.
This article is available at russian, bulgarian, belarusian, ukrainian, serbian, croatian, romanian, polish, slovak, hungarian
Article verified: Polikarpov Saveliy
Share information:
Previous articles
БМВ E34: Engine repair
Next articles
Similar articles on other types of BMW cars:
Removal and installation the cylinder head. Models 320i, 325i, 328i… BMW 3 Series E36 (1990-2000)
Removal and installation the cylinder head BMW 3 Series E30 (1982-1994)
Cylinder head of gasoline engines of the M52 series — removal and… BMW 7 Series E32 (1986-1994)
Removal and installation cylinder head covers BMW 7 Series E38 (1994-2001)
Removal and installation the cylinder head BMW X3 E83 (2003-2010)
Removal and installation the lock cylinder BMW X5 E53 (1999-2006)
Removal and installation the cylinder head. Models 320i, 325i, 328i… BMW 3 Series E36 (1990-2000)
Removal and installation the cylinder head BMW 3 Series E30 (1982-1994)
Cylinder head of gasoline engines of the M52 series — removal and… BMW 7 Series E32 (1986-1994)
Removal and installation cylinder head covers BMW 7 Series E38 (1994-2001)
Removal and installation the cylinder head BMW X3 E83 (2003-2010)
Removal and installation the lock cylinder BMW X5 E53 (1999-2006)
Link in different formats to this page
Visitor comments
No comments yet
- General information
- Governing bodies
- Manual
- Maintenance
- Power unit
- Engine repair
- Lubrication system
- Cooling system
- Ignition system
- Supply system
- Injection system (gasoline)
- Injection system (diesel)
- Exhaust system
- Transmission
- Clutch
- Car gearbox
- Front axle
- Rear axle
- Chassis
- Steering
- Brake system
- Wheels and tires
- Body
- Interior
- Exterior
- Heating system
- Electrical equipment
- Equipment and devices
- Power devices
- Windscreen wipers
- Electrical circuits
- General information
- Manual
- Maintenance
- Power unit
- Engine repair
- Ignition system
- Engine lubrication system
- Cooling system
- Fuel system (gasoline)
- Fuel system (diesel)
- Exhaust system
- Transmission
- Clutch
- Car gearbox
- Chassis
- Front and rear suspension
- Steering
- Brake system
- Body
- Exterior
- Interior
- Electrical equipment
- Heating system
- Equipment and devices
- Power devices
- Electrical circuits
- General information
- Manual
- Maintenance
- Power unit
- Engine in a car
- Engine overhaul
- Cooling system
- Supply system
- Ignition system
- Control system
- Transmission
- Clutch
- Manual gearbox
- Automatic gearbox
- Transmission line
- Chassis
- Steering
- Front suspension
- Rear suspension
- Brake system
- Body
- Body elements
- Car care and painting
- Electrical equipment
- Heater and air conditioner
- Equipment and devices
- Starter and generator
- Electrical circuits
- General information
- Operation and maintenance
- Specifications
- Power unit
- Engine repair
- Cooling and lubrication system
- Supply system
- Ecotronic power supply system
- Fuel injection system
- Ignition system
- Transmission
- Clutch
- Gearbox BMW 242/4
- Gearbox Getrag 262/8
- Gearbox Getrag 265/6
- Automatic gearbox
- Cardan gear
- Rear axle
- Chassis
- Steering
- Front suspension
- Rear suspension
- Brake system
- Electrical equipment
- Equipment and devices
- Electrical circuits