
- Home
- BMW 7 Series
- E32
- Electrical equipment
- Equipment and devices
- Battery capacity — check
Battery capacity — check (BMW 7 Series E32)
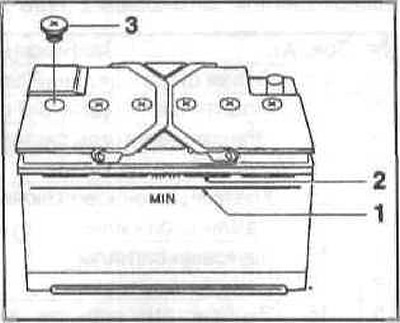
Checking the electrolyte level
The electrolyte level in individual cans should be between the MIN (1) and MAX (2) marks. If necessary, unscrew the battery plugs (3) and add distilled water.
Checking voltage
The condition of the battery is checked by measuring its voltage. Disconnect the wire from the battery.
Before checking, the battery must stand discharged for at least 2 hours. Connect a voltmeter to the battery and measure the voltage.
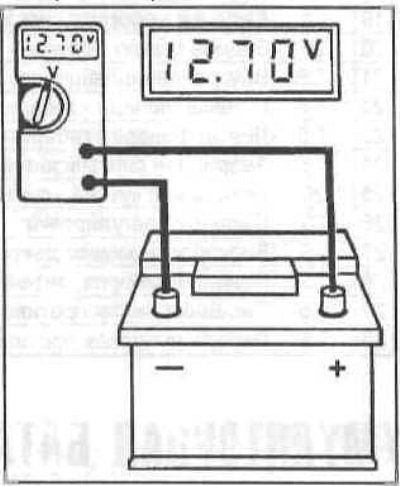
Measurement results:
- 12.7V or higher - battery is in good condition;
- 12.5 V - normal condition;
- 12.3 V or lower - the battery is in bad condition, charge it or replace it. Connect the wires to the battery.
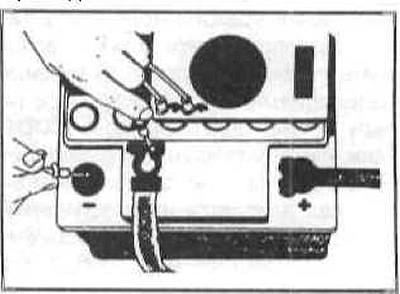
Checking the battery under load
Connect the voltmeter to the battery terminals.
Start the battery and measure the voltage.
During engine starting, the voltage on the battery should not drop below 10 V.
If the voltage drops sharply, and the electrolyte in different battery banks has different densities, then this indicates a faulty battery.
Checking the density of the electrolyte (not carried out on unattended AB)
The density of the electrolyte together with the results of voltage measurements allows to make an accurate conclusion about the state of charge of the battery. A hydrometer is used for measurements. The density of the electrolyte is measured in g/ml (g/cm³) or degrees.

The following values can be obtained during measurements (electrolyte temperature 20°C).
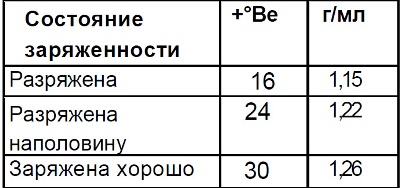
Check all the AB cans one by one - they should have the same electrolyte density (the acceptable difference is 0.04 g/ml). If this is not the case, then the AB is faulty.
Self-discharge of the battery
Depending on the vehicle configuration, the natural self-discharge of the battery is supplemented by the current consumption of various control units and systems in a non-operating state. In this case, the battery must be recharged every 6 weeks when the vehicle is not in operation. If there is a suspicion of leakage currents, the electrical equipment must be checked as follows.
A charged battery is used for testing.
Turn off all current consumers, including clocks and other non-disconnectable consumers.
Close the doors, hood and trunk
Disconnect the negative cable from the battery.
On the ammeter (with measurement limits of 0-5mA and 0-5A) turn on the maximum measurement limit. Connect the ammeter between the negative terminal of the battery and the negative wire connected to it.
Note: The test can also be performed using a test lamp. If the lamp connected between the negative wire and the negative contact of the battery does not light, then an ammeter must be used.
Turn the ammeter measurement ranges one by one until a readable current value is obtained (maybe 1-3 mA).
Pulling out fuses one by one, break various circuits. If the current drops to zero when pulling out a fuse, you need to look for the cause in the corresponding circuit. The reasons may be the following: corroded or dirty contacts, frayed wire insulation, internal short circuit in the units.
If no faults are detected in the circuits protected by fuses, then it is necessary to disconnect the wires from the units not protected by fuses: the ignition system, generator and starter.
If the current drops to zero when one of the unprotected units is disconnected, the parts must be repaired or replaced. If there are current leaks in the starter or ignition system, the ignition switch must also be checked.
Connect the negative wire to the battery, restore the clock readings and radio settings.
This article is available at russian, bulgarian, belarusian, ukrainian, serbian, croatian, romanian, polish, slovak, hungarian
Article verified: Sevastyanov Nikolay
Share information:
Previous articles
БМВ E32: Equipment and devices
Next articles
Similar articles on other types of BMW cars:
Battery charging system — check BMW 3 Series E46 (1998-2006, petrol)
Pressure check BMW 3 Series E21 (1975-1983)
Replacing the check valve of the throttle valve servo of the 1st… BMW 5 Series E12 (1972-1981)
Battery BMW 5 Series E34 (1988-1996)
Brake booster check valve BMW X3 E83 (2003-2010)
Battery — care and charging BMW X5 E53 (1999-2006)
Link in different formats to this page
Visitor comments
No comments yet
- General information
- Introduction to guide
- Manual
- Maintenance
- Power unit
- Engine M60/1, M60/2 (petrol)
- M62 engine (petrol)
- M57 engine (diesel)
- M67 engine (diesel)
- Cooling system
- Fuel system (petrol)
- Fuel system (diesel)
- Exhaust system
- Ignition and control systems
- Charge and launch systems
- Transmission
- Clutch
- Mechanical gearbox
- Automatic gearbox
- Cardan and drive shafts
- Chassis
- Brake system
- Front suspension
- Rear suspension
- Steering
- Body
- Exterior
- Interior
- Electrical equipment
- Equipment and devices
- Lighting
- Heating and air conditioning
- Electrical circuits
- General information
- Care and maintenance
- Power unit
- Minor engine repair
- Engine overhaul
- Lubrication system
- Cooling system
- Ignition system
- Supply system
- Injection system (petrol)
- Injection system (diesel)
- Exhaust system
- Transmission
- Clutch
- Manual gearbox
- Automatic gearbox
- Cardan gear
- Rear axle and shafts
- Chassis
- Front suspension
- Rear suspension
- Steering
- Wheels and tires
- Brake system
- Body
- Body elements
- Electrical equipment
- Equipment and devices
- Electrical circuits