
Removal and installation of all injectors of the injection system (M47T2)
Attention:
- When working with oil, fuel and coolant circuits, the generator must be protected from contamination.
- Cover the generator.
- Failure to comply with this condition may result in generator failure.
Attention:
- When working with the power supply system, extreme cleanliness must be maintained.
- Do not allow dirt or foreign objects to enter the system.
- Use only lint-free cloths.
- Before installation, clean pipelines or parts from dirt.
- Seal all open holes in the fuel system with protective plugs.
Attention:
- Collect and dispose of leaking fuel.
- Observe the applicable national disposal regulations.
1. Read fault codes in the DDE control unit.
2. Turn off the ignition.
3. The structure of the Common Rail system.
4. Remove all leaking fuel drain lines.
5. Remove the intake manifold.
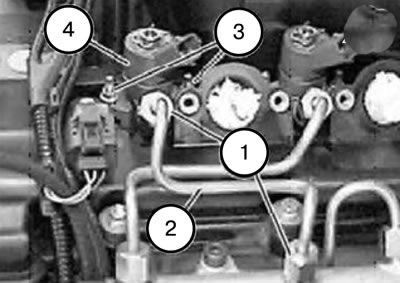
6. Unscrew the union nuts (1) securing the high-pressure pipelines using tool 135020 on the injectors (4) and loosen them on the receiver.
Note: To avoid deformation of high-pressure pipelines, adjust the device in advance.
7. Unscrew the nut (3).
Tightening torque: 9 Nm.
8. Remove the nozzle (4).
Attention:
- Risk of injector failure. It is essential to observe the tightening torques of the union nuts.
Tightening torque: 70 Nm.
- Tighten all union nuts of pressure pipes by hand.
- Tighten the union nuts on the injectors to the specified tightening torque.
- Tighten the union nuts on the receiver and on the high pressure pump.
- Visually check the tightness of all components of the Common Rail system.
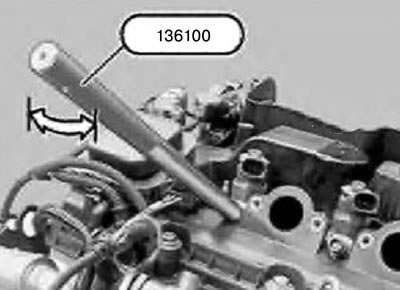
Note:
- If the injectors are tightly seated, use the 136100 tool, which is mounted on the injector fitting.
- Remove the nozzle by gently rocking it from side to side.
Please note: The swinging space of the rod puller is limited by the lateral edge clearance of up to several degrees.
Note:
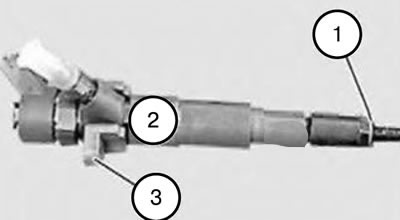
- Check whether the sealing ring (1) remains on the removed injector.
- If not, the sealing ring (1) must be removed from the cylinder head.
Note:
- When installing, it is necessary to replace the sealing ring (1) on the nozzle (2).
- Replace the injector stem sealing ring.
- Pay attention to the position of the flange (3).
- Lightly lubricate the injector rod with high temperature resistant lubricant (bMW part number 83230441070).
Note: Before installing the injectors, it is necessary to clean the corresponding channels.
Note:
- If you replace the injectors, you need to perform "Correction of the amount of fuel injected by the injectors":
- Boat key DIS-tester.
- Identify the vehicle.
- Select "Select Function".
- Select "Additional features".
Note:
- When installing new injectors, you need to read 1 MA codes accordingly.
- EU 3: Correction Value (6-digit alphanumeric code) engraved on each nozzle.
- EU 4: Correction Value (7-digit alphanumeric code) engraved on each nozzle.
- Enter numbers/letters according to the installation location (cylinder) of the new injectors.
- Select "Digital Electronic Diesel Engine Management System".
- Select "Corrections, correction of the amount of fuel injected by the injectors".
- Select "Test Plan".
- For each cylinder, when replacing one injector, a correction value must be entered.
Note: New injectors must be adjusted to ensure they operate fully.
9. Installation should be carried out in the reverse order of removal, taking into account the above notes.
Note:
- Check the recorded fault codes.
- Clear fault codes.