
Table of contents: Removal ↓ Installation ↓
- Home
- BMW 3 Series
- E30
- Transmission
- Manual gearbox
- Removal and installation the gearbox
Removal and installation the gearbox (BMW 3 Series E30)
The instructions for removal and installation do not apply to the gearbox of all-wheel drive vehicles and to the sports gearbox.
Raise the car.
Remove the exhaust system (see section "Removal and installation of the exhaust system").
Remove the heat-insulating screen.
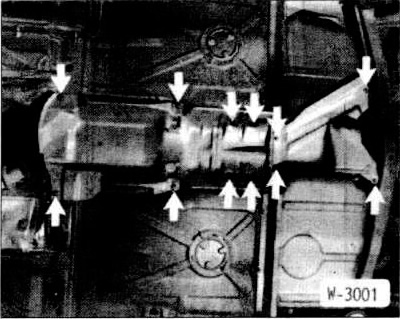
Unscrew the drive shaft disc from the gearbox. For a design with a built-in vibration damper, unscrew the nuts on the drive shaft disc.
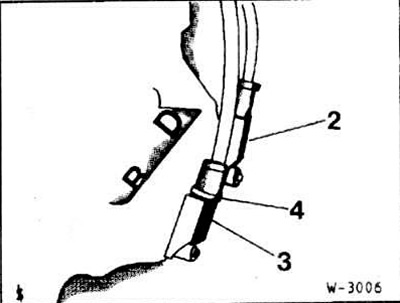
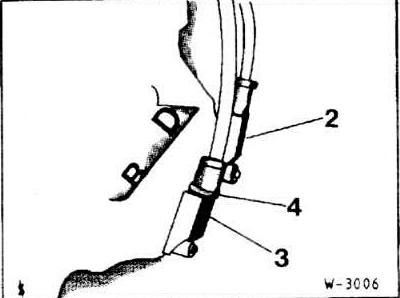
Use a pipe wrench to loosen the threaded ring (arrow) in the middle of the cardan shaft by several turns.
Unscrew the middle support "A" of the cardan shaft.
Tilt the cardan shaft downwards and pull it out of the centering journal.
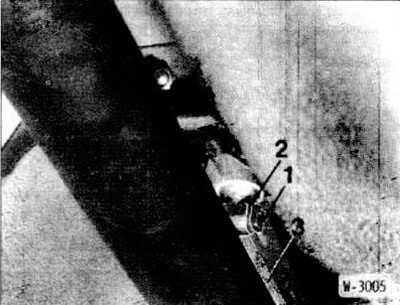
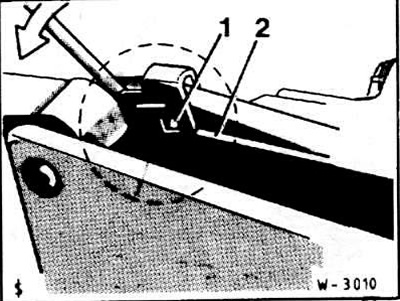
With the cardan shaft removed, disconnect the locking bracket "1" from the shift rod, remove the washer "2" and pull out the rod "3".
Disconnect the reverse light switch wire from the rear of the gearbox.
Unscrew the shift console from the rear of the gearbox.
On vehicles with a gearshift lever: remove the spring from the nose on the housing with a screwdriver and move it back. Pull the support pin.
Remove the clutch slave cylinder. The hydraulic drives remain connected (see section "Removal and installation the clutch slave cylinder").
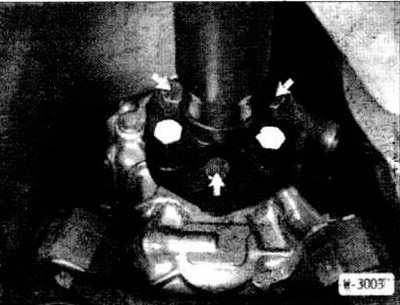
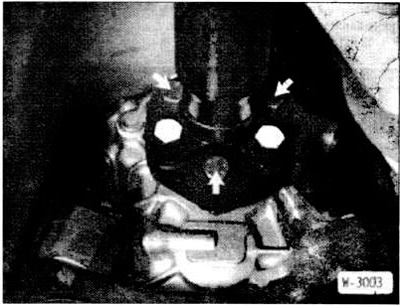
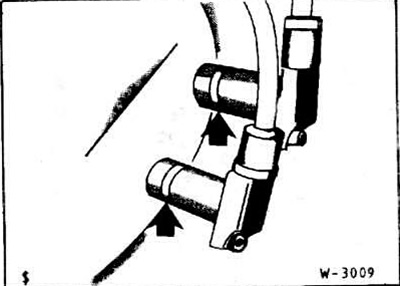
On vehicles with OME (Motronic): remove the heat-insulating shield. Pull out the speed sensor "2" and the reference mark sensor "3".
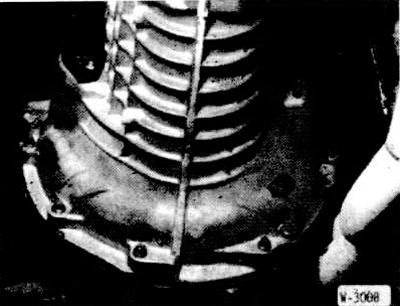
Support the gearbox with a jack.
Remove the cross beam.
Lower the gearbox to the front axle beam.
Loosen the gearbox bolts using HAZET 880 "E10", "E12", "E14" insert keys.
Separate the gearbox from the engine and, with the help of an assistant, pull it downwards.
Before installation, check the clutch (see section "Removal and installation, clutch check").
Check the ease of movement of the clutch release bearing. Lubricate the bearing, for example Liqui Moly M-320. If noise was previously observed when the clutch was released during operation of the bearing, replace the release bearing (see section "Removal and installation the release bearing").
Clean the splined connection of the input shaft and the centering journal and lightly lubricate with Moly plain bearing paste or spray with Moly aerosol.
Engage any gear.
Raise the box and insert it into the clutch in a horizontal position. If the primary shaft does not enter the clutch disk, turn it by hand by the flange of the cardan shaft.
Tighten the gearbox mounting bolts on the engine. Tightening torques: M18 bolts — 20 Nm; m10 bolts - 40 Nm; m12 bolts - 70 Nm.
Raise the gearbox and secure it to the cross member with a tightening torque of 25 N/mm for the bolts.
Do not mix up the connectors, otherwise the engine will not start. Install the speed sensor "2" without a ring in the hole "D", and the reference mark sensor "3" with a ring "4" in the hole "B".
Before installation, check the O-rings. Insert the sensors, covering them with Molykore Longtherm 2.
Install the clutch hydraulic actuator slave cylinder (see section "Removal and installation the clutch slave cylinder").
Insert the support pin, covering it with Motykore Longtherm 2.
Using the pusher, place the spring "1" on the spout "2".
Secure the shift console with new self-locking bolts with a tightening torque of 20 Nm. When tightening the bolts, ensure that the supports are in a horizontal position relative to the shift console.
Insert the shift rod. Place the washer on the pin and secure the shift rod with the lock washer.
Connect the reverse light switch wire.
Install the cardan shaft (see section "Removal and installation the propeller shaft").
Install a heat-insulating screen.
Install the exhaust system (see section "Removal and installation of the exhaust system").
Check the gearbox oil level (see section "Checking the gearbox oil level").
Examine the original source using the link on the website «BMWMAN»
Removal
Raise the car.
Remove the exhaust system (see section "Removal and installation of the exhaust system").
Remove the heat-insulating screen.
Unscrew the drive shaft disc from the gearbox. For a design with a built-in vibration damper, unscrew the nuts on the drive shaft disc.
Use a pipe wrench to loosen the threaded ring (arrow) in the middle of the cardan shaft by several turns.
Unscrew the middle support "A" of the cardan shaft.
Tilt the cardan shaft downwards and pull it out of the centering journal.
Attention: Tie up the cardan shaft.
With the cardan shaft removed, disconnect the locking bracket "1" from the shift rod, remove the washer "2" and pull out the rod "3".
Disconnect the reverse light switch wire from the rear of the gearbox.
Unscrew the shift console from the rear of the gearbox.
Caution: Self-locking bolts are difficult to remove.
On vehicles with a gearshift lever: remove the spring from the nose on the housing with a screwdriver and move it back. Pull the support pin.
Remove the clutch slave cylinder. The hydraulic drives remain connected (see section "Removal and installation the clutch slave cylinder").
On vehicles with OME (Motronic): remove the heat-insulating shield. Pull out the speed sensor "2" and the reference mark sensor "3".
Support the gearbox with a jack.
Remove the cross beam.
Lower the gearbox to the front axle beam.
Loosen the gearbox bolts using HAZET 880 "E10", "E12", "E14" insert keys.
Separate the gearbox from the engine and, with the help of an assistant, pull it downwards.
Installation
Before installation, check the clutch (see section "Removal and installation, clutch check").
Check the ease of movement of the clutch release bearing. Lubricate the bearing, for example Liqui Moly M-320. If noise was previously observed when the clutch was released during operation of the bearing, replace the release bearing (see section "Removal and installation the release bearing").
Clean the splined connection of the input shaft and the centering journal and lightly lubricate with Moly plain bearing paste or spray with Moly aerosol.
Engage any gear.
Raise the box and insert it into the clutch in a horizontal position. If the primary shaft does not enter the clutch disk, turn it by hand by the flange of the cardan shaft.
Tighten the gearbox mounting bolts on the engine. Tightening torques: M18 bolts — 20 Nm; m10 bolts - 40 Nm; m12 bolts - 70 Nm.
Raise the gearbox and secure it to the cross member with a tightening torque of 25 N/mm for the bolts.
Cars with DME
Do not mix up the connectors, otherwise the engine will not start. Install the speed sensor "2" without a ring in the hole "D", and the reference mark sensor "3" with a ring "4" in the hole "B".
Before installation, check the O-rings. Insert the sensors, covering them with Molykore Longtherm 2.
Caution: The front sides of the OME sensors must be clean and free of grease.
Install the clutch hydraulic actuator slave cylinder (see section "Removal and installation the clutch slave cylinder").
Option with shift knob
Insert the support pin, covering it with Motykore Longtherm 2.
Using the pusher, place the spring "1" on the spout "2".
Secure the shift console with new self-locking bolts with a tightening torque of 20 Nm. When tightening the bolts, ensure that the supports are in a horizontal position relative to the shift console.
Insert the shift rod. Place the washer on the pin and secure the shift rod with the lock washer.
Connect the reverse light switch wire.
Install the cardan shaft (see section "Removal and installation the propeller shaft").
Install a heat-insulating screen.
Install the exhaust system (see section "Removal and installation of the exhaust system").
Check the gearbox oil level (see section "Checking the gearbox oil level").
Examine the original source using the link on the website «BMWMAN»
This article is available at russian, bulgarian, belarusian, ukrainian, serbian, croatian, romanian, polish, slovak, hungarian
Article verified: Polikarpov Saveliy
Share information:
Previous articles
БМВ E30: Manual gearbox
Next articles
Similar articles on other types of BMW cars:
Removal and installation the gearbox BMW 5 Series E12 (1972-1981)
Removal and installation the gearbox BMW 5 Series E39 (1995-2003)
Rear axle gearbox removal and installation BMW 7 Series E32 (1986-1994)
Removal and installation the rear axle gearbox BMW 7 Series E38 (1994-2001)
Pistons — removal and installation BMW X3 E83 (2003-2010)
Removal and installation of gearbox S5D 280Z BMW X5 E53 (1999-2006)
Link in different formats to this page
Visitor comments
No comments yet
- General information
- Manual
- Maintenance
- Power unit
- Engine repair
- Cooling system
- Power system (gasoline)
- Injection system (gasoline)
- Fuel system (diesel)
- Exhaust system
- Ignition system
- Charge and launch systems
- Transmission
- Car gearbox
- Clutch and drive shafts
- Chassis
- Brake system
- Suspension front and rear
- Steering
- Body
- Body care and repair
- Exterior
- Interior
- Electrical equipment
- Troubleshooting
- Lighting and signaling
- Equipment and devices
- Heater and air conditioner
- Electrical circuits
- General information
- Manual
- Repair on the road
- Weekly checks
- Maintenance
- Troubleshooting
- Power unit
- 4 cylinder engines
- 6 cylinder engines
- Engine overhaul
- Cooling and heating
- Fuel and exhaust system
- Starting and charging system
- Ignition system
- Transmission
- Clutch
- Mechanical gearbox
- Automatic gearbox
- Cardan and drive shafts
- Chassis
- Brake system
- Wheel suspension
- Steering
- Body
- Exterior
- Interior
- Electrical equipment
- Equipment and devices
- Electrical circuits
- General information
- Maintenance
- Power unit
- Engine repair
- Cooling system
- Ignition system
- Supply system
- Fuel injection system
- Exhaust system
- Transmission
- Clutch
- Car gearbox
- Front and rear axle
- Chassis
- Steering
- Brake system
- Body
- Exterior
- Interior
- Electrical equipment
- Heating system
- Equipment and devices
- Power devices
- Electrical circuits
- Power unit
- M10/M20 engine
- M40 engine
- Ignition system
- Lubrication system
- Cooling system
- Supply system
- Fuel injection
- Exhaust system
- Transmission
- Clutch
- Manual gearbox
- Front axle
- Rear axle
- Chassis
- Steering
- Brake system
- Body
- Exterior
- Interior
- Electrical equipment
- Heating system
- Equipment and devices
- Electrical circuits
- General information
- Specifications
- Operation and maintenance
- 4-cylinder engine
- Engine repair
- Cooling and lubrication system
- Supply system
- Ignition system
- 6-cylinder engine
- Engine repair
- Cooling and lubrication system
- Supply system
- Fuel injection system
- Ignition system
- Transmission
- Clutch
- 4-speed manual gearbox
- 5-speed manual gearbox
- Automatic gearbox
- Cardan and rear axle
- Chassis
- Steering
- Front suspension
- Rear suspension
- Brake system
- Electrical equipment
- Equipment and devices
- Electrical circuits