
Table of contents: Adjustment without removing the door…↓ Adjustment by removing the door trim ↓
- Home
- BMW 3 Series
- E36
- Body
- Exterior
- Adjusting the glass of the door window: coupe
Adjusting the glass of the door window: coupe (BMW 3 Series E36)
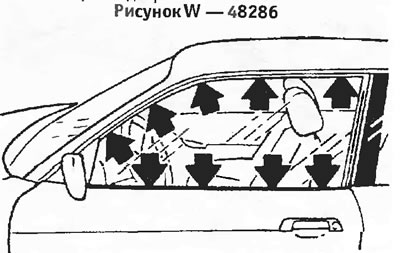
The window glass is adjusted correctly if it is positioned parallel to the window cutout at the top and is evenly immersed in the window seal. Since the coupe has frameless window glass, the prerequisite for correct adjustment is the correct fit of the door and flawless seals.
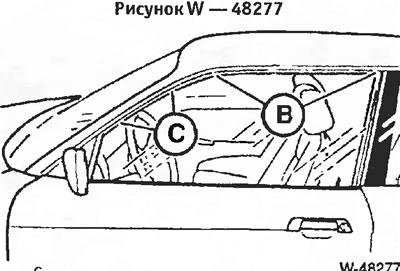
The glass can be adjusted without removing the door trim if only the following parameters need to be adjusted: immersion depth "B" (see picture), parallelism to the body, as well as the clamp. If there is a second hole behind the door molding, the immersion depth "C" can also be adjusted.
The following tools are required: 1/4-inch Torx Wrench head set with cross joint and extension cord.
Using the external or internal door handles, the glass is automatically lowered by 4-6 mm. The window lift control unit recognizes the closed position by the resistance when the mechanical stop of the window lift mechanism is reached.
Attention: After adjustment, make sure that if the automatic system fails, the glass is not pinched in the area "B" or "C" in the door seal. Otherwise, the glass may break when the door is opened. Therefore, it is necessary to check the end stop as follows:
- Open the door and raise the glass as far as possible.
- Close the door lock latch with your hand. The control unit receives a "Door closed" signal and the glass begins to move upwards by approximately 5 mm to its final position.
- Disconnect the battery or disconnect the window lift motor connector.
- Open the door lock, the latch opens and the door can be closed.
- Carefully close the door. Make sure that if the automatic system fails, the glass is not jammed in the area "B" or "C" in the door seal. Otherwise, correct the adjustment.
Adjustment without removing the door trim
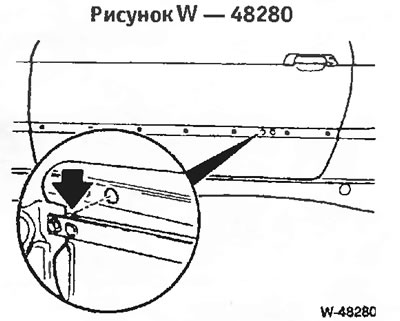
Correction of the immersion depth "B" (Figure W 48277): Lower the glass and remove the plugs at the bottom of the door.
Adjust the height of the stops by turning the adjusting screws.
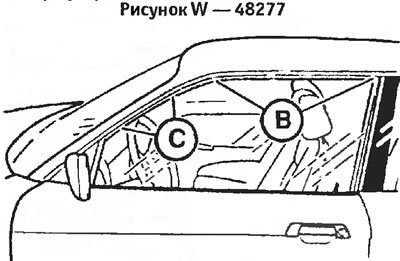
Close the door and mark the immersion depth "B" with a felt-tip pen. Dimension B is measured at a distance of 90 and 400 mm from the middle post. Open the door and measure the immersion depth of the upper edge of the glass. It should be from 1.5 to 2.5 mm.
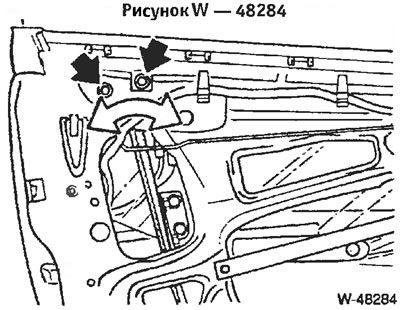
Correction of the immersion depth "C" (Figure W 48277): Lower the glass approximately 105 mm from the top edge of the door trim.
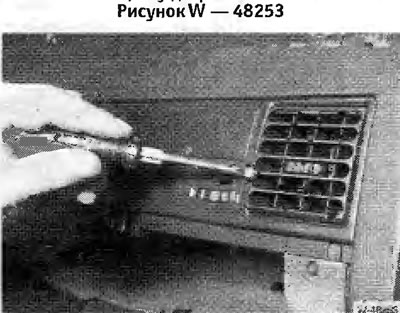
Remove the moldings and turn the adjusting bolt to the right, which will unscrew it.
Close the door and raise the glass.
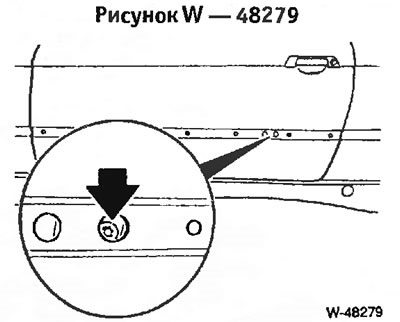
Align the glass longitudinally and tighten the adjusting bolt, see figure.
Close the door and mark the immersion depth "C" on the glass with a felt-tip pen (Figure W 48277). Open the door and measure the depth of immersion relative to the upper edge of the glass. It should be between 10 and 1.5 mm.
Check the end stop with the window lift motor disconnected as described above.
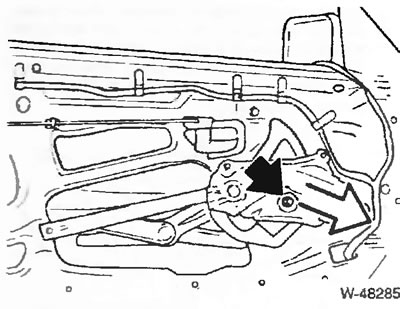
Adjusting parallelism (glass tilt): Remove the molding and turn the adjusting bolt in the left hole to the right (loosen). The picture shows the view of the fastening from the inside of the door. The adjusting bolt is located approximately 35 mm to the left and 15 mm above the hole in the door.
Align the glass and tighten the bolt.
Check the end stop as described above.
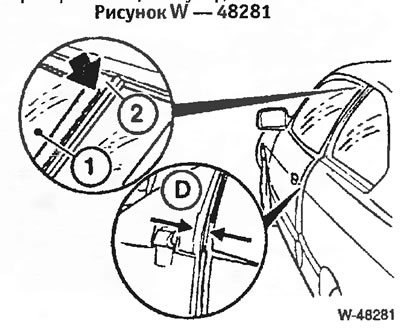
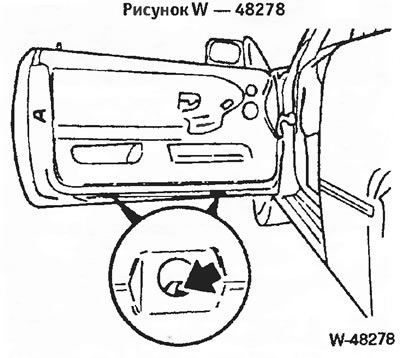
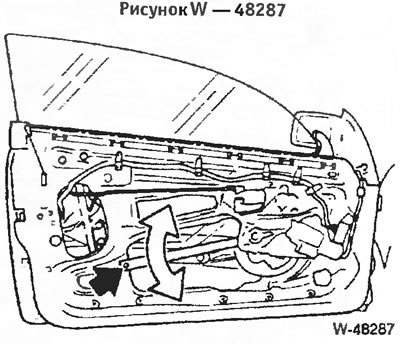
Adjusting the pressure: To ensure a seal, the glass must be positioned closer to the inside than the rest of the door. To check, lift the glass and close the door until it touches the "arrow" seal. In this position, the "D" dimension, measured 20 cm above the door rebate, should be 8 mm.
If necessary, loosen the 2 bolts at the bottom of the door and adjust the pressure by moving the glass guide.
Caution: Too much pressure may damage the glass when closing the door.
Check the end stop as described above.
Adjustment by removing the door trim
This adjustment includes preliminary adjustments and should be carried out after replacing the mechanical parts of the window regulator.
Remove the door trim.
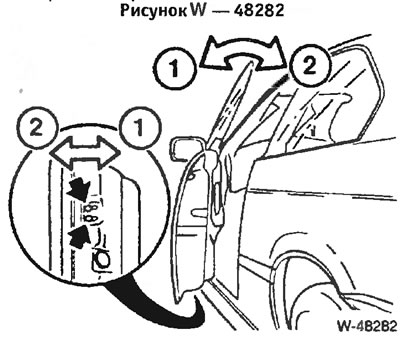
Preliminary adjustment of the pressure: Loosen the fastening of the corner of the rear roller guide. Then tighten the bolts of the glass guide rail on the inside of the door so that they are in the middle of the slots (Figure W 48282).
Adjust the clamp as described in the subsection "Adjustment without removing the door trim".
Preliminary adjustment of the immersion depth "C": Screw the glass rail from above in the middle position.
Close the doors and raise and lower the glass. If the glass hits the top seal, loosen the main stop bolt, push forward and tighten again.

Preliminary adjustment of the pressure on the front roller guide: Raise and lower the glass several times. Tighten the corner on the roller guide so that it can still move.
After this, adjust the clamp as described in the subsection "Adjustment without removing the door trim".
Adjusting parallelism (glass tilt). Close the window and use a felt-tip pen to outline the glass along the contour of the seals.
Loosen the rail bolt and move the rail so that the glass is parallel to the window frame.
After this, check the immersion depths "B" and "C" into the seal again and adjust if necessary as described in the subsection "Adjustment without removing the door trim".
Check the end stop with the window lift motor disconnected, as described at the beginning of the section.
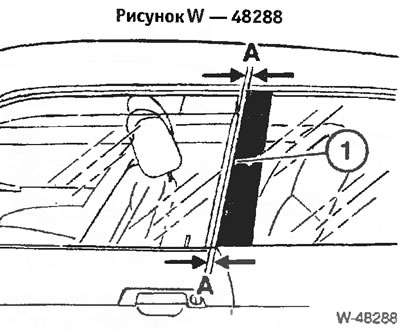
Finally, check the dimension "A" between the glass and the overlay. It should be 4-5 mm. If not, remove and replace the overlay.
This article is available at russian, bulgarian, belarusian, ukrainian, serbian, croatian, romanian, polish, slovak, hungarian
Article verified: Chebotarev Vladislav
Share information:
Previous articles
БМВ E36: Exterior
Next articles
Similar articles on other types of BMW cars:
Removal and installation the window lifting mechanism / Adjusting the… BMW 5 Series E34 (1988-1996)
Removal and installation / adjustment of the door window glass BMW 5 Series E39 (1995-2003)
Replacement and adjustment of sliding door glass BMW 7 Series E38 (1994-2001)
Checking/adjusting the start of injection pump delivery BMW 7 Series E32 (1986-1994)
Removal window glass using the Roll Out 2000 system BMW X3 E83 (2003-2010)
Adjusting the position of the front door glass BMW X5 E53 (1999-2006)
Link in different formats to this page
Visitor comments
No comments yet
- General information
- Manual
- Maintenance
- Power unit
- Engine repair
- Cooling system
- Power system (gasoline)
- Injection system (gasoline)
- Fuel system (diesel)
- Exhaust system
- Ignition system
- Charge and launch systems
- Transmission
- Car gearbox
- Clutch and drive shafts
- Chassis
- Brake system
- Suspension front and rear
- Steering
- Body
- Body care and repair
- Exterior
- Interior
- Electrical equipment
- Troubleshooting
- Lighting and signaling
- Equipment and devices
- Heater and air conditioner
- Electrical circuits
- General information
- Manual
- Repair on the road
- Weekly checks
- Maintenance
- Troubleshooting
- Power unit
- 4 cylinder engines
- 6 cylinder engines
- Engine overhaul
- Cooling and heating
- Fuel and exhaust system
- Starting and charging system
- Ignition system
- Transmission
- Clutch
- Mechanical gearbox
- Automatic gearbox
- Cardan and drive shafts
- Chassis
- Brake system
- Wheel suspension
- Steering
- Body
- Exterior
- Interior
- Electrical equipment
- Equipment and devices
- Electrical circuits
- General information
- Maintenance
- Power unit
- Engine repair
- Cooling system
- Ignition system
- Supply system
- Fuel injection system
- Exhaust system
- Transmission
- Clutch
- Car gearbox
- Front and rear axle
- Chassis
- Steering
- Brake system
- Body
- Exterior
- Interior
- Electrical equipment
- Heating system
- Equipment and devices
- Power devices
- Electrical circuits
- Power unit
- M10/M20 engine
- M40 engine
- Ignition system
- Lubrication system
- Cooling system
- Supply system
- Fuel injection
- Exhaust system
- Transmission
- Clutch
- Manual gearbox
- Front axle
- Rear axle
- Chassis
- Steering
- Brake system
- Body
- Exterior
- Interior
- Electrical equipment
- Heating system
- Equipment and devices
- Electrical circuits
- General information
- Specifications
- Operation and maintenance
- 4-cylinder engine
- Engine repair
- Cooling and lubrication system
- Supply system
- Ignition system
- 6-cylinder engine
- Engine repair
- Cooling and lubrication system
- Supply system
- Fuel injection system
- Ignition system
- Transmission
- Clutch
- 4-speed manual gearbox
- 5-speed manual gearbox
- Automatic gearbox
- Cardan and rear axle
- Chassis
- Steering
- Front suspension
- Rear suspension
- Brake system
- Electrical equipment
- Equipment and devices
- Electrical circuits