



- Home
- BMW 3 Series
- E46
- General information
- Maintenance
- Checking the functioning of the cooling system and frost resistance of the coolant
Checking the functioning of the cooling system and frost resistance of the coolant (BMW 3 Series E46)
1. Many serious engine malfunctions are related to cooling system failures. If the car is equipped with an automatic transmission, its operation and service life are also directly related to the operation of the cooling system.
2. The cooling system should be checked when the engine is cold, so it is best to do this before the first trip of the day or no earlier than three hours after turning off the engine.
3. Slowly, being careful in case the engine is still warm, remove the radiator cap. Rinse it thoroughly inside and out with clean water. Also rinse the radiator filler neck. The presence of traces of corrosion in the filler neck means that the coolant should be replaced (refer to Section Replacing the coolant). The coolant inside the radiator should be relatively clean and transparent. If it is brownish in color, drain the system and fill it with new coolant.
4. Carefully inspect the radiator hoses, as well as the heater hoses, which have a smaller diameter. Check the entire length of the coolant hoses, replacing any cracked, bulging or worn hoses. Cracks are easier to spot if you squeeze the hose with your hand. Pay special attention to the clamps that hold the hoses to the cooling system components. These clamps can cut or puncture the hoses, causing coolant to leak.
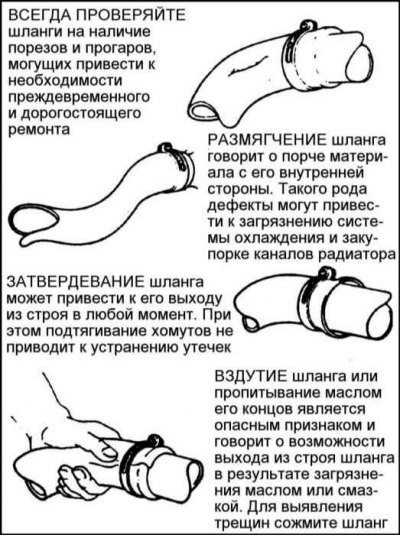
5. Make sure all hose connections are securely fastened. Coolant leaks usually show up as white or rusty deposits in the area of the leak. If your vehicle uses wire-type clamps, it may make sense to replace them with screw-type clamps.
6. Using compressed air or a soft brush, clean the front of the radiator (and also the air conditioner condenser, where available). Remove any insects, leaves, or other foreign objects that may have gotten onto the radiator fins. Be very careful not to damage the fins or cut your fingers on them.
7. If the coolant level is constantly dropping and you have not found any leaks, you should pressure test the radiator cap and the entire cooling system.
Before the start of the winter season, it is necessary to check the concentration of antifreeze in the coolant, especially if clean water was poured into the system during operation.
This requires a frost resistance meter. There is also an optical level tester HAZET No.4810.
8. Warm up the engine slightly so that the upper radiator hose is warm. When measuring the concentration of antifreeze, the temperature of the liquid should be close to +20°C.
9. Carefully unscrew the expansion tank cap.
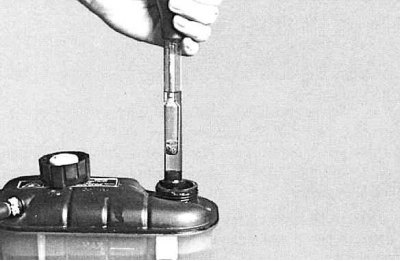
10. Draw up the liquid using the hydrometer bulb.
11. In our latitudes, the concentration of antifreeze is sufficient to provide protection for the system down to a temperature of –25°C, and in particularly cold climates down to –35°C.
Please refer to the materials Specifications at the beginning of the Chapter.
If it is necessary to ensure frost resistance down to a temperature of –25°C, the concentration of antifreeze in the coolant should be 40%.
If it is necessary to ensure frost resistance down to a temperature of –35°C, the antifreeze concentration should be 50%.
12. Remove the required amount of coolant and add antifreeze according to the Specifications.
13. Close the radiator cap and after a test drive, check the antifreeze concentration again, contact Specifications.
(The original article is located on BMWMAN.RU)
2. The cooling system should be checked when the engine is cold, so it is best to do this before the first trip of the day or no earlier than three hours after turning off the engine.
3. Slowly, being careful in case the engine is still warm, remove the radiator cap. Rinse it thoroughly inside and out with clean water. Also rinse the radiator filler neck. The presence of traces of corrosion in the filler neck means that the coolant should be replaced (refer to Section Replacing the coolant). The coolant inside the radiator should be relatively clean and transparent. If it is brownish in color, drain the system and fill it with new coolant.
4. Carefully inspect the radiator hoses, as well as the heater hoses, which have a smaller diameter. Check the entire length of the coolant hoses, replacing any cracked, bulging or worn hoses. Cracks are easier to spot if you squeeze the hose with your hand. Pay special attention to the clamps that hold the hoses to the cooling system components. These clamps can cut or puncture the hoses, causing coolant to leak.
5. Make sure all hose connections are securely fastened. Coolant leaks usually show up as white or rusty deposits in the area of the leak. If your vehicle uses wire-type clamps, it may make sense to replace them with screw-type clamps.
6. Using compressed air or a soft brush, clean the front of the radiator (and also the air conditioner condenser, where available). Remove any insects, leaves, or other foreign objects that may have gotten onto the radiator fins. Be very careful not to damage the fins or cut your fingers on them.
7. If the coolant level is constantly dropping and you have not found any leaks, you should pressure test the radiator cap and the entire cooling system.
Checking the frost resistance of the coolant
Do not allow antifreeze to come into contact with your skin or painted surfaces of your vehicle. If it does come into contact with your skin, rinse immediately with plenty of water. Antifreeze is extremely toxic and can be fatal if ingested. Do not leave antifreeze in an open container or spilled on the floor; its sweet smell can easily attract children or pets. Check your local regulations for disposal of used antifreeze. Many areas have special collection centers for it.
Before the start of the winter season, it is necessary to check the concentration of antifreeze in the coolant, especially if clean water was poured into the system during operation.
This requires a frost resistance meter. There is also an optical level tester HAZET No.4810.
Examination
8. Warm up the engine slightly so that the upper radiator hose is warm. When measuring the concentration of antifreeze, the temperature of the liquid should be close to +20°C.
When the engine is hot, the expansion tank cap should be opened carefully. There is a risk of burns! Place a rag on the cap. Open the cap only when the liquid temperature is no more than +90°C.
9. Carefully unscrew the expansion tank cap.
10. Draw up the liquid using the hydrometer bulb.
11. In our latitudes, the concentration of antifreeze is sufficient to provide protection for the system down to a temperature of –25°C, and in particularly cold climates down to –35°C.
Adding antifreeze
Please refer to the materials Specifications at the beginning of the Chapter.
If it is necessary to ensure frost resistance down to a temperature of –25°C, the concentration of antifreeze in the coolant should be 40%.
If it is necessary to ensure frost resistance down to a temperature of –35°C, the antifreeze concentration should be 50%.
If a higher degree of protection against freezing is required, the concentration level of the antifreeze can be increased to 60%. This concentration will provide protection down to -40°C. If the concentration is increased to a higher level, the degree of engine protection begins to decrease and, in addition, the heat-dissipating properties of the coolant deteriorate.
12. Remove the required amount of coolant and add antifreeze according to the Specifications.
13. Close the radiator cap and after a test drive, check the antifreeze concentration again, contact Specifications.
(The original article is located on BMWMAN.RU)
This article is available at russian, bulgarian, belarusian, ukrainian, serbian, croatian, romanian, polish, slovak, hungarian
Article verified: Sevastyanov Nikolay
Share information:
Previous articles
БМВ E46: Maintenance
Next articles
Similar articles on other types of BMW cars:
Checking the functioning of the cooling system BMW 5 Series E28 (1981-1988)
Checking the tightness of the cooling system BMW 5 Series E34 (1988-1996)
Checking the cooling system for tightness BMW 7 Series E32 (1986-1994)
Checking the brake system and clutch BMW 7 Series E38 (1994-2001)
Bleeding the cooling system and checking it for leaks (M54, N46, N47,… BMW X3 E83 (2003-2010)
Checking the tightness between the cooling system and the combustion… BMW X5 E53 (1999-2006)
Checking the functioning of the cooling system BMW 5 Series E28 (1981-1988)
Checking the tightness of the cooling system BMW 5 Series E34 (1988-1996)
Checking the cooling system for tightness BMW 7 Series E32 (1986-1994)
Checking the brake system and clutch BMW 7 Series E38 (1994-2001)
Bleeding the cooling system and checking it for leaks (M54, N46, N47,… BMW X3 E83 (2003-2010)
Checking the tightness between the cooling system and the combustion… BMW X5 E53 (1999-2006)
Link in different formats to this page
Visitor comments
No comments yet
- General information
- Manual
- Maintenance
- Power unit
- Engine repair
- Cooling system
- Power system (gasoline)
- Injection system (gasoline)
- Fuel system (diesel)
- Exhaust system
- Ignition system
- Charge and launch systems
- Transmission
- Car gearbox
- Clutch and drive shafts
- Chassis
- Brake system
- Suspension front and rear
- Steering
- Body
- Body care and repair
- Exterior
- Interior
- Electrical equipment
- Troubleshooting
- Lighting and signaling
- Equipment and devices
- Heater and air conditioner
- Electrical circuits
- General information
- Manual
- Repair on the road
- Weekly checks
- Maintenance
- Troubleshooting
- Power unit
- 4 cylinder engines
- 6 cylinder engines
- Engine overhaul
- Cooling and heating
- Fuel and exhaust system
- Starting and charging system
- Ignition system
- Transmission
- Clutch
- Mechanical gearbox
- Automatic gearbox
- Cardan and drive shafts
- Chassis
- Brake system
- Wheel suspension
- Steering
- Body
- Exterior
- Interior
- Electrical equipment
- Equipment and devices
- Electrical circuits
- General information
- Maintenance
- Power unit
- Engine repair
- Cooling system
- Ignition system
- Supply system
- Fuel injection system
- Exhaust system
- Transmission
- Clutch
- Car gearbox
- Front and rear axle
- Chassis
- Steering
- Brake system
- Body
- Exterior
- Interior
- Electrical equipment
- Heating system
- Equipment and devices
- Power devices
- Electrical circuits
- Power unit
- M10/M20 engine
- M40 engine
- Ignition system
- Lubrication system
- Cooling system
- Supply system
- Fuel injection
- Exhaust system
- Transmission
- Clutch
- Manual gearbox
- Front axle
- Rear axle
- Chassis
- Steering
- Brake system
- Body
- Exterior
- Interior
- Electrical equipment
- Heating system
- Equipment and devices
- Electrical circuits
- General information
- Specifications
- Operation and maintenance
- 4-cylinder engine
- Engine repair
- Cooling and lubrication system
- Supply system
- Ignition system
- 6-cylinder engine
- Engine repair
- Cooling and lubrication system
- Supply system
- Fuel injection system
- Ignition system
- Transmission
- Clutch
- 4-speed manual gearbox
- 5-speed manual gearbox
- Automatic gearbox
- Cardan and rear axle
- Chassis
- Steering
- Front suspension
- Rear suspension
- Brake system
- Electrical equipment
- Equipment and devices
- Electrical circuits