
Table of contents: Selection of inserts ↓ Installing pistons with connecting…↓
- Home
- BMW 3 Series
- E46
- Power unit
- Engine overhaul
- Pistons with connecting rods — installation
Pistons with connecting rods — installation (BMW 3 Series E46)
Caution! When installing pistons and connecting rods, be careful not to damage the oil jets for cooling the pistons, if they are present on this engine. The manufacturer recommends that after reinstalling the piston group, adjust the position of the jets using the BMW 117 320 device (m43TU engine) or 119,370 (n42 engine).
Selection of inserts
1. BMW manufactures connecting rod lower head liners in several sizes: nominal size for standard crankshafts and repair sizes for shafts with machined journals.
2. Give the crankshaft to service station specialists - they will, if necessary, machine it and select liners of the required size.
Installing pistons with connecting rods
Note: New connecting rod cap bolts are required for assembly. This operation also requires a piston ring compressor.
3. It is assumed that the main bearing caps are already installed (see paragraph 17).
4. Insert the connecting rod bearing shells into place. Make sure that the projections of the shells enter the corresponding grooves of the connecting rod heads and their caps. Do not touch the working surfaces of the shells with your fingers. If the shells are covered with protective grease, wash it off with kerosene. Wipe the shells dry with a lint-free cloth.
5. Lubricate the surfaces of the cylinders, pistons and piston rings, then lay out the pistons with connecting rods in the order of their installation.
6. Begin installation with cylinder #1. Make sure the piston rings are in place and spaced as indicated in paragraph 16. After this, place the mandrel on the top of the piston and compress the rings with it.
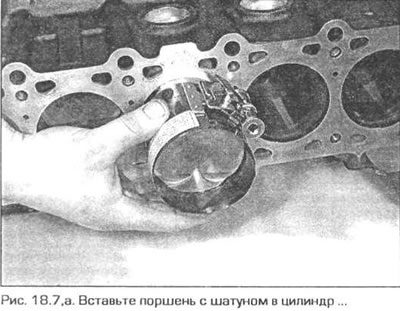
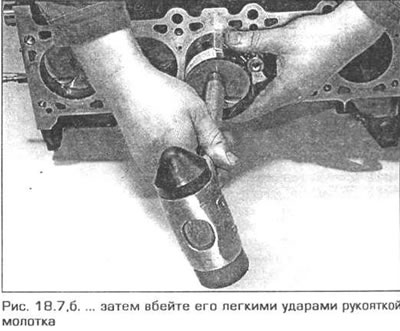
7. Insert the piston with the connecting rod from above into cylinder #1. Turn the assembly so that the arrow on the piston bottom points toward the front of the engine (i.e. towards the chain), and the marks on the lower head of the connecting rod and on its cover - towards the exhaust manifold. Using the handle of a hammer, drive the piston into the cylinder until the bottom of the piston is flush with the plane of the cylinder block (fig. 18.7,a,b).
8. Make sure that the connecting rod lower head bearings and the connecting rod cap are in place. Lubricate the crankshaft crank and both bearings with engine oil. Push the piston with the connecting rod down and place the connecting rod lower head on the crank. During this operation, be careful not to scratch the cylinder bore with the connecting rod. Install the cap on the connecting rod lower head. Note: the protrusions of the connecting rod bearings and the cap must face the same way.
9. Screw in the new cover mounting bolts and gradually tighten them one by one to the torque corresponding to the 1st tightening stage (see Technical data). After tightening both bolts to the torque corresponding to the 1st stage, turn them to the angle corresponding to the 2nd stage. To turn the bolts to the required angle, it is recommended to use a special ratchet with an angle scale. If you do not have such a ratchet, apply white paint marks on the bolt head and on the connecting rod cover, by which you can control the angle of rotation of the bolt.
10. After tightening the connecting rod head bolts, turn the crankshaft. Check if it rotates easily. After installing new parts, the shaft may turn more tightly than usual, but the resistance to rotation should be uniform, without local jamming.
11. Install the remaining pistons with connecting rods in the same way.
12. Install the oil separator on the underside of the engine (if it is provided for by the design).
13. On a 4-cylinder engine, install the cylinder head, balance shaft housing with oil pump and oil pan (see chapter 2A).
14. On a 6-cylinder engine, install the cylinder head, oil pump and oil pan (see chapter 2B).
This article is available at russian, bulgarian, belarusian, ukrainian, serbian, croatian, romanian, polish, slovak, hungarian
Article verified: Ilyinsky Matvey
Share information:
Previous articles
БМВ E46: Engine overhaul
Next articles
Similar articles on other types of BMW cars:
Removal pistons/connecting rods BMW 5 Series E28 (1981-1988)
Removal and installation steering rods BMW 5 Series E34 (1988-1996)
Pistons and connecting rods — installation and checking of connecting… BMW 7 Series E32 (1986-1994)
Removal and installation steering rods, steering knuckle and pendulum… BMW 7 Series E38 (1994-2001)
Pistons — removal and installation BMW X3 E83 (2003-2010)
Pistons and connecting rods — design description BMW X5 E53 (1999-2006)
Link in different formats to this page
Visitor comments
No comments yet
- General information
- Manual
- Maintenance
- Power unit
- Engine repair
- Cooling system
- Power system (gasoline)
- Injection system (gasoline)
- Fuel system (diesel)
- Exhaust system
- Ignition system
- Charge and launch systems
- Transmission
- Car gearbox
- Clutch and drive shafts
- Chassis
- Brake system
- Suspension front and rear
- Steering
- Body
- Body care and repair
- Exterior
- Interior
- Electrical equipment
- Troubleshooting
- Lighting and signaling
- Equipment and devices
- Heater and air conditioner
- Electrical circuits
- General information
- Manual
- Repair on the road
- Weekly checks
- Maintenance
- Troubleshooting
- Power unit
- 4 cylinder engines
- 6 cylinder engines
- Engine overhaul
- Cooling and heating
- Fuel and exhaust system
- Starting and charging system
- Ignition system
- Transmission
- Clutch
- Mechanical gearbox
- Automatic gearbox
- Cardan and drive shafts
- Chassis
- Brake system
- Wheel suspension
- Steering
- Body
- Exterior
- Interior
- Electrical equipment
- Equipment and devices
- Electrical circuits
- General information
- Maintenance
- Power unit
- Engine repair
- Cooling system
- Ignition system
- Supply system
- Fuel injection system
- Exhaust system
- Transmission
- Clutch
- Car gearbox
- Front and rear axle
- Chassis
- Steering
- Brake system
- Body
- Exterior
- Interior
- Electrical equipment
- Heating system
- Equipment and devices
- Power devices
- Electrical circuits
- Power unit
- M10/M20 engine
- M40 engine
- Ignition system
- Lubrication system
- Cooling system
- Supply system
- Fuel injection
- Exhaust system
- Transmission
- Clutch
- Manual gearbox
- Front axle
- Rear axle
- Chassis
- Steering
- Brake system
- Body
- Exterior
- Interior
- Electrical equipment
- Heating system
- Equipment and devices
- Electrical circuits
- General information
- Specifications
- Operation and maintenance
- 4-cylinder engine
- Engine repair
- Cooling and lubrication system
- Supply system
- Ignition system
- 6-cylinder engine
- Engine repair
- Cooling and lubrication system
- Supply system
- Fuel injection system
- Ignition system
- Transmission
- Clutch
- 4-speed manual gearbox
- 5-speed manual gearbox
- Automatic gearbox
- Cardan and rear axle
- Chassis
- Steering
- Front suspension
- Rear suspension
- Brake system
- Electrical equipment
- Equipment and devices
- Electrical circuits