
Table of contents: Removal ↓ Installation ↓
- Home
- BMW 3 Series
- E46
- Power unit
- Engine repair
- Removal and installation the oil pan
Removal and installation the oil pan (BMW 3 Series E46)
Removal
Due to the limited space available to remove the oil pan, both engine mounts must be disconnected and the front suspension beam must be lowered.
1. Remove the heater air box, refer to Section Removal and installation the air intake box.
2. Remove the air intake hose from the air box, refer to Section Removal and installation the engine air filter.
3. Models 320d: Remove the engine cover in the area of the oil filter, refer to Section Connecting and disconnecting the quick release coupling.
The operation of lifting and installing the vehicle on stands is associated with danger! Therefore, before carrying out the operation, read the Section Jacking and towing
4. Raise and place the vehicle on stands. Loosen the mounting bolts and remove the engine compartment cover, refer to Section Removal and installation the lower engine compartment cover.
5. Drain the engine oil, refer to Section Changing engine oil and oil filter.
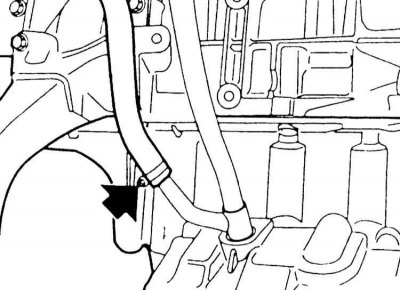
6. Models 320i, 323i, 328i: Remove the oil drain hose from the oil separator on the oil level indicator guide pipe. To do this, disconnect the mounting clamp (arrow on the illustration).
7. Unscrew the level indicator guide tube at the holder. Pull the guide tube upwards out of the oil pan. Pay attention to the sealing ring.
8. Models 320i, 323i, 328i: Remove the power steering pump mounting bolts and hang it on a wire with the hoses attached to the engine, refer to Section Removal and installation the power steering pump.
The hoses should be left attached to the pump, otherwise oil will leak out. If the hydraulic system is opened, special care must be taken to ensure that it is kept clean, as dirt that gets into the system can cause failures.
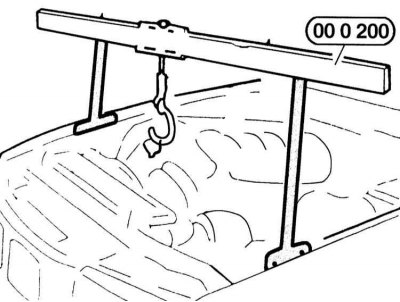
9. Lift the engine using a crane by the front eyes. If you don't have a crane, thread a cable through the eyes on the engine. Thread a pipe of sufficient strength through the cable and support it on two stands.
The BMW-00 0 200 device shown in the illustration rests on the left and right side of the wing supports and is secured there with bolts. A similar device, KLANN No. KL-0205-3US, is available for sale.
10. Raise the engine with a crane by 5 mm to relieve the load on the supports.
11. Models 320i, 323i, 328i: Loosen the engine mounts on the right and left at the top by about 4 turns.
12. Unscrew the nuts from both engine mounts from the bottom of the vehicle.
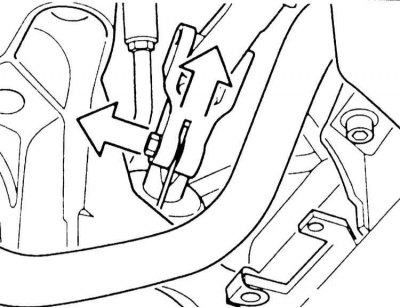
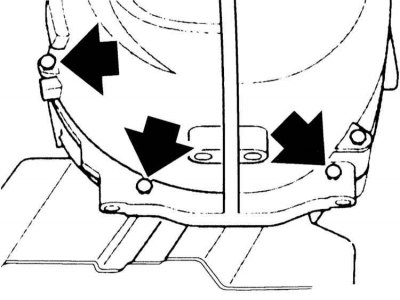
13. Disconnect the steering shaft from the steering gear and remove the lower steering column from the universal joint (arrows in the illustration).
14. Disconnect the stabilizer on the left and right from the engine beam.
The following operations are described in more detail in Section Removal and installation the front suspension beam.
- Remove the front end reinforcement from the vehicle.
- Loosen the mounting bolts and remove the left and right suspension arms.
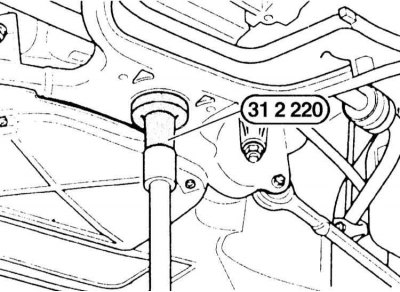
- Support the front suspension beam with a garage lift and place the appropriate support. The illustration shows the BMW-31 2 220 support. If the specified support is not available, place a wooden shim underneath to avoid damaging the beam.
- Loosen the beam mounting bolts and lower it as low as possible.
15. Disconnect the oil level sensor connector.
16. Models 320d: Remove the oil level sensor cable and reverse switch from the holders on the oil pan.
17. If there are AT oil lines, remove them from the holders at the oil pan.
18. 316i, 318i: Loosen the mounting bolts and remove the fuel line holder in the oil pan area.
19. Loosen the mounting bolts and remove the oil pan.
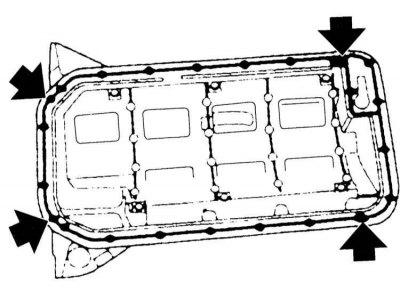
The illustration shows the fastening of the 316i, 318i engine oil pan to the manual transmission flange. Unscrew the bolts on the manual transmission flange (arrows in the illustration) and on the cylinder block.
20. Lower the oil pan and remove it back.
Installation
21. Clean the sealing surfaces of the oil pan and cylinder block.
If a new oil pan is installed on the 316i, 318i, it is necessary to move the oil intake and suction pipe to the new pan, installing a new seal.
The suction pipe has self-tapping mounting bolts. Therefore, the new oil pan does not have threads for mounting bolts. The bolts cut the threads themselves when screwed in.
22. Models 316i, 318i: Place a new sealing gasket on the oil pan. Fill the grooves (arrows in the illustration) in the oil pan seals under the connecting planes of the cylinder block at the gear cover and the locking cover with a sealant that has long-term elasticity, for example, "Drei Bond 1209" or "Loctite Ultra Black".
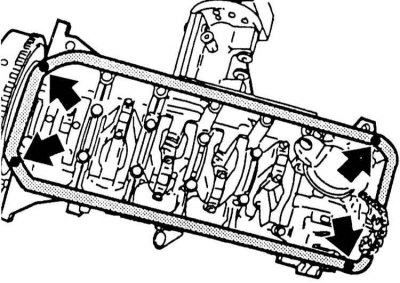
23. Models 320d, 320i, 323i, 328i: Apply to dividing planes (arrows in the illustration) on the gear cover and the locking cover there is a bead of sealant with long-term elasticity, for example, "Drei Bond 1209" or "Loctite Ultra Black." The rollers should be 3 mm wide and 2 mm high. Glue the new crankcase gasket using grease. Check that the gasket is positioned correctly.
24. Install the oil pan.
25. Screw in the oil pan mounting bolts without tightening them yet. Lightly tighten the bolts first at the manual transmission, then at the engine. Then tighten all the bolts to 10 N·m, that is, lightly again. If the bolts are tightened too much, the gasket may be crushed and the seal may be lost.
26. Insert the guide tube for the oil level indicator using a new O-ring. Secure the tube to the holder.
27. Models 320i, 323i, 328i: Secure the oil drain hose from the separator to the level indicator guide pipe with a clamp.
28. If there are oil lines, secure them in the holders on the oil pan.
29. Models 316i, 318i: Secure the fuel line bracket to the oil pan area with bolts.
30. Models 320d: Secure the oil level sensor cable and reverse switch to the holders at the oil pan.
31. Connect and secure the oil level sensor connector.
The following operations are described in more detail in Section Removal and installation the front suspension beam.
- Raise the front suspension beam and secure it with bolts, refer to Section Removal and installation the front suspension beam.
- Fasten the left and right suspension arms to the engine beam with bolts.
- Install the front end reinforcement.
32. Secure the lower part of the steering column to the ball joint. Tighten the terminal bolt to 20 N·m.
33. Lower the engine, remove the crane. Fasten both engine mounts with bolts. Tightening torques are given in Specifications.
34. Models 320i, 323i, 328i: Install the power steering pump, refer to Section Removal and installation the power steering pump.
35. Fill the system with engine oil, refer to Section Changing engine oil and oil filter.
36. Reinstall the air collection box, refer to Section Checking the thermal switch.
37. Models 320d: Install the engine cover in the area of the oil filter, refer to Section Connecting and disconnecting the quick release coupling.
38. Install the air intake hose to the engine air filter box.
39. Lower the car onto its wheels.
40. Fasten the stabilizer clamps to the front suspension beam with a torque of 25 N·m. For this, the car must be in a normal position.
41. Drive the vehicle and check the oil pan for leaks. If necessary, carefully tighten the mounting bolts.
42. Secure the lower engine compartment cover with bolts, refer to Section Removal and installation the lower engine compartment cover.
This article is available at russian, bulgarian, belarusian, ukrainian, serbian, croatian, romanian, polish, slovak, hungarian
Article verified: Sevastyanov Nikolay
Share information:
Previous articles
БМВ E46: Engine repair
Next articles
Similar articles on other types of BMW cars:
Removal and installation the oil pan BMW 5 Series E12 (1972-1981)
Cylinder Head Cover — Removal and Installation BMW 7 Series E32 (1986-1994)
Pistons — removal and installation BMW X3 E83 (2003-2010)
Removal and installation the engine BMW X5 E53 (1999-2006)
Removal and installation the oil pan BMW 5 Series E12 (1972-1981)
Cylinder Head Cover — Removal and Installation BMW 7 Series E32 (1986-1994)
Pistons — removal and installation BMW X3 E83 (2003-2010)
Removal and installation the engine BMW X5 E53 (1999-2006)
Link in different formats to this page
Visitor comments
No comments yet
- General information
- Manual
- Maintenance
- Power unit
- Engine repair
- Cooling system
- Power system (gasoline)
- Injection system (gasoline)
- Fuel system (diesel)
- Exhaust system
- Ignition system
- Charge and launch systems
- Transmission
- Car gearbox
- Clutch and drive shafts
- Chassis
- Brake system
- Suspension front and rear
- Steering
- Body
- Body care and repair
- Exterior
- Interior
- Electrical equipment
- Troubleshooting
- Lighting and signaling
- Equipment and devices
- Heater and air conditioner
- Electrical circuits
- General information
- Manual
- Repair on the road
- Weekly checks
- Maintenance
- Troubleshooting
- Power unit
- 4 cylinder engines
- 6 cylinder engines
- Engine overhaul
- Cooling and heating
- Fuel and exhaust system
- Starting and charging system
- Ignition system
- Transmission
- Clutch
- Mechanical gearbox
- Automatic gearbox
- Cardan and drive shafts
- Chassis
- Brake system
- Wheel suspension
- Steering
- Body
- Exterior
- Interior
- Electrical equipment
- Equipment and devices
- Electrical circuits
- General information
- Maintenance
- Power unit
- Engine repair
- Cooling system
- Ignition system
- Supply system
- Fuel injection system
- Exhaust system
- Transmission
- Clutch
- Car gearbox
- Front and rear axle
- Chassis
- Steering
- Brake system
- Body
- Exterior
- Interior
- Electrical equipment
- Heating system
- Equipment and devices
- Power devices
- Electrical circuits
- Power unit
- M10/M20 engine
- M40 engine
- Ignition system
- Lubrication system
- Cooling system
- Supply system
- Fuel injection
- Exhaust system
- Transmission
- Clutch
- Manual gearbox
- Front axle
- Rear axle
- Chassis
- Steering
- Brake system
- Body
- Exterior
- Interior
- Electrical equipment
- Heating system
- Equipment and devices
- Electrical circuits
- General information
- Specifications
- Operation and maintenance
- 4-cylinder engine
- Engine repair
- Cooling and lubrication system
- Supply system
- Ignition system
- 6-cylinder engine
- Engine repair
- Cooling and lubrication system
- Supply system
- Fuel injection system
- Ignition system
- Transmission
- Clutch
- 4-speed manual gearbox
- 5-speed manual gearbox
- Automatic gearbox
- Cardan and rear axle
- Chassis
- Steering
- Front suspension
- Rear suspension
- Brake system
- Electrical equipment
- Equipment and devices
- Electrical circuits