
Table of contents: Cleaning ↓ Checking the status ↓
- Home
- BMW 3 Series
- E46
- Power unit
- Engine overhaul
- Cylinder block/crankcase — cleaning and condition check
Cylinder block/crankcase — cleaning and condition check (BMW 3 Series E46)
Attention! On engines with piston cooling oil nozzles, be careful not to damage the nozzles when cleaning the engine. The manufacturer recommends adjusting the position of the nozzles using BMW 117 320 devices after overhauling the engine (m43TU engine) or 119,370 (n42 engine).
Cleaning
1. Remove all wiring, sensors and connectors from the engine. To completely flush the engine, it is recommended to remove the technological plugs from the cylinder block. To do this, drill a hole in the plug, screw a self-tapping screw into it and pull out the screw together with the plug using pliers or an impact puller.
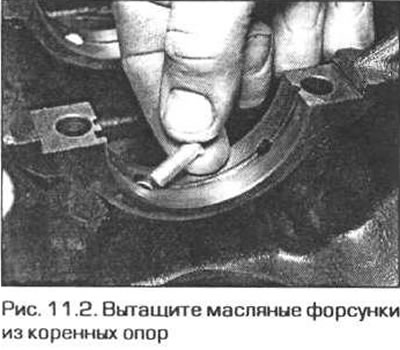
2. Pull out or unscrew the piston cooling oil nozzles. On 4-cylinder engines, the nozzles are located in supports No.2 and 5, and on 6-cylinder engines, in supports No.2 and 7 (Fig. 11.2).
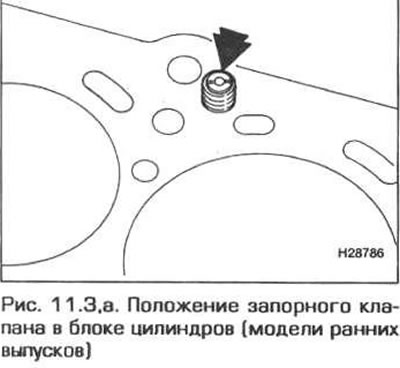
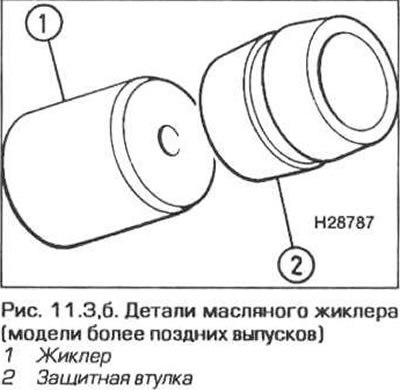
3. On the 4-cylinder M43TU engine, unscrew the shut-off valve from the top of the cylinder block. On older models, the shut-off valve is screwed into the block (fig. 11.3,a). Later models may be equipped with a calibrated jet with a protective sleeve (fig. 11.3,b). On the 4-cylinder N42 engine, two shut-off valves are mounted on the front side of the cylinder head surface (fig. 11.3,c). They just need to be pulled out of the block.
4. Scrape off any remaining old gasket from the machined surface of the cylinder block. Be careful - the block is made of aluminum alloy and is easily damaged.
5. Unscrew the plugs from all oil channels. Usually these plugs are screwed in tightly and cannot be unscrewed. In this case, they must be drilled out and new threads cut in the holes. Naturally, in this case, the plugs will need to be replaced during assembly.
6. If the cast parts are heavily contaminated, they must be treated with steam.
7. After such cleaning, clean all channels of the lubrication and cooling system again. Rinse the internal cavities of the engine with warm water until the water becomes clear. Wipe dry all surfaces and lubricate the treated surfaces with a thin layer of oil to protect against rust. Lubricate the cylinder mirrors as well. If you have access to compressed air, use it to speed up drying and to remove all foreign particles from the channels.
Caution: Wear safety glasses when working with compressed air.
8. If the cast parts are not too dirty, they can be washed. They should be washed in very hot water (how much can you bear) soapy water with a stiff brush. Take your time and do it thoroughly. Regardless of the cleaning method you choose, thoroughly clean all channels and cavities and dry all parts well. Lubricate the surfaces to protect them from rust.
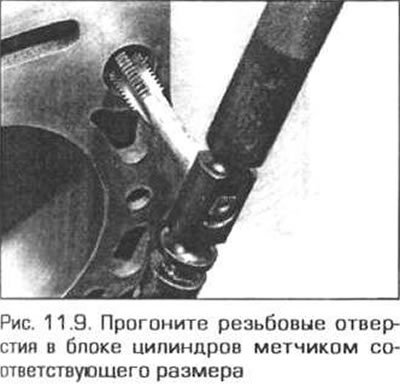
9. Clean all threaded holes to ensure precise tightening torques during assembly. To clean threaded holes from dirt, rust and sealant residues, and to restore damaged threads, run them with a tap of the required size (Fig. 11.9). After cleaning, blow out the holes with compressed air (if there is such a possibility).
If there is no compressed air, then, as an option, a water-absorbing aerosol can be injected into the holes.
Caution: Wear safety glasses when blowing holes in this manner.
10. Dry all threaded holes.
11. Lubricate the edges of the cylinder block technological plugs with sealant and press them into the walls of the block. Make sure that they enter without distortions and take the proper position, otherwise leaks may occur when filling the block jacket with coolant.
To press in the plugs, you can use a socket head with an outside diameter slightly smaller than the diameter of the plug.
12. Screw new plugs into the oil channel holes. Pre-lubricate the threads with sealant. Tighten the plugs securely.
13. Clean the shut-off valve thoroughly (or jet) lubrication system and install it as follows.
14. If the engine has a valve that screws into the cylinder block, make sure that it is blown from the bottom up and not blown from the top down. Thoroughly clean the valve, put a new sealing ring on it and screw it into the block. Tighten the valve carefully.
15. If the engine has a jet, insert it into the block (with a calibrated hole facing outwards) and insert the protective sleeve.
Caution: If the jet is installed incorrectly, it may restrict the oil supply to the cylinder head.
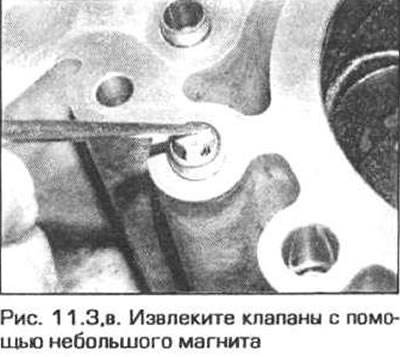
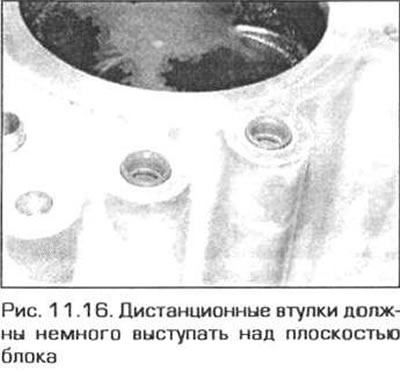
16. On the 4-cylinder N42 engine, insert the shut-off valves and spacers into the cylinder block (fig. 11.16).
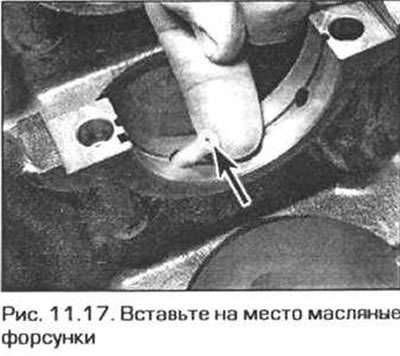
17. Wash the piston cooling oil jets and insert them back into their original places (fig. 11.17).
18. On the 4-cylinder N42 engine, clean the grooves of the mating surfaces of the cylinder block and lower crankcase from sealant residues. Remove the sealant filling nozzles - they must be replaced during assembly.
19. If you are not going to start assembling the engine immediately, lubricate the cylinders and engine bores to protect against rust (if it hasn't been done yet) and cover the engine with a large piece of plastic to protect it from dust.
Checking the status
20. Inspect the cast engine parts for cracks and corrosion. Check for stripped threads in the holes. If coolant leaks are noticed during engine operation, hand over the cylinder block to specialists for inspection on special equipment. If a defect is found, then perhaps specialists will be able to fix it or you will have to buy a new block.
21. Inspect each cylinder for scratches and scoring. Is there a band on the top of the cylinder indicating significant cylinder wear?.
22. Give the block to the service station specialists. They will decide whether the cylinders are too worn and whether they require regrinding. After regrinding, pistons and rings of the repair size will need to be inserted into the cylinders.
This article is available at russian, bulgarian, belarusian, ukrainian, serbian, croatian, romanian, polish, slovak, hungarian
Article verified: Ilyinsky Matvey
Share information:
Previous articles
БМВ E46: Engine overhaul
Next articles
Similar articles on other types of BMW cars:
Cleaning and checking the condition of the cylinder head and… BMW 5 Series E28 (1981-1988)
Cylinder Block Specifications BMW 5 Series E12 (1972-1981)
Cylinder Block — Cleaning BMW 7 Series E32 (1986-1994)
Removal and installation cylinder head covers BMW 7 Series E38 (1994-2001)
Identifying engine faults by the condition of spark plugs BMW X3 E83 (2003-2010)
Cylinder Block — Design Description BMW X5 E53 (1999-2006)
Link in different formats to this page
Visitor comments
No comments yet
- General information
- Manual
- Maintenance
- Power unit
- Engine repair
- Cooling system
- Power system (gasoline)
- Injection system (gasoline)
- Fuel system (diesel)
- Exhaust system
- Ignition system
- Charge and launch systems
- Transmission
- Car gearbox
- Clutch and drive shafts
- Chassis
- Brake system
- Suspension front and rear
- Steering
- Body
- Body care and repair
- Exterior
- Interior
- Electrical equipment
- Troubleshooting
- Lighting and signaling
- Equipment and devices
- Heater and air conditioner
- Electrical circuits
- General information
- Manual
- Repair on the road
- Weekly checks
- Maintenance
- Troubleshooting
- Power unit
- 4 cylinder engines
- 6 cylinder engines
- Engine overhaul
- Cooling and heating
- Fuel and exhaust system
- Starting and charging system
- Ignition system
- Transmission
- Clutch
- Mechanical gearbox
- Automatic gearbox
- Cardan and drive shafts
- Chassis
- Brake system
- Wheel suspension
- Steering
- Body
- Exterior
- Interior
- Electrical equipment
- Equipment and devices
- Electrical circuits
- General information
- Maintenance
- Power unit
- Engine repair
- Cooling system
- Ignition system
- Supply system
- Fuel injection system
- Exhaust system
- Transmission
- Clutch
- Car gearbox
- Front and rear axle
- Chassis
- Steering
- Brake system
- Body
- Exterior
- Interior
- Electrical equipment
- Heating system
- Equipment and devices
- Power devices
- Electrical circuits
- Power unit
- M10/M20 engine
- M40 engine
- Ignition system
- Lubrication system
- Cooling system
- Supply system
- Fuel injection
- Exhaust system
- Transmission
- Clutch
- Manual gearbox
- Front axle
- Rear axle
- Chassis
- Steering
- Brake system
- Body
- Exterior
- Interior
- Electrical equipment
- Heating system
- Equipment and devices
- Electrical circuits
- General information
- Specifications
- Operation and maintenance
- 4-cylinder engine
- Engine repair
- Cooling and lubrication system
- Supply system
- Ignition system
- 6-cylinder engine
- Engine repair
- Cooling and lubrication system
- Supply system
- Fuel injection system
- Ignition system
- Transmission
- Clutch
- 4-speed manual gearbox
- 5-speed manual gearbox
- Automatic gearbox
- Cardan and rear axle
- Chassis
- Steering
- Front suspension
- Rear suspension
- Brake system
- Electrical equipment
- Equipment and devices
- Electrical circuits