
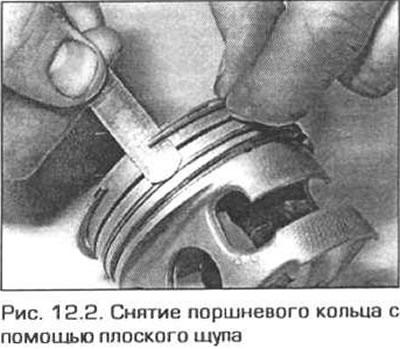
2. To remove the ring, separate its ends and pull the ring up through the piston. To prevent the ring from falling into free grooves, two or three old probes can be inserted under the ring (pic. 12.2). The rings have sharp ends - do not injure your hands, and do not scratch the surface of the piston. In addition, the rings are very fragile and break easily. Keep in mind that the third (oil scraper) the ring is provided with a spring Remove the rings only through the piston crown. If rings are to be used further, keep them together with the corresponding piston. Note which side each ring is facing up.
3. Scrape the carbon off the piston crown. Carbon deposits can be removed with a wire brush or sandpaper.
4. Clean the grooves for the rings from carbon deposits. To do this, you can use a piece of the piston ring. Only remove carbon deposits from the grooves, not piston metal. The piston is made of aluminum alloy and is easily scratched by the hard and sharp ring.
5. After cleaning from carbon deposits, wash the piston and connecting rod with kerosene or other solvent and dry them well. Don't forget to clean the oil holes in the bottom ring groove.
6. If the cylinders and pistons are not too worn or damaged, you can not bore the cylinders and do not change the pistons. Measure piston diameters and make sure piston diameters are within tolerance. Check clearances between pistons and cylinders. If the gaps are too large, then the cylinders will still have to be bored out and the pistons replaced. On a normally run-in piston, there may be a light uniform strip on one side and a small play of the upper compression ring in the groove. When assembling the engine, the piston rings are replaced with new ones in any case.
7. Carefully inspect each piston for cracks in the skirt, around the piston pin holes, and between the ring grooves.
8. Inspect the piston skirt for scratches and nicks, the piston crown for burn marks and scorched or overheated areas around the edges. If there are scratches and scuffs on the skirt, then the engine may have overheated due to an insufficiently efficient cooling system or due to improper combustion. In this case, it is necessary to carefully check the cooling and lubrication systems. Scorched areas along the edges of the piston crown indicate a breakthrough of gases into the crankcase. Bottom burnouts or overheated areas along the edges of the piston are due to improper ignition (self-ignition, detonation). If such defects are found, it is necessary to find out and eliminate their cause, otherwise the defects will arise again. The reasons may be incorrect ignition timing, leakage in the intake system, a mixture of the wrong composition.
9. Pitting on the piston crown means that coolant is entering the combustion chamber or crankcase. In this case, you also need to find and eliminate the cause.
10. New pistons can be ordered from your BMW dealer.
11. Inspect each connecting rod for damage such as cracks around the holes in the top and bottom heads. Make sure the connecting rods are not bent or warped. Such defects are unlikely unless the engine has been seized and has not overheated. A complete check of the connecting rods can be performed by a workshop specialist using special equipment.
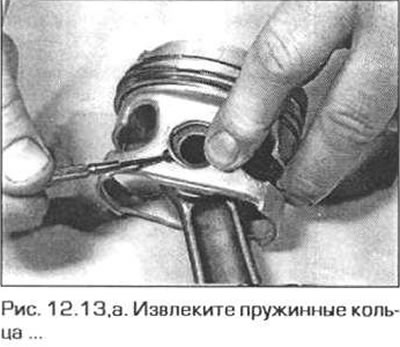
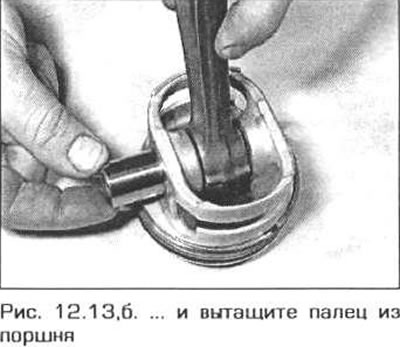
12. Piston pins of floating type, fixed from axial mixing by spring rings. The connecting rod can be separated from the piston as follows.
13. Using a small screwdriver, remove the spring rings holding the finger (pic. 12.13, a, b). To extract the finger, the force of the hand should be enough. Mark the piston and pin for reassembly. Spring rings can be thrown away - new ones are needed for assembly. The manufacturer does not recommend changing the pins separately from the pistons - the pins are matched to specific pistons in size within tolerance.
14. Inspect the piston pins and top heads of the respective connecting rods for wear and damage. The finger should enter the connecting rod by hand, without noticeable play. In case of heavy wear, it is necessary to change the piston with a pin in a pair.
15. It is not normally necessary to change the connecting rods, except in the event of a seized engine or other serious malfunction. Evaluate the straightness of the connecting rod by eye and, if there are any suspicions, give it to a specialist for a more thorough check.
16. Check all parts and purchase replacement parts. Pistons are usually supplied complete with pins and circlips.
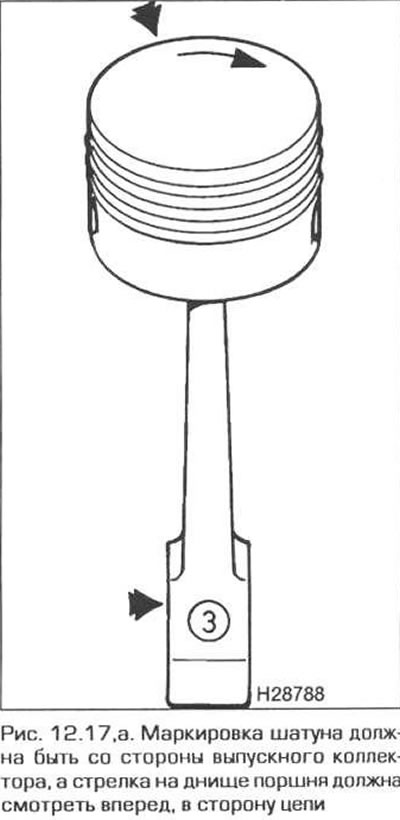
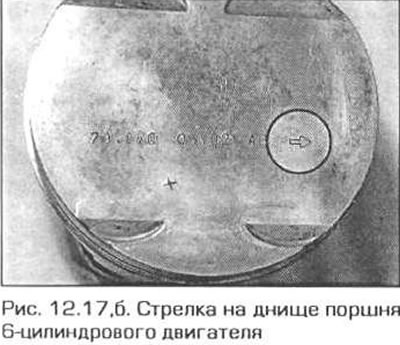
17. When connecting the connecting rod to the piston, turn them relative to each other so that, after installation in the engine, the numbers on the connecting rod and the cover of its lower head face the exhaust manifold, and the arrow on the piston crown faces the front side of the engine (to the chain) (fig 12.17, a, b).
18. Lubricate the piston pin with engine oil and insert it into the piston and into the upper head of the connecting rod. Check that the piston rotates easily with respect to the connecting rod. Secure the finger with two circlips. Make sure that the rings are in position in their grooves.