
Table of contents: Cleaning ↓ Examination ↓
- Home
- BMW 3 Series
- E46
- Power unit
- Engine overhaul
- Cylinder head and valve mechanism — cleaning and checking the condition
Cylinder head and valve mechanism — cleaning and checking the condition (BMW 3 Series E46)
1. A thorough cleaning of the cylinder head and valve train and subsequent inspection of their condition will allow you to estimate the amount of repair work that needs to be done. Note: If the engine has been significantly overheated, the cylinder head is most likely warped - check this assumption especially carefully.
2. Scrape off any remaining old gasket from the cylinder head.
3. Scrape off carbon deposits from combustion chamber surfaces and valve passages. Wash the head in kerosene or other suitable solvent.
4. Scrape off any heavy carbon deposits from the valve heads, then give the valve heads and stems a final cleaning with a wire brush clamped in a power drill.
5. Carefully inspect the head for cracks, obvious leaks and other damage. If cracks are found, the head must be replaced.
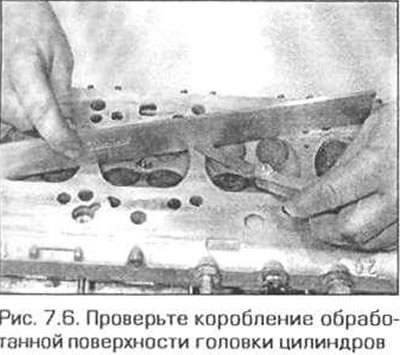
6. Check the machined surface of the head for warpage. To do this, apply the edge of a steel ruler to the surface being checked and measure the gap between the ruler and the surface in several places using flat feeler gauges (Fig. 7.6). If the surface is warped, it may be possible to restore it by mechanical treatment, if after treatment its height does not become less than the permissible level. Note. If the head is ground by 0.3 mm, then when assembling the engine, a gasket 0.3 mm thicker than usual should be installed under it. This is necessary to maintain the compression ratio, prevent the valves from hitting the pistons, and maintain the correct distances between the valve plates and guides.
7. Inspect the valve seats in each combustion chamber. If the seats are cracked, burnt through or severely pitted, the seats should be replaced or reground (this is a job for a specialist). If the seat surfaces are only slightly pitted, this defect can be corrected by grinding the valves to the seats as described below.
8. Check the wear of the valve guide bushings. To do this, insert the valve into the corresponding bushing. Rock the valve from side to side. A small amount of play is acceptable. If the play seems excessive, replace the valve. Guide bushings are not supplied separately as spare parts, while the valves are produced with stems of various repair sizes.
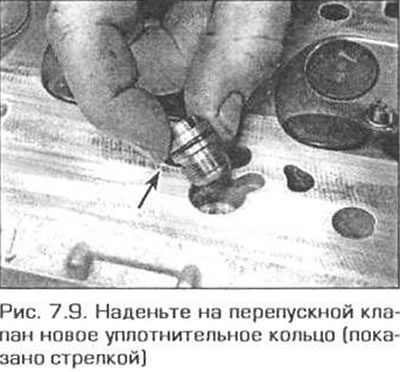
9. On a 6-cylinder engine, unscrew the bypass valve from the lower plane of the cylinder head. Make sure that the valve is blown from the bottom up, and not blown from the top down. Wash the valve, replace the sealing ring on its body and screw it into place, tightening it securely (Fig. 7.9).
10. Inspect the camshaft bearing bores and caps for significant wear or damage.
11. On engines with separate camshaft bearings, check the mating surfaces of the bearings and the cylinder head for warpage using a steel ruler placed on its edge and flat feeler gauges. If the warpage exceeds the permissible level, the bearings and head will have to be replaced.
12. Inspect the valve heads for cracks, burnout, wear, and pitting. Inspect the valve stems for scoring and significant wear. Rotate the valve in the guide and see if the stem is bent. Inspect the stem ends for significant wear and wear. If such defects are found, replace the valve.
13. If the inspection shows that the valve is in good condition, do not rush to rejoice. Measure the diameter of the valve stem in several places with a micrometer (Fig. 7.13). A significant difference in diameters indicates unacceptable wear of the stems. In this case, the valve should also be replaced.

14. If the valves are in good condition, they should be lapped to the seats to create a hermetic, gas-tight joint. If the seat is not severely pitted, or if it has been reground, lapping with only a fine abrasive paste may be sufficient. Coarse paste should only be used if the seat has burnouts or deep pitting. In this case, it is recommended to show the cylinder head to a specialist who will decide whether the seat can be restored by lapping or whether it needs to be reground or even replaced.
15. The valve grinding is performed as follows: Place the cylinder head on the workbench with the combustion chambers facing up.
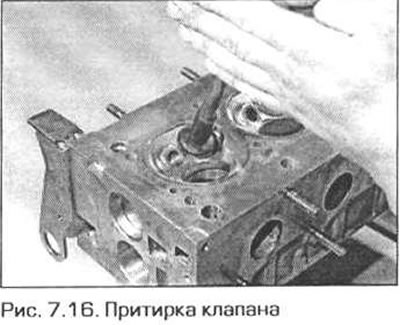
16. Apply a layer of abrasive paste of the appropriate grain size to the seat surface. Insert the valve and press it to the seat with the suction cup of the lapping device. Clamp the rod of the lapping device between your palms and rotate the valve in one direction and the other (Fig. 7.16). From time to time, lift the valve and redistribute the paste evenly over the seat. The operation is significantly simplified if you place a weak spring under the valve plate.
17. When using coarse lapping paste, stop lapping when a matte belt without breaks forms on the valve seat and valve plate. Then wipe off the coarse paste from the surfaces and continue lapping with fine paste. Continue lapping until both surfaces acquire a matte gray color. Do not lap the valves more than necessary.
18. After grinding all the valves, wash off all the remaining paste with kerosene or another suitable solvent.
19. Inspect the valve springs for damage and overheating. The manufacturer does not specify the length of the springs in a free state, so they can only be compared with a new spring.
20. Place each spring on a smooth surface and check that it is perpendicular to the surface. If any of the springs are defective, bent, or have lost their elasticity, replace the entire set of valve springs. It is recommended to replace all valve springs regardless of their condition if the engine is being overhauled.
21. Replace all valve stem seals regardless of their condition.
22. Inspect the mating surfaces of these parts for significant wear and scoring. If significant wear is evident, replace the parts.
Cleaning
2. Scrape off any remaining old gasket from the cylinder head.
3. Scrape off carbon deposits from combustion chamber surfaces and valve passages. Wash the head in kerosene or other suitable solvent.
4. Scrape off any heavy carbon deposits from the valve heads, then give the valve heads and stems a final cleaning with a wire brush clamped in a power drill.
Examination
Note. Before making a decision about the need for mechanical processing of parts and contacting the service station specialists for help, perform all the checks listed below. Make a list of points where you need professional help.
Cylinder head
5. Carefully inspect the head for cracks, obvious leaks and other damage. If cracks are found, the head must be replaced.
6. Check the machined surface of the head for warpage. To do this, apply the edge of a steel ruler to the surface being checked and measure the gap between the ruler and the surface in several places using flat feeler gauges (Fig. 7.6). If the surface is warped, it may be possible to restore it by mechanical treatment, if after treatment its height does not become less than the permissible level. Note. If the head is ground by 0.3 mm, then when assembling the engine, a gasket 0.3 mm thicker than usual should be installed under it. This is necessary to maintain the compression ratio, prevent the valves from hitting the pistons, and maintain the correct distances between the valve plates and guides.
7. Inspect the valve seats in each combustion chamber. If the seats are cracked, burnt through or severely pitted, the seats should be replaced or reground (this is a job for a specialist). If the seat surfaces are only slightly pitted, this defect can be corrected by grinding the valves to the seats as described below.
8. Check the wear of the valve guide bushings. To do this, insert the valve into the corresponding bushing. Rock the valve from side to side. A small amount of play is acceptable. If the play seems excessive, replace the valve. Guide bushings are not supplied separately as spare parts, while the valves are produced with stems of various repair sizes.
9. On a 6-cylinder engine, unscrew the bypass valve from the lower plane of the cylinder head. Make sure that the valve is blown from the bottom up, and not blown from the top down. Wash the valve, replace the sealing ring on its body and screw it into place, tightening it securely (Fig. 7.9).
10. Inspect the camshaft bearing bores and caps for significant wear or damage.
11. On engines with separate camshaft bearings, check the mating surfaces of the bearings and the cylinder head for warpage using a steel ruler placed on its edge and flat feeler gauges. If the warpage exceeds the permissible level, the bearings and head will have to be replaced.
Valves
Warning! The exhaust valves of some engines are filled with sodium to improve their thermal conductivity. Sodium is a very reactive metal and can cause a fire or explosion, especially when in contact with water or water vapor. Such valves should not be disposed of as normal scrap. Consult your local authorities or your BMW dealer regarding disposal of such valves.
12. Inspect the valve heads for cracks, burnout, wear, and pitting. Inspect the valve stems for scoring and significant wear. Rotate the valve in the guide and see if the stem is bent. Inspect the stem ends for significant wear and wear. If such defects are found, replace the valve.
13. If the inspection shows that the valve is in good condition, do not rush to rejoice. Measure the diameter of the valve stem in several places with a micrometer (Fig. 7.13). A significant difference in diameters indicates unacceptable wear of the stems. In this case, the valve should also be replaced.
14. If the valves are in good condition, they should be lapped to the seats to create a hermetic, gas-tight joint. If the seat is not severely pitted, or if it has been reground, lapping with only a fine abrasive paste may be sufficient. Coarse paste should only be used if the seat has burnouts or deep pitting. In this case, it is recommended to show the cylinder head to a specialist who will decide whether the seat can be restored by lapping or whether it needs to be reground or even replaced.
15. The valve grinding is performed as follows: Place the cylinder head on the workbench with the combustion chambers facing up.
16. Apply a layer of abrasive paste of the appropriate grain size to the seat surface. Insert the valve and press it to the seat with the suction cup of the lapping device. Clamp the rod of the lapping device between your palms and rotate the valve in one direction and the other (Fig. 7.16). From time to time, lift the valve and redistribute the paste evenly over the seat. The operation is significantly simplified if you place a weak spring under the valve plate.
17. When using coarse lapping paste, stop lapping when a matte belt without breaks forms on the valve seat and valve plate. Then wipe off the coarse paste from the surfaces and continue lapping with fine paste. Continue lapping until both surfaces acquire a matte gray color. Do not lap the valves more than necessary.
18. After grinding all the valves, wash off all the remaining paste with kerosene or another suitable solvent.
Valve Mechanism Parts
19. Inspect the valve springs for damage and overheating. The manufacturer does not specify the length of the springs in a free state, so they can only be compared with a new spring.
20. Place each spring on a smooth surface and check that it is perpendicular to the surface. If any of the springs are defective, bent, or have lost their elasticity, replace the entire set of valve springs. It is recommended to replace all valve springs regardless of their condition if the engine is being overhauled.
21. Replace all valve stem seals regardless of their condition.
Pushers and hydraulic supports
22. Inspect the mating surfaces of these parts for significant wear and scoring. If significant wear is evident, replace the parts.
This article is available at russian, bulgarian, belarusian, ukrainian, serbian, croatian, romanian, polish, slovak, hungarian
Article verified: Ilyinsky Matvey
Share information:
Previous articles
БМВ E46: Engine overhaul
Next articles
Similar articles on other types of BMW cars:
Cleaning and checking the condition of the cylinder head and… BMW 5 Series E28 (1981-1988)
Checking the technical condition of the cylinder head BMW 5 Series E12 (1972-1981)
Cylinder head — cleaning and inspection BMW 7 Series E32 (1986-1994)
Removal and installation cylinder head covers BMW 7 Series E38 (1994-2001)
Cylinder head BMW X3 E83 (2003-2010)
Checking the valve timing of the left cylinder head BMW X5 E53 (1999-2006)
Link in different formats to this page
Visitor comments
No comments yet
- General information
- Manual
- Maintenance
- Power unit
- Engine repair
- Cooling system
- Power system (gasoline)
- Injection system (gasoline)
- Fuel system (diesel)
- Exhaust system
- Ignition system
- Charge and launch systems
- Transmission
- Car gearbox
- Clutch and drive shafts
- Chassis
- Brake system
- Suspension front and rear
- Steering
- Body
- Body care and repair
- Exterior
- Interior
- Electrical equipment
- Troubleshooting
- Lighting and signaling
- Equipment and devices
- Heater and air conditioner
- Electrical circuits
- General information
- Manual
- Repair on the road
- Weekly checks
- Maintenance
- Troubleshooting
- Power unit
- 4 cylinder engines
- 6 cylinder engines
- Engine overhaul
- Cooling and heating
- Fuel and exhaust system
- Starting and charging system
- Ignition system
- Transmission
- Clutch
- Mechanical gearbox
- Automatic gearbox
- Cardan and drive shafts
- Chassis
- Brake system
- Wheel suspension
- Steering
- Body
- Exterior
- Interior
- Electrical equipment
- Equipment and devices
- Electrical circuits
- General information
- Maintenance
- Power unit
- Engine repair
- Cooling system
- Ignition system
- Supply system
- Fuel injection system
- Exhaust system
- Transmission
- Clutch
- Car gearbox
- Front and rear axle
- Chassis
- Steering
- Brake system
- Body
- Exterior
- Interior
- Electrical equipment
- Heating system
- Equipment and devices
- Power devices
- Electrical circuits
- Power unit
- M10/M20 engine
- M40 engine
- Ignition system
- Lubrication system
- Cooling system
- Supply system
- Fuel injection
- Exhaust system
- Transmission
- Clutch
- Manual gearbox
- Front axle
- Rear axle
- Chassis
- Steering
- Brake system
- Body
- Exterior
- Interior
- Electrical equipment
- Heating system
- Equipment and devices
- Electrical circuits
- General information
- Specifications
- Operation and maintenance
- 4-cylinder engine
- Engine repair
- Cooling and lubrication system
- Supply system
- Ignition system
- 6-cylinder engine
- Engine repair
- Cooling and lubrication system
- Supply system
- Fuel injection system
- Ignition system
- Transmission
- Clutch
- 4-speed manual gearbox
- 5-speed manual gearbox
- Automatic gearbox
- Cardan and rear axle
- Chassis
- Steering
- Front suspension
- Rear suspension
- Brake system
- Electrical equipment
- Equipment and devices
- Electrical circuits