
- Home
- BMW 5 Series
- E28
- Power unit
- Supply system
- Checking the operation and replacing the cold start injector and temperature switch
Checking the operation and replacing the cold start injector and temperature switch (BMW 5 Series E28)
Fuel is extremely flammable, so take extra precautions when working on any part of the fuel system. Do not smoke or allow open flames or unshaded lamps near the work area. Do not work in a garage with natural gas equipment with a wick (such as a water heater or a clothes dryer). If fuel comes into contact with your skin, wash it off immediately with soap and water. Wear safety glasses and keep a fire extinguisher handy when performing any work on the fuel system.
Cold start injector
Examination
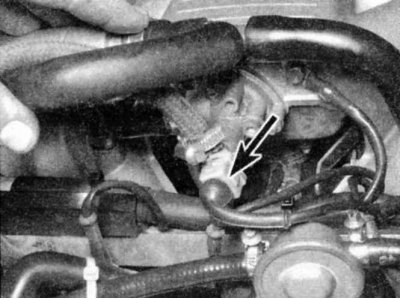
During this check the coolant temperature should be below 30°C. It is advisable that the engine has been stopped for several hours. Disconnect from the cold start injector (shown by arrow) electrical connector and move it away from the work area - fuel vapors will appear in the area.
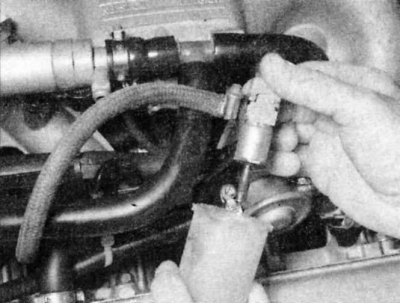
1. Loosen the two screws securing the injector to the intake manifold flange and remove the injector. The fuel line remains connected. Wipe the injector nozzle. Disconnect the ignition system by disconnecting the ignition coil wire from the central contact of the distributor cap and connecting it with a jumper to the cylinder block housing. Turn on the fuel pump for 1 minute by short-circuiting the corresponding relay contacts (see section Checking fuel pressure/fuel pump). There should be no fuel coming out of the injector nozzle. If fuel comes out of the nozzle, the injector is faulty and should be replaced. Turn off the ignition and restore the previous state of the relay connector.
2. Next, point the injector nozzle into the jar or bottle. Have an assistant turn on the ignition and starter. Fuel should start to flow out of the injector into the jar in a conical stream. If the spray pattern is good, the injector is working properly. If the spray pattern is irregular, the injector is damaged or faulty and should be cleaned or replaced.
3. If no fuel comes out of the cold start injector at all, with the starter on, check the voltage at the cold start injector electrical connector. If there is no voltage, check the temperature switch.
Temperature switch
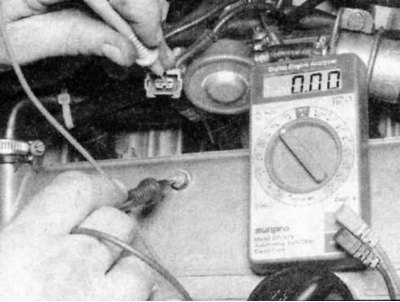
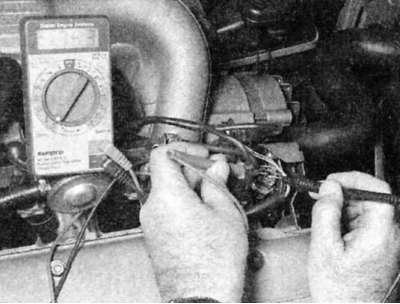
1. The temperature switch detects the engine temperature and controls the cold start injector. The switch is usually located at the top front near the coolant temperature sensor. For this check, the coolant temperature must be below 30°C. It is advisable that the engine has been stopped for several hours. Disable the ignition system by disconnecting the ignition coil wire from the central contact of the distributor cap and connecting it with a jumper to the cylinder block housing. Slide the rubber boot off the temperature switch and check for voltage at the connector contact with the black/yellow wire that goes to it with a voltmeter.
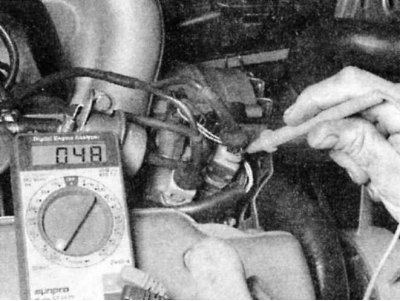
2. Have an assistant turn on the ignition and starter. The voltmeter should show voltage when the starter is turned on. Voltage should be present for approximately 6 to 10 seconds, depending on engine temperature.
3. If the voltage is correct, disconnect the electrical connector and use an ohmmeter to check for resistance between the temperature switch contacts. It should correspond to a short circuit.
4. Connect the ignition coil wire, start the engine and warm it up to a temperature above 41°C. There should be no short circuit between the contacts on a warmed-up engine. If there is, the switch is faulty and must be replaced.
Several types of temperature switches are installed. Each one is stamped with the operating temperature and maximum switching time.
Replacement
Cold start injector
1. Relieve the pressure in the fuel system (see section Relieving pressure in the fuel injection system).
2. Disconnect the electrical connector from the cold start injector.
3. If possible, use a socket or open-end wrench to loosen the fuel line nipple attached to the cold start injector. On other models, simply loosen the hose clamp and disconnect the hose from the injector.
4. Loosen the cold start injector mounting bolts and remove the injector.
5. Installation is the reverse of removal. Clean the mating surfaces and apply a new gasket.
Temperature switch
Wait until the engine has cooled down completely before starting this procedure. Also, to relieve residual pressure in the cooling system, unscrew the radiator cap or expansion tank.
1. Prepare the new temperature switch for installation by applying a thin layer of thread sealant to the threads.
2. Disconnect the electrical connector from the old switch.
3. Use a long socket or open-end wrench to loosen the switch. Coolant will leak out after the switch is removed, so install a new switch as soon as possible. Tighten the switch and reconnect the electrical connector.
This publication was borrowed from an online resource bmwman.ru
This article is available at russian, bulgarian, belarusian, ukrainian, serbian, croatian, romanian, polish, slovak, hungarian
Article verified: Zhuravleva Isolda
Share information:
Previous articles
БМВ E28: Supply system
Next articles
Similar articles on other types of BMW cars:
Checking and replacing the brake light switch BMW 3 Series E36 (1990-2000)
Checking the fuel system, replacing the fuel filter. Operation of a… BMW 3 Series E46 (1998-2006)
Brake Light Switch — Checking and Replacing BMW 7 Series E32 (1986-1994)
Checking the condition and replacing hoses and tubes in the engine… BMW 7 Series E38 (1994-2001)
Checking the operation of the power steering pump BMW X3 E83 (2003-2010)
Checking the engine oil level and replacing it BMW X5 E53 (1999-2006)
Link in different formats to this page
Visitor comments
No comments yet
- General information
- Governing bodies
- Manual
- Maintenance
- Power unit
- Engine repair
- Lubrication system
- Cooling system
- Ignition system
- Supply system
- Injection system (gasoline)
- Injection system (diesel)
- Exhaust system
- Transmission
- Clutch
- Car gearbox
- Front axle
- Rear axle
- Chassis
- Steering
- Brake system
- Wheels and tires
- Body
- Interior
- Exterior
- Heating system
- Electrical equipment
- Equipment and devices
- Power devices
- Windscreen wipers
- Electrical circuits
- General information
- Manual
- Maintenance
- Power unit
- Engine repair
- Ignition system
- Engine lubrication system
- Cooling system
- Fuel system (gasoline)
- Fuel system (diesel)
- Exhaust system
- Transmission
- Clutch
- Car gearbox
- Chassis
- Front and rear suspension
- Steering
- Brake system
- Body
- Exterior
- Interior
- Electrical equipment
- Heating system
- Equipment and devices
- Power devices
- Electrical circuits
- General information
- Manual
- Maintenance
- Power unit
- Engine in a car
- Engine overhaul
- Cooling system
- Supply system
- Ignition system
- Control system
- Transmission
- Clutch
- Manual gearbox
- Automatic gearbox
- Transmission line
- Chassis
- Steering
- Front suspension
- Rear suspension
- Brake system
- Body
- Body elements
- Car care and painting
- Electrical equipment
- Heater and air conditioner
- Equipment and devices
- Starter and generator
- Electrical circuits
- General information
- Operation and maintenance
- Specifications
- Power unit
- Engine repair
- Cooling and lubrication system
- Supply system
- Ecotronic power supply system
- Fuel injection system
- Ignition system
- Transmission
- Clutch
- Gearbox BMW 242/4
- Gearbox Getrag 262/8
- Gearbox Getrag 265/6
- Automatic gearbox
- Cardan gear
- Rear axle
- Chassis
- Steering
- Front suspension
- Rear suspension
- Brake system
- Electrical equipment
- Equipment and devices
- Electrical circuits