
Attention! All work on the exhaust system must only be carried out with a cold engine and a cold exhaust system.
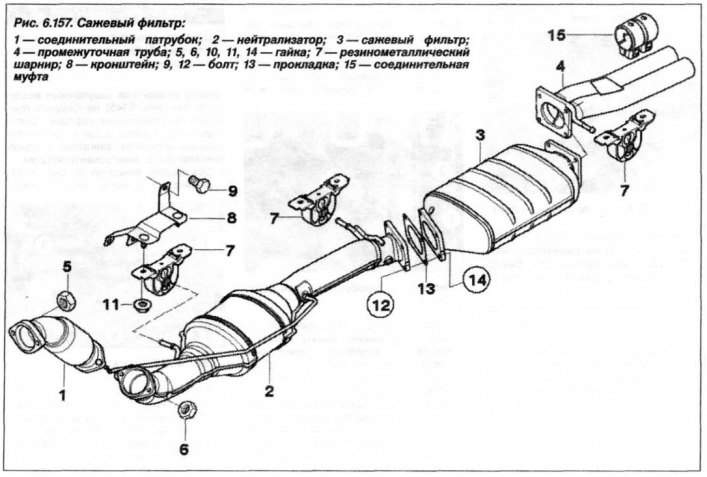
All elements of the exhaust system are interconnected by bolted, flanged and coupling connections, so they can be replaced individually.
Checking the tightness of the exhaust system must be carried out especially in the case when it is difficult to start the engine, the engine vibrates at idle, increases the speed in jerks. All this indicates a leak in the exhaust system.
The leak test must be carried out on a cold or slightly warm engine, in the following order.
Start the engine and cover the exhaust system with a cloth.
Check for possible leaks (flange connections) by the noise of the exhaust gas and by spraying suspicious places with a special spray, by the formation of bubbles.
Attention! The main criterion for replacing the elements of the exhaust system is their leakage.
The exhaust gas catalytic converter is shock-resistant.
Removing the exhaust system must be carried out in the following order. Allow the exhaust system to cool completely, the temperature must be below 35°C, apply the parking brake and block the wheels.
Support the exhaust system using the tool «31.2.220» (garage jack) and a wooden spacer. Remove the protective cover of the engine accessories.
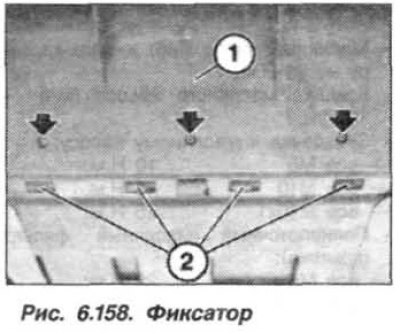
Remove bolts (arrows), release the lower and side locks (2, fig. 6.158) and take out the flap (1).
Loosen the internal rubber-metal hinges (5, see fig. 6.19) both rear mufflers. Loosen the three front rubber-metal hinges (5) exhaust systems.

Disconnect the loops of the oxygen content sensors in the exhaust gas and unscrew the sensors of the oxygen content in the exhaust gas from the exhaust system.
Moisten the screw connections of the exhaust system with a rust remover. The product can be applied by spray or brush. Wait a while for the rust to dissolve.
When working with an assistant, unscrew the threaded connection (nuts 2, 3) exhaust system between TC, connecting pipe (1) and converter with pipelines (4) and remove the tube (1).
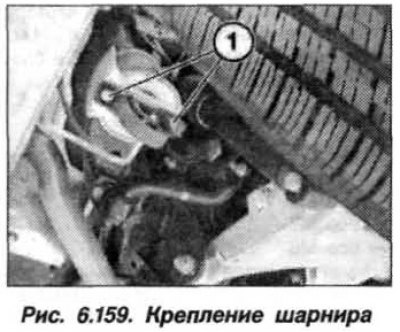
Loosen the bolts (1, fig. 6.159) fastening rubber-metal hinges on the rear axle beam and the bottom of the body, on the left and right sides. Detach exhaust system from holder and remove from vehicle.
Installation of the exhaust system should be carried out in the reverse order, if necessary.
Replace all fasteners, rings and gaskets with new ones. Replace rubber mounts on rear muffler.
Check for deformation of the exhaust manifold flanges and corrosion of the pipelines. Straighten deformed flanges.
Lubricate the threads of bolts and nuts before installation with high-temperature copper-containing grease type «Liqui Moly LM-50B-ASC» or pasta «CRC».
When installing the exhaust system on the vehicle, first tighten the nuts by hand on the entire system. Align the exhaust system so that the gap between the body and the system is at least 25 mm at any point of its installation.
Fasten the converter with the downpipe to the connecting pipe using new self-locking nuts in two steps: the first - with a torque of 30 Nm (3.0 kgf·m) and the second - with a moment of 50 Nm (5.0 kgf·m). Tighten the bolts and nuts between the connecting pipe and the TC to a torque of 42 Nm (4.2 kgf·m).
Start the engine and check the tightness of the exhaust system by closing its outlet with a cloth gag.
If the stiffening plate was removed, then replace the bolts of its fastening and tighten them with a torque of 56 Nm (5.6 kgf·m) and turn 90°.