
Pressure Bleeding Kit (no more than 2.0 kgf/cm²) is installed in place of the cover of the feed tank for the brake-clutch drive system fluid; work should be carried out in accordance with the instructions for using the device.
Bleeding of the hydraulic clutch drive must be carried out in the following order.
Prepare the "21.5.030" tool and remove the rear part of the engine auxiliary unit protective panel.
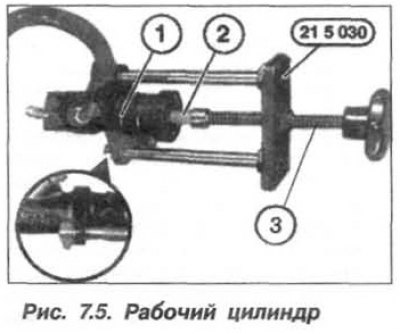
Unscrew the nuts (18, see Fig. 7.2), remove the slave cylinder (14) of the clutch hydraulic drive without disconnecting the pipeline. Install it on the slave cylinder (1, Fig. 7.5) device "21.5.030" and fully insert the piston rod (2) of the working cylinder using the lead screw (3).
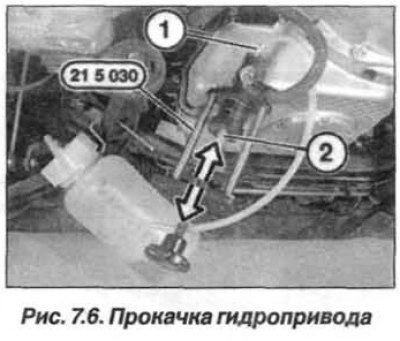
Connect the bleeding device to the clutch hydraulic fluid reservoir. Install the bleeding hose onto the fitting (1, Fig. 7.6). Hold the working cylinder with the device "21.5.030" in the position shown in Figure 7.6. Loosen the nipple (1) when the brake fluid flows without air bubbles, slightly push the piston rod (2) of the working cylinder outward with the lead screw and push it back in again. Screw in the nipple (1) for bleeding if air bubbles do not come out, otherwise repeat the entire process again.
Attention! Never remove the "21.5.030" device from the working cylinder if the brake pedal is pressed, otherwise the piston with the rod may be pushed out of the working cylinder.
Turn off the bleeding device and disconnect it from the tank. Slowly pull out the rod (2, see Fig. 7.5) piston of the working cylinder (1) using the device "21.5.030" and remove it from the working cylinder.
Install the slave cylinder on the manual transmission housing, replace the self-locking nuts and tighten them to a torque of 22 N·m (2.2 kgf·m).
Check the brake fluid level in the hydraulic reservoir and, if necessary, restore it.
In emergency cases, the hydraulic drive system is bled through the nipple (15, see Fig. 7.2) removing air from the clutch slave cylinder without removing it from the manual transmission. In this case, bleeding the hydraulic clutch drive must be carried out in the following order.
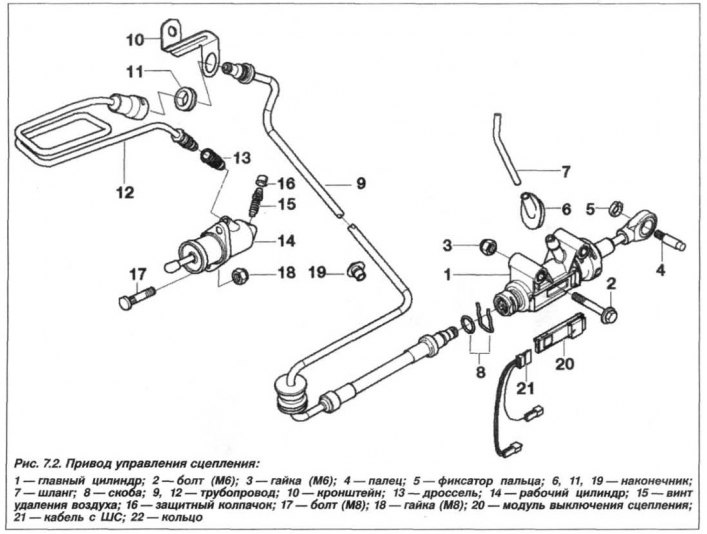
Clean the working cylinder from dirt and put one end of the transparent hose on the bleed nipple (15), having first removed the protective cap (16). Lower the other end of the hose into a jar filled 2/3 full with brake fluid. It is necessary to ensure that the end of the hose is constantly immersed in the fluid.
Check the level of the working fluid in the general feed tank of the systems and bring it up to the "Max" mark.
Attention! Constantly monitor the brake fluid level in the feed tank and keep it at the "Max" mark, adding fresh fluid to the system. Work with working (brake) fluid should be carried out in rubber gloves and a respirator.
Pre-filling the transparent hose with brake fluid is allowed. To do this, close the bleed nipple on the slave cylinder. Have the assistant slowly press the clutch pedal and hold it down. Open the bleed nipple. The brake fluid will begin to displace air from the tube into the can. Close the bleed nipple and release the clutch pedal.
Press the clutch pedal 9-11 times to create a sharp counterpressure on it. Fix the pedal in the pressed position and open the bleed nipple. The brake fluid will start to flow into the can, when the flowing fluid no longer contains air bubbles, tighten the bleed nipple.
Repeat the process as many times as necessary to ensure that there is no air in the escaping brake fluid. Tighten the bleed nipple to a torque of 15 N·m (1.5 kgf·m), remove the hose and put on the protective cap (16).
Restore the brake fluid level in the feed tank of the drive system to the "Max" mark. Check the operation of the brake system and clutch drive.
The removed brake fluid must be disposed of.
Attention! If extraneous sounds are detected during the inspection and there are comments on the functioning of the clutch (grinding noise, incomplete shutdown) you need to contact a service station to bleed the system under pressure, as there may be air left in the system.