
Table of contents: Removal ↓ Installation ↓
- Home
- BMW 5 Series
- E28
- Chassis
- Steering
- Removal and installation the steering gear
Removal and installation the steering gear (BMW 5 Series E28)
Removal
If you find that the steering mechanism is faulty, it is not recommended to repair it yourself. Since repairs require special tools, it is better to provide it to the dealer service department (or replace the unit completely). The procedure for removing and installing the steering gear is given below.
1. On E28 ("retro") models, discharge the hydraulic system by depressing the brake pedal approximately 20 times.
2. Using a large syringe or hand pump, drain the power steering hydraulic reservoir (see chapter Routine car maintenance).
3. Jack up the front of the vehicle and securely place it on axle supports.
4. Support the front of the engine with a jack on wheels. Place a block of wood between the jack head and the oil pan to prevent damage to the pan.
5. Loosen the pivot bolts on the inner ends of the suspension arms (see chapter Front suspension).
6. Loosen the nuts on the left and right engine mounts (see chapter Engine).
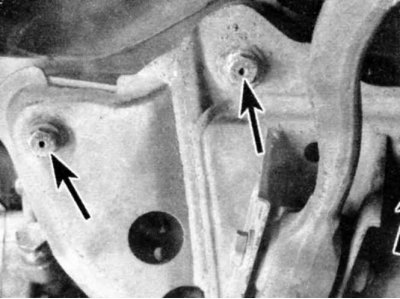
7. Remove the mounting bolts (on early models there were two on each side, on later models there were three on each side) on the subframe cross member and remove the subframe.
8. Loosen the nuts and bolts securing the steering shaft to the steering gear worm shaft. Lift the steering shaft up and remove it from the worm shaft. Inspect the steering shaft for signs of wear. If it is worn or the cardan joints are sticking, replace it.
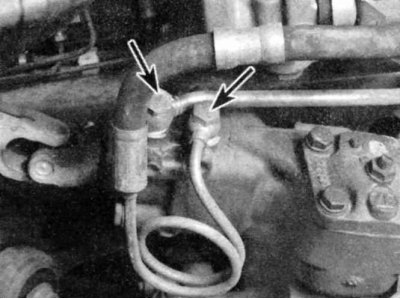
9. Loosen the hollow bolts and disconnect the intake (right arrow) and return lines (left arrow) hydraulic system from the steering gear. Note that the hollow bolt of the return line fitting is larger than the bolt of the inlet line fitting (shown for left hand drive models). Plug the ends of the lines to prevent contamination and fluid loss. Discard the sealing washers - new ones should be installed during reassembly.
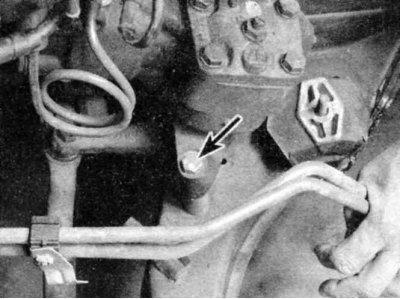
10. Loosen the steering gear mounting bolts and remove the steering gear. The bolt indicated by the arrow holds the steering gear to the subframe crossmember. Access to the nut, which is not visible in the photo above, is provided through a hole in the crossmember (in the photo the engine is removed for better visibility; a model with left-hand drive is shown):
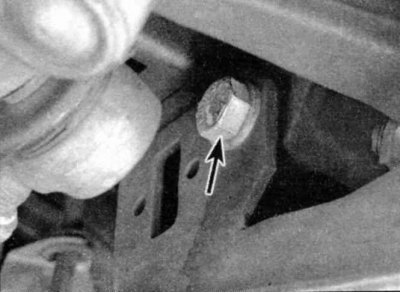
11. This bolt (indicated by the arrow) holds the steering gear to the body (the nut, which is not visible in the photo, is located on the front side of the mechanism):
12. If it is necessary to disconnect the steering knuckle from the sector shaft of the mechanism (to repair the mechanism or replace the bipod), mark both parts so that you can assemble them correctly. Remove the pitman arm mounting nut and washer. If necessary, use a puller to remove the pitman arm.
Installation
1. Install the steering arm by aligning the marks made earlier. Then tighten the nut to the required torque.
2. After installation, the steering arm should not have any noticeable axial play within 100 o from the neutral position. If there is play, check the following parts:
- Sector shaft and bearings (for wear)
- Thrust washer and adjusting bolt head (for wear)
- Ball nut and worm shaft (for wear)
3. Install the steering gear. Align the marks on the steering gear shaft and the steering shaft and tighten the steering gear mounting bolts to the required torque.
4. The rest of the installation procedure is the reverse of removal. Be sure to install new locknuts on the steering shaft, center tie rod, steering gear, and crossmember. Use new sealing washers on the hydraulic line unions.
5. Refer to Chapter Routine car maintenance and fill the power steering reservoir with the recommended fluid, then bleed the system as described in Section Bleeding the hydraulic system of the power steering mechanism. Check for fluid leaks in lines and connections.
This article is available at russian, bulgarian, belarusian, ukrainian, serbian, croatian, romanian, polish, slovak, hungarian
Article verified: Zhuravleva Isolda
Share information:
Previous articles
БМВ E28: Steering
Next articles
Similar articles on other types of BMW cars:
Steering gear — removal, repair and installation BMW 3 Series E46 (1998-2006, petrol)
Removal and installation steering BMW 3 Series E21 (1975-1983)
Removal and installation of the power steering gear BMW 7 Series E38 (1994-2001)
Gear Shift Lever — Removal and Installation BMW 7 Series E32 (1986-1994)
Removal and installation the power steering gear BMW X3 E83 (2003-2010)
Removal and installation the steering wheel BMW X5 E53 (1999-2006)
Link in different formats to this page
Visitor comments
No comments yet
- General information
- Governing bodies
- Manual
- Maintenance
- Power unit
- Engine repair
- Lubrication system
- Cooling system
- Ignition system
- Supply system
- Injection system (gasoline)
- Injection system (diesel)
- Exhaust system
- Transmission
- Clutch
- Car gearbox
- Front axle
- Rear axle
- Chassis
- Steering
- Brake system
- Wheels and tires
- Body
- Interior
- Exterior
- Heating system
- Electrical equipment
- Equipment and devices
- Power devices
- Windscreen wipers
- Electrical circuits
- General information
- Manual
- Maintenance
- Power unit
- Engine repair
- Ignition system
- Engine lubrication system
- Cooling system
- Fuel system (gasoline)
- Fuel system (diesel)
- Exhaust system
- Transmission
- Clutch
- Car gearbox
- Chassis
- Front and rear suspension
- Steering
- Brake system
- Body
- Exterior
- Interior
- Electrical equipment
- Heating system
- Equipment and devices
- Power devices
- Electrical circuits
- General information
- Manual
- Maintenance
- Power unit
- Engine in a car
- Engine overhaul
- Cooling system
- Supply system
- Ignition system
- Control system
- Transmission
- Clutch
- Manual gearbox
- Automatic gearbox
- Transmission line
- Chassis
- Steering
- Front suspension
- Rear suspension
- Brake system
- Body
- Body elements
- Car care and painting
- Electrical equipment
- Heater and air conditioner
- Equipment and devices
- Starter and generator
- Electrical circuits
- General information
- Operation and maintenance
- Specifications
- Power unit
- Engine repair
- Cooling and lubrication system
- Supply system
- Ecotronic power supply system
- Fuel injection system
- Ignition system
- Transmission
- Clutch
- Gearbox BMW 242/4
- Gearbox Getrag 262/8
- Gearbox Getrag 265/6
- Automatic gearbox
- Cardan gear
- Rear axle
- Chassis
- Steering
- Front suspension
- Rear suspension
- Brake system
- Electrical equipment
- Equipment and devices
- Electrical circuits