
Parking brake shoe linings on models with rear disc brakes may be made from asbestos-containing materials. Please refer to the Warning at the beginning of this Section Replacement of brake drum shoes. When servicing these components, do not create dust by rubbing or grinding the linings.
The parking brake system should be checked regularly. With the car parked on a hill, set the parking brake, put the transmission in neutral and check if the parking brake alone, with the brakes released, can hold the car (during the inspection you must be in the car). However, every two years, or if a fault is suspected, the parking brake assembly itself must be inspected.
1. After jacking up the car and placing it on axle supports, remove the rear wheels.
2. On models with rear drum brakes, perform the normal procedure for checking the brake shoe lining thickness as described in Chapter Routine car maintenance.
3. On models with rear disc brakes, remove the rear discs as described in Section Inspection, removal and installation of the brake disc. Hang the caliper assemblies on a clothes hanger or thick wire; do not disconnect the brake lines from the caliper.
4. With the disc removed, the parking brake components are clearly visible and can be inspected for signs of wear and damage. The linings usually last the same as the vehicle. However, they can wear if the parking brake system is poorly adjusted or if the parking brake is used repeatedly to stop the vehicle. There is no minimum lining thickness for the parking brake shoes, but as a rule of thumb, if it is less than 1.5 mm, the linings should be replaced. Also check the springs and adjuster mechanism and inspect the drum for deep scratches or other damage.
Removal and installation
The following procedure applies only to models with rear disc brakes. The parking brake system on models with rear drum brakes is an integral part of the rear brake assembly (see section Replacement of brake drum shoes).
1. Loosen the rear wheel mounting bolts, jack up the rear of the vehicle and securely place it on axle stands. Remove the rear wheels. Remove the brake discs (see section Inspection, removal and installation of the brake disc). Work on only one side of the car at a time so that the other side can serve as a reference during assembly and to avoid mixing up parts.

2. Remove the lower shoe tension spring (diagonal pliers are used for this as they grip the spring well, but care must be taken not to damage the spring).
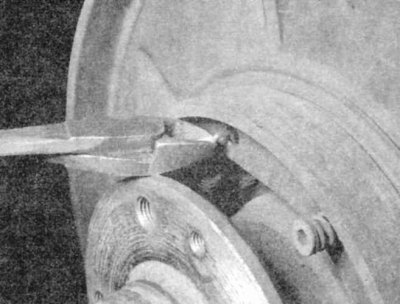
3. Remove the upper shoe tension spring.
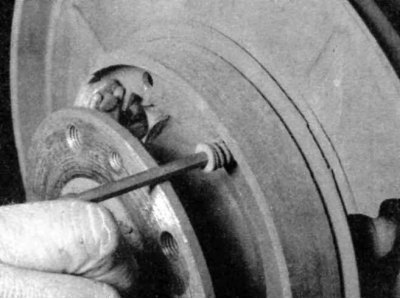
4. Remove the shoe retaining springs.
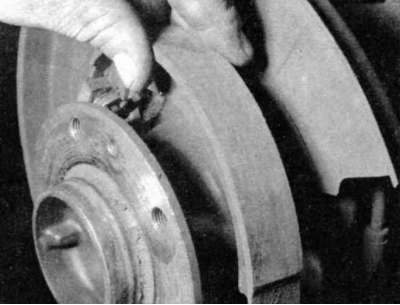
5. Remove the brake shoes.
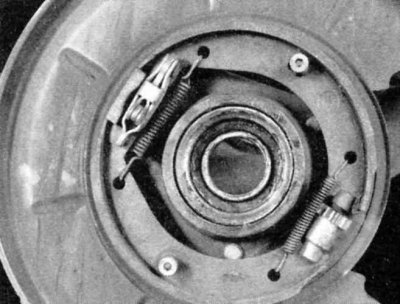
6. Install in reverse order. After finishing the work, the actuator should be correctly installed between the two shoes, as shown in the photo (the hub has been removed for clarity).
7. After installing the brake disc, adjust the parking brake shoes. Temporarily install the two wheel mounting bolts, turn the adjuster and spread the shoes wide enough to lock the disc, then turn it back just enough so that the shoes do not brake (see section Adjusting the parking brake). Install the wheel mounting bolts and tighten them to the required torque.