
- Home
- BMW 5 Series
- E28
- Chassis
- Brake system
- Removal and installation the master brake cylinder
Removal and installation the master brake cylinder (BMW 5 Series E28)
Brake fluid is poisonous. It is also a strong paint solvent. See Warning in Section Bleeding the hydraulic brake system.
Although there are parts and a master cylinder rebuild kit available for most models, we still recommend replacing the entire master cylinder with a new or overhauled one. It will take you much longer to rebuild a master cylinder than to replace it, and you won't be able to tell if your master cylinder needs an overhaul until you remove it. And then you may find that it's simply beyond repair.
Removal
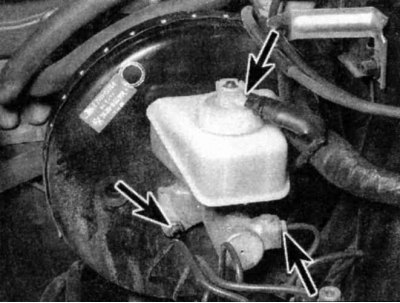
1. The master cylinder is connected to the brake booster, and both are mounted on the bulkhead on the left side of the engine compartment. To remove the master cylinder, disconnect the electrical connector (top arrow), hydraulic brake line nipples (bottom right arrow, the other fitting is not visible in this photo) and remove the two master cylinder mounting nuts (bottom left arrow, other nut not visible in this photo).
2. Using a syringe, suck out as much liquid as possible from the reservoir.
3. Place rags under the line fittings and have caps or plastic bags available to plug the ends of the tubes after disconnecting them.
Brake fluid will damage paint. Cover all body parts and try not to spill any fluid during this procedure.
4. Loosen the union nuts on the ends of the brake pipes where they connect to the master cylinder. To prevent the flats on these nuts from stripping, use a special open-end (or "brake") wrench that covers the entire nut.
5. Carefully remove the brake pipes from the master cylinder and plug their ends to prevent dirt from entering and fluid from leaking.
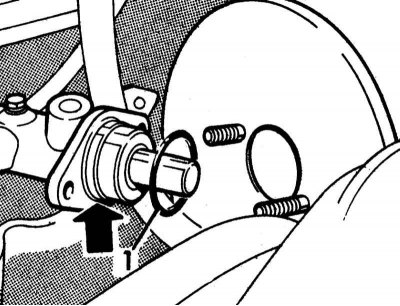
6. Disconnect all electrical connectors from the master cylinder, then remove the nuts that secure the master cylinder to the brake booster. Pull the cylinder off the studs and out of the engine bay. Again, be careful not to spill any fluid. Discard the O-ring between the master cylinder and the brake booster.
This sealing ring should always be replaced. A faulty sealing ring can cause vacuum leakage, which will reduce brake performance and cause intermittent brake failure.
Pumping procedure
1. Before installing a new or overhauled master cylinder, it should be blown out on a work bench. It is recommended to mount the master cylinder in a vice, as you will have to apply pressure to its piston and at the same time control the flow from the brake pipe outlets. Use a vice with protected jaws and do not overtighten it, otherwise the master cylinder body may crack.
2. Insert threaded plugs into the brake line outlets. Tighten them so that no air gets in, but they are easy to release.
3. Fill the reservoir with the recommended type of brake fluid (see chapter Routine car maintenance).
4. Remove one plug and push the piston assembly into the master cylinder bore to remove air from the cylinder. Use a large Phillips screwdriver to do this.
5. To prevent air from entering back into the master cylinder, install and tighten the plug until the pressure on the piston assembly is relieved.
6. Repeat the procedure until the brake fluid comes out of the brake line outlet without air bubbles. Repeat the procedure for the other brake line outlet with the plug. Monitor the brake fluid level in the reservoir to prevent air from entering the system.
7. The bench bleed procedure does not use high pressure, so the plugs described above do not need to be installed each time the piston is released. Instead, before releasing the piston, place your finger firmly over the hole to prevent air from getting back into the cylinder. Wait a few seconds to allow the brake fluid to flow from the reservoir into the piston cylinder, then depress the piston again, removing your finger as fluid flows out. Remember to place your finger over the hole each time the piston is released, and when the procedure for that hole is complete, replace the plug and tighten it before moving on to the next hole.
Installation
1. Install the master cylinder (together with a new sealing ring) onto the vacuum booster studs and tighten the mounting nuts with your fingers.
2. Attach the brake line fittings to the master cylinder. Since the master cylinder is not yet firmly secured, it can be moved slightly to make it easier to attach the fittings. Be careful not to strip the threads when tightening the fittings.
3. Tighten the brake system nipples and mounting nuts to the required torque.
4. Fill the master cylinder reservoir with brake fluid, then bleed the master cylinder (only if it hasn't already been pumped) and the braking system as described in Section Bleeding the hydraulic brake system.
5. To bleed the cylinder directly on the car, have an assistant press the brake pedal several times and then hold it fully depressed. Loosen the union nut to allow air and fluid to escape, then tighten the nut. Repeat this procedure until fluid begins to come out without air bubbles. Check the brakes thoroughly before starting normal operation of the car.
[The original entry can be found on the portal bmwman.ru]
This article is available at russian, bulgarian, belarusian, ukrainian, serbian, croatian, romanian, polish, slovak, hungarian
Article verified: Zhuravleva Isolda
Share information:
Previous articles
БМВ E28: Brake system
Next articles
Similar articles on other types of BMW cars:
Brake Master Cylinder — Removal and Installation BMW 3 Series E21 (1975-1983)
Clutch Master Cylinder — Removal, Inspection and Installation BMW 3 Series E46 (1998-2006, petrol)
Removal and installation of the brake master cylinder and its… BMW 7 Series E38 (1994-2001)
Cylinder head of gasoline engines of the M52 series — removal and… BMW 7 Series E32 (1986-1994)
Removal and installation the clutch master cylinder BMW X3 E83 (2003-2010)
Removal and installation the parking brake lever BMW X5 E53 (1999-2006)
Link in different formats to this page
Visitor comments
No comments yet
- General information
- Governing bodies
- Manual
- Maintenance
- Power unit
- Engine repair
- Lubrication system
- Cooling system
- Ignition system
- Supply system
- Injection system (gasoline)
- Injection system (diesel)
- Exhaust system
- Transmission
- Clutch
- Car gearbox
- Front axle
- Rear axle
- Chassis
- Steering
- Brake system
- Wheels and tires
- Body
- Interior
- Exterior
- Heating system
- Electrical equipment
- Equipment and devices
- Power devices
- Windscreen wipers
- Electrical circuits
- General information
- Manual
- Maintenance
- Power unit
- Engine repair
- Ignition system
- Engine lubrication system
- Cooling system
- Fuel system (gasoline)
- Fuel system (diesel)
- Exhaust system
- Transmission
- Clutch
- Car gearbox
- Chassis
- Front and rear suspension
- Steering
- Brake system
- Body
- Exterior
- Interior
- Electrical equipment
- Heating system
- Equipment and devices
- Power devices
- Electrical circuits
- General information
- Manual
- Maintenance
- Power unit
- Engine in a car
- Engine overhaul
- Cooling system
- Supply system
- Ignition system
- Control system
- Transmission
- Clutch
- Manual gearbox
- Automatic gearbox
- Transmission line
- Chassis
- Steering
- Front suspension
- Rear suspension
- Brake system
- Body
- Body elements
- Car care and painting
- Electrical equipment
- Heater and air conditioner
- Equipment and devices
- Starter and generator
- Electrical circuits
- General information
- Operation and maintenance
- Specifications
- Power unit
- Engine repair
- Cooling and lubrication system
- Supply system
- Ecotronic power supply system
- Fuel injection system
- Ignition system
- Transmission
- Clutch
- Gearbox BMW 242/4
- Gearbox Getrag 262/8
- Gearbox Getrag 265/6
- Automatic gearbox
- Cardan gear
- Rear axle
- Chassis
- Steering
- Front suspension
- Rear suspension
- Brake system
- Electrical equipment
- Equipment and devices
- Electrical circuits