
Attention! All work must be carried out on a cold engine. Coolant temperature must be less than +40°C.
The BMW X5 E53 coolant replacement must be carried out in the following order.
- Place the car still on a level surface and remove the cap from the expansion tank, securing your hand with a large piece of cloth if the engine is still warm. Loosen the air bleed screw on the radiator pipe (engines "M62" and "N62") or on the expansion tank (engines "M54" and "M57").
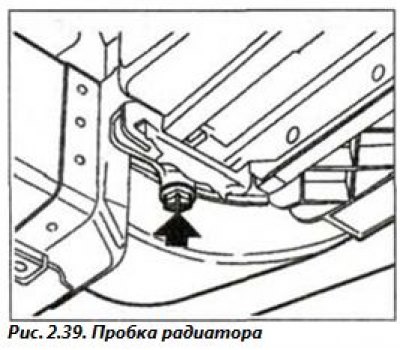
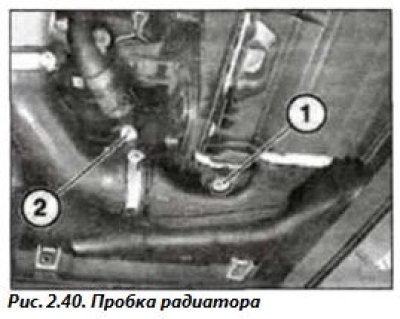
- Remove the stiffening plate and the front underbody trim. Place a clean container under the radiator and use a large flat-head screwdriver to unscrew the drain plug at the bottom of the radiator, M62 engine (Fig. 2.39), M54 and M57 engine (Fig. 2.40).
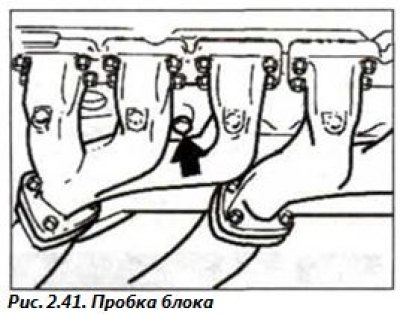
Place a clean container under the cylinder block and use a wrench to unscrew the drain plug (2.41) on the cylinder block, which is located under the exhaust manifold.
Completely drain the coolant from the system and send it for disposal.
- Check the condition of the radiator and heater hoses and their fastening clamps. Replace defective parts. Remove the damaged radiator and send it to a specialized workshop.
- Install the drain plug (M14x1.5) with a new gasket (A14x18) on the cylinder block and tighten to a torque of 25 N·m (2.5 kgf·m).
- Screw the drain plug into the radiator, tightening it on the M62 engine to a torque of 2.5 N·m (0.25 kgf·m), on the M54 and M57 engines - to a torque of 8.0 N·m (0.8 kgf·m). You can use a coin.
The cooling system should be flushed in the following order. Drain the coolant from the system, do not install plugs. Install transparent drain hoses on the drain holes. Flush the radiator with clean running water in large quantities, running water will do. Flush until there is no coolant from the hoses (or drain holes) clean water does not start to flow out. This can only remove deposits from the cooling system.
- To remove rust and scale, it is necessary to use a chemical cleaner of the cooling system. The procedure for its use is described by the manufacturer on the label of the package (bottle). After removing (draining) all the chemical cleaner, flush the engine cooling system with running water, as described above.
- Reinstall the cooling system drain plugs, see above.
- When installing a remote expansion tank (M62) in the engine cooling system, it is necessary to remove the overflow hose from it, drain the coolant, rinse it separately with clean water and connect it to the engine cooling system.
- The quality of the coolant must be checked in the following order. Fill the system with only high-quality coolant and in accordance with the climatic conditions of the vehicle operation. For the European region of Russia, this is a temperature of up to -35°C. Prepare a device for checking the density of the coolant - a hydrometer.
- Take a sample of the liquid from the expansion tank or coolant storage tank using a hydrometer. Read the readings from the device; the density should be within the range of 1.080–1.085 g/cm³. For reasons of corrosion resistance, the ratio of water to ethylene glycol (antifreeze) in the mixture should be maintained year-round at about 50:50.
- Filling the engine cooling system should be done in the following order. Fill the expansion tank with new coolant to the brim. Cover the radiator vent plug with a clean rag. The plug is located on the expansion tank (see fig. 2.22), pipe or radiator, depending on the vehicle's engine configuration. Open the ventilation plug (air bleed plug).
- Fill with new coolant until the liquid coming out of the vent plug is free of air bubbles. Close the vent plug and restore the coolant level in the expansion tank, see Fig. 2.22.
- Close the neck of the expansion tank with a plug and start the engine, turn on the heating and ventilation system in the "Warm" mode and warm up the engine until the viscous fan clutch engages. At the same time, maintain the shaft speed at about 2500 min⁻¹. In the process of removing air from the system, the fluid level will drop to the "MIN" mark on the expansion tank and even lower. Turn off the engine and let it cool down to 20-30°C.
- Open the cap on the expansion tank and restore the coolant level. The level is normal (M62) if the end of the red float is flush with the top edge of the filler neck (arrow, see Fig. 2.22). Open the vent plugs again and make sure that the liquid comes out without air bubbles.
- Check the expansion tank cap seals, install the cap and tighten it. Visually check the tightness of the cooling system. Especially in places where hoses are connected and plugs are installed. The hoses should be far from the connecting pipes and tightly secured with screw clamps. The appearance of coolant under the pump indicates damage to the pump seal. Replace the pump.