
Table of contents: Cylinders 1–4 ↓ Cylinders 5–8 ↓
- Home
- BMW X5
- E53
- N62 petrol engine
- Engine repair
- Replacing all pistons
Replacing all pistons (BMW X5 E53)
Attention!
- Pistons and piston pins are matched as a pair and cannot be disassembled.
- The crankshaft connecting rod bearing cap is machined together with the connecting rod and cannot be disassembled. There is a marking by cylinder and direction.
- The connecting rod and bearing cap markings must be on the same side and match in pairs.
- Install pistons, connecting rods and bearing shells in the same place and in the same position.
- When installing pistons into cylinders, to avoid breaking piston rings, do not apply significant force.
- The piston pin should be pushed through the bushing by pressing with a finger and should have no visible gap with it.
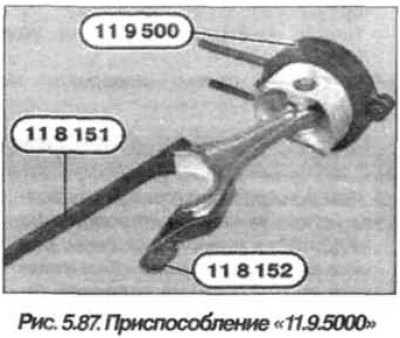
The pistons must be replaced in the following order. Prepare the tools "00.9.120", "11.8.141", "11.8.151", "11.8.152" and "11.9.500".
Remove the engine and install it on the assembly stand. Remove both cylinder heads and the oil pan.
Note: The sequence of operations during removal and installation is different.
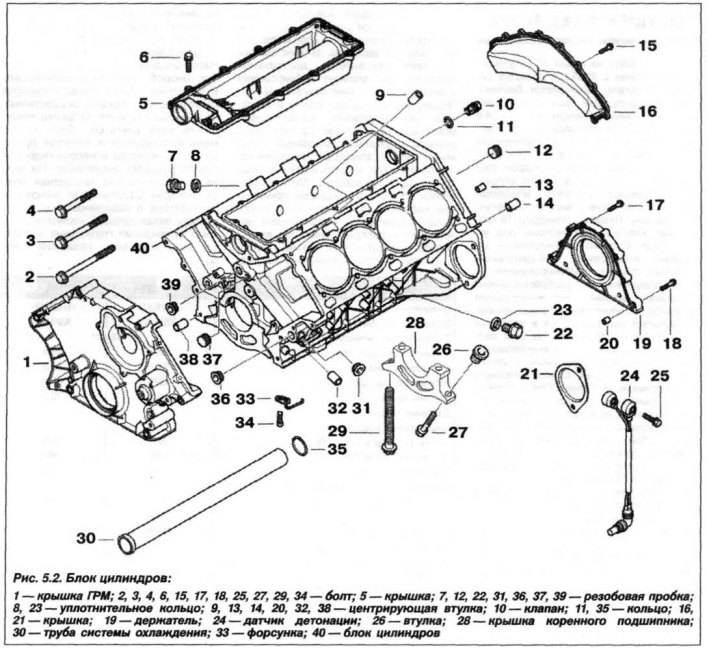
Remove the oil pump. If there is a lot of oil carbon on the fire belt, carefully remove it from the cylinder walls. Injectors are installed in the lower part of the cylinder block, between the main bearing beds (33, see Fig. 5.2) to cool the pistons. In order not to damage the injectors, it is recommended to unscrew the screws and remove them.
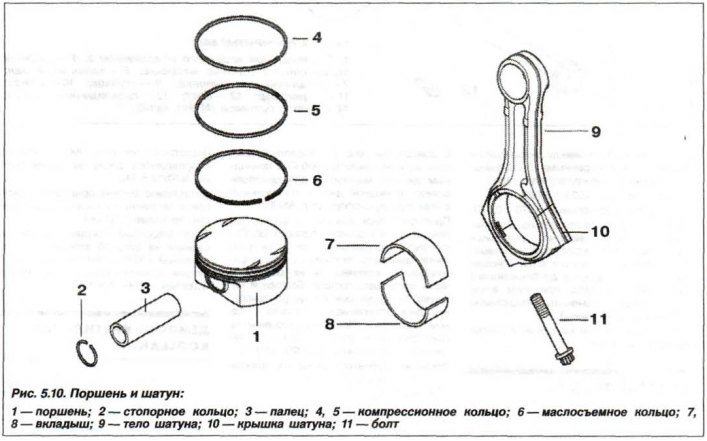
Loosen the bolts (11, see Fig. 5.10) and remove the caps (10) of the connecting rod bearings, put them in order.
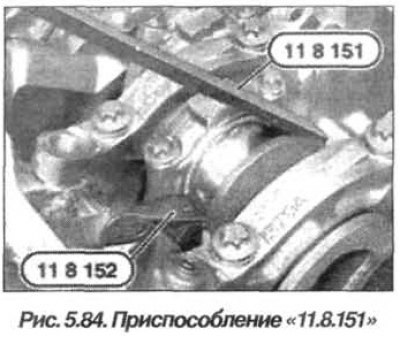
Install devices "11.8.151" and "11.8.152" in place of the connecting rod bolts (Fig. 5.84).
Move the connecting rod with the piston towards the cylinder head, remove and remove the installed devices. Remove the retaining ring (2, see Fig. 5.10) and press out the piston pin (3).
Check the technical condition of the pistons, pins, connecting rods, bearing shells and piston rings, and replace them if necessary.
Note: Connecting rods can be replaced separately.
Before installation, measure the nominal clearance between the piston and the bore in the cylinder block, for which:
- measure the piston diameter with a micrometer at a distance "A", 11.0 mm for the N62B36 engine or 18.0 mm for the N62B44 engine, from the lower edge of the skirt in the plane at an angle of 90° to the axis of the piston pin, and with an offset of 90° in the horizontal plane from the axis under the piston pin.
- measure the diameter of the cylinder mirror in three planes with a micrometer (top, middle and bottom) and calculate the average value. Nominal cylinder bore diameter for N62B36 engine – 84,000+0,014 mm, for engine N62B44 – 92,000+0,014 mm.
- subtract the piston diameter from the average cylinder diameter;
- the resulting value of the nominal clearance during installation should be within the range of 0.001–0.044 mm, the working clearance – within the range of 0.026–0.073 mm, the maximum permissible value, as a criterion for the necessary repairs when parts wear out, is 0.10 mm.
The piston pin should be pushed through the connecting rod upper head bushing by pressing with a finger and should have no visible clearance or binding.
The pistons of cylinders 1–8 are identical.
Attention! Connecting rods of cylinders 1–4 and 5–8 are installed differently.
Cylinders 1–4
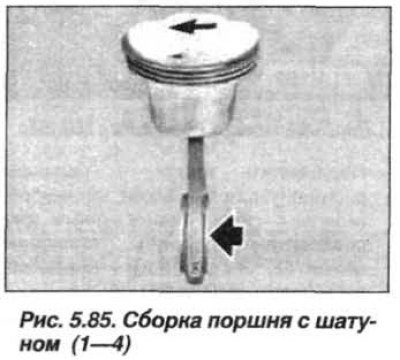
Assemble the connecting rod with the piston pin in the piston so that the flat side of the connecting rod (bottom arrow) was facing backwards, and the arrow on the piston was facing forward (Fig. 5.85).
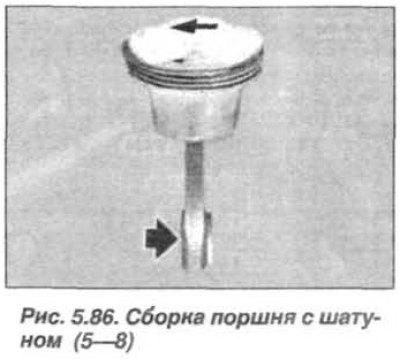
Cylinders 5–8
Assemble the connecting rod with the piston pin in the piston so that the flat side of the connecting rod (bottom arrow) was facing forward, and the arrow on the piston was facing forward (Fig. 5.86).
Install the piston pin retaining ring so that its lock is located opposite the recess in the piston.
Install tools "11.8.151" and "11.8.152" in place of the connecting rod bolts.
Lightly lubricate the pistons and piston rings with engine oil. Adjust the piston rings so that their ring ends are approximately 120° apart, but they should not be located above the piston bosses.
For the N62B44 engine, compress the piston rings using the "11.9.500" tool (Fig. 5.87), holding them compressed, install the pistons so that the "arrow" on the piston head (bottom) points towards the timing drive. For the N62B36 engine, use the "11.8.141" tool.
Using your fingers, insert the piston into the cylinder block, without applying significant force due to the risk of breaking the piston rings.
Align the crankshaft journal and connecting rod head (see fig. 4.81) and remove the devices "11.8.151" and "11.8.152".
Replace the connecting rod bearing shells and lubricate them with engine oil.
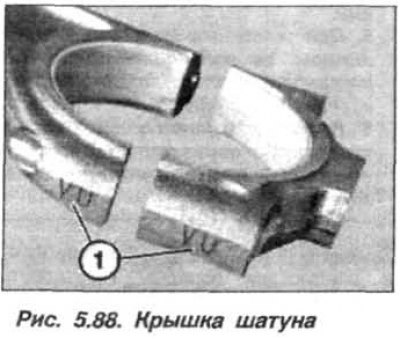
Install the bearing cover in such a way (Fig. 5.88) that the letters of their selection in pairs ("VU") match on one side.
Insert new, clean connecting rod bolts, lightly lubricated with engine oil. Using tool "00.9.120" (torque wrench with protractor), tighten both bolts in three parallel steps on each bolt:
- Step 1 – tighten to 5.0 Nm (0.5 kgf·m);
- 2nd step – tighten to 20 Nm (2.0 kgf·m);
- 3rd step – turn to an angle of 70°.
Continue assembling the engine in reverse order, while doing so it is necessary to replace the piston cooling nozzle mounting screws; the threaded portion of the screws should be coated with a non-loosening agent.
This article is available at russian, bulgarian, belarusian, ukrainian, serbian, croatian, romanian, polish, slovak, hungarian
Article verified: Zhuravleva Isolda
Share information:
Previous articles
БМВ E53: Engine repair
Next articles
Similar articles on other types of BMW cars:
Replacing pistons BMW 3 Series E21 (1975-1983)
Replacing the coolant BMW 5 Series E12 (1972-1981)
Replacing the oil filter (center bolt design) BMW 7 Series E32 (1986-1994)
Replacing the cabin filter (ventilation system) BMW 7 Series E38 (1994-2001)
Pistons — removal and installation BMW X3 E83 (2003-2010)
Link in different formats to this page
Visitor comments
No comments yet
- General information
- Manual
- Maintenance
- M54 petrol engine
- Engine repair
- Lubrication system
- Cooling system
- Supply system
- Injection system
- Exhaust system
- Engine electrics
- M62 petrol engine
- Engine repair
- Lubrication system
- Cooling system
- Supply system
- Exhaust system
- Engine electrics
- N62 petrol engine
- Engine repair
- Cooling and lubrication system
- Power and exhaust system
- Engine electrics
- Diesel engine M57
- Engine repair
- Lubrication system
- Cooling system
- Power and exhaust system
- Engine electrics
- Turbocharging system
- Transmission
- Clutch
- Mechanical gearbox
- Automatic gearbox
- Transfer case and cardan
- Chassis
- Brake system
- Steering
- Front suspension
- Rear suspension
- Wheels and tires
- Body
- Exterior
- Interior
- Doors and windows
- Repair and maintenance
- Heater and air conditioner
- Electrical equipment
- Equipment and devices
- Levers and switches
- Electrical circuits