
- Home
- BMW X5
- E53
- Transmission
- Automatic gearbox
- Replacing the automatic transmission control shaft seals
Replacing the automatic transmission control shaft seals (BMW X5 E53)
Replacement of the control axle seal of the automatic transmission "A5S 440Z"
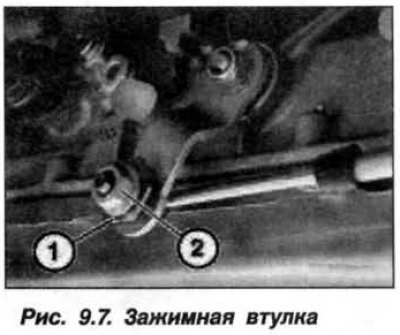
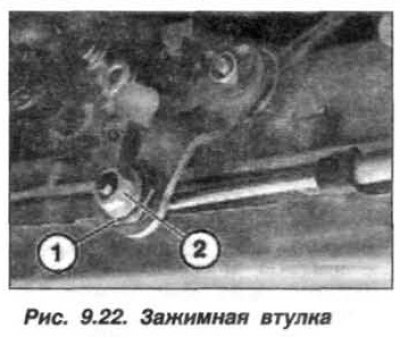
The replacement of the left and right oil seals of the control axis of the automatic transmission "A5S 440Z" must be carried out in the following order. Prepare the tools "24.5.260", "24.5.270" and "24.5.490". Remove the front propeller shaft. Hold the clamping sleeve (1, see Fig. 9.7), loosen the nut (2).
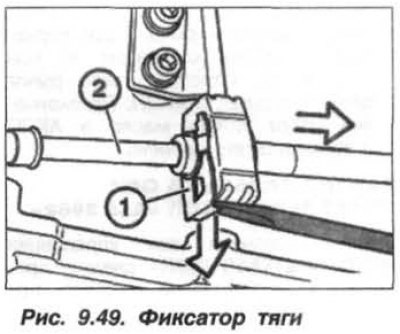
Using a screwdriver, remove the retainer (1, Fig. 9.49) and pull out the rod (2). Unscrew the lever mounting nut and remove it from the axle.
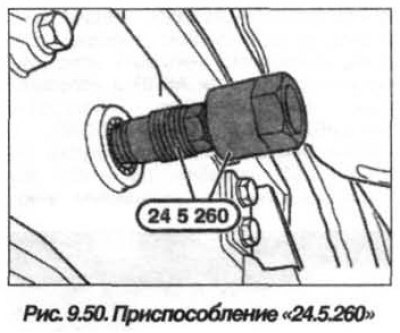
Screw the device "24.5.260" (Fig. 9.50) into the seal and remove it, tightening the clamping sleeve.
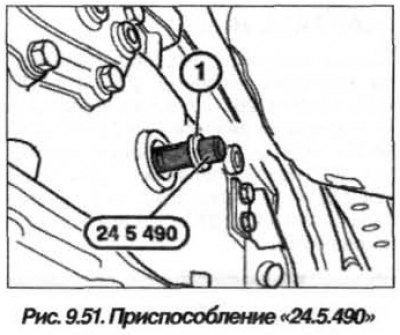
Install the "24.5.490" tool (Fig. 9.51) onto the control shaft. Lubricate the working edge of the new oil seal with automatic transmission oil and install the new oil seal (1) onto the automatic transmission control shaft.
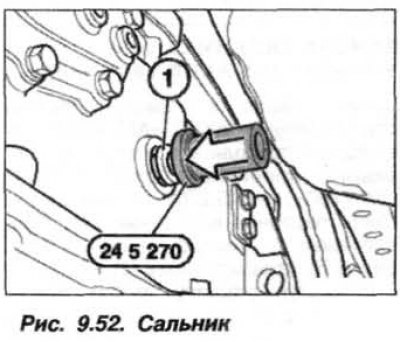
Using the "24.5.270" mandrel (Fig. 9.52), press the oil seal (1) into the automatic transmission housing until it stops.
Tighten the control axle lever mounting nut to 10 N·m (1.0 kgf·m). Adjust the automatic transmission control unit lever. Upon completion of the work, add oil to the automatic transmission and check its level.
Replacement of the control shaft seal of the automatic transmission type "A5S 390R"
The replacement of the control shaft seal of the automatic transmission type "A5S 390R" should be carried out in a similar order, while it is necessary to take into account the design features of the automatic transmission and use devices "24.5.361", "24.5.362", "24.5.363" and "24.5.364".
Replacement of the control shaft seal of the automatic transmission type "GA6HP26Z"
The replacement of the control shaft seal of the automatic transmission type "GA6HP26Z" should be carried out in a similar order, while it is necessary to take into account the design features of the automatic transmission and use devices "24.5.361", "24.5.362", "24.5.364" and "24.5.366".
Holding the clamping sleeve (1, Fig. 9.53), loosen the nut (2). Using a screwdriver, remove the bracket (3) with a downward movement. Remove the cable (4) from the bracket (5). Unscrew the nut (6) and remove the bracket (5).

Screw in the device "24.5.361" (Fig. 9.54) until it is firmly connected to the seal.

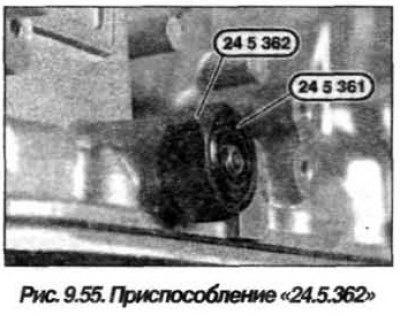
Screw and tighten the device "24.5.362" (Fig. 9.55) onto the device "24.5.361".
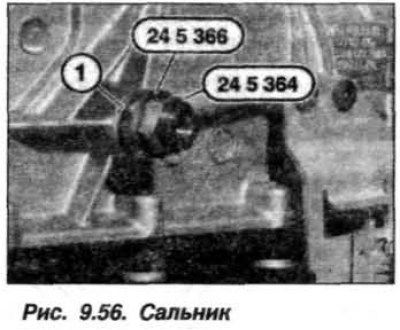
When tightening, the seal is pulled out of the automatic transmission housing. Lubricate the working edge of the new seal (1, Fig. 9.56) oil for automatic transmission and install it on the automatic transmission control shaft. Using the devices "24.5.366" and "24.5.364", press the oil seal (1) into the automatic transmission housing until it stops.
Tighten the control axle lever mounting nut to 10 N·m (1.0 kgf·m). Adjust the automatic transmission control unit lever. Upon completion of the work, fill the automatic transmission with oil and check its level.
Replacing the rear cover seal of the automatic transmission
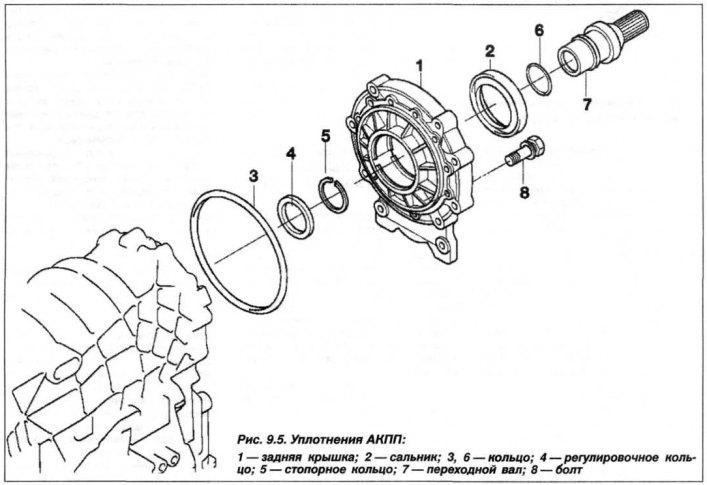
Due to the installation of an automatic transmission on a vehicle with all-wheel drive, the output shaft of the automatic transmission type "A5S 440Z" has an adapter shaft (7, see Fig. 9.5) for connection to the transfer case.
Replacing the rear cover seal of the automatic transmission type "A5S 440Z"
Replacing the oil seal (2, see Fig. 9.5) rear cover (1) of the automatic transmission type "A5S 440Z" must be carried out in the following order. Prepare the devices "00.5.500" and "24.4.090", remove the transfer case and automatic transmission.
Unscrew the bolts (M8, 8) securing the rear cover (1) of the automatic transmission and remove the rear cover (1) with the adapter shaft (7). Remove the retaining ring (5), press out the adapter shaft.
Clamp the back cover (1, Fig. 9.57) Automatic transmission in a vice with soft material pads on its jaws.
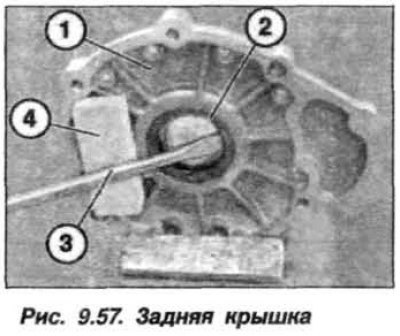
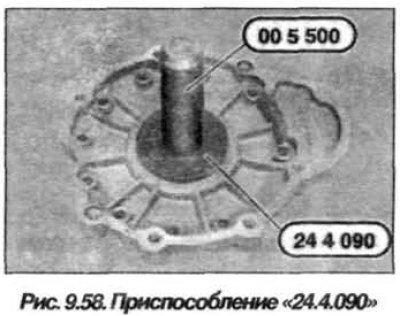
Hook the seal (2) with a screwdriver (3) and remove the seal, placing a wooden block (4) under the screwdriver. Using tools "24.4.090" and "00.5.500" (Fig. 9.58), press the new seal flush into the rear cover of the automatic transmission.
Lubricate the working edge of the oil seal with automatic transmission oil. Insert the adapter shaft into the automatic transmission cover and install a new retaining ring. Install the rear automatic transmission cover with the adapter shaft on the automatic transmission housing and tighten all the mounting bolts (M8) by hand until their heads touch the cover.
Check the position of the sealing gasket (3, see Fig. 9.5) and tighten the bolts (8) crosswise in several steps with a final torque of 23 N·m (2.3 kgf·m). Upon completion of the work, fill the automatic transmission with oil and check its level.
Replacing the rear cover seal of the automatic transmission type "A5S 390R"
Replacing the oil seal (6, see Fig. 9.22) the rear cover (1) of the automatic transmission type "A5S 390R" must be carried out in the same order as for the automatic transmission type "A5S 440Z", using the devices "00.5.500" and "23.1.380" and taking into account the design features of the automatic transmission - insert a new sealing ring (4) into the groove of the output shaft of the automatic transmission.
[Original publication posted on the website bmwman.ru]
This article is available at russian, bulgarian, belarusian, ukrainian, serbian, croatian, romanian, polish, slovak, hungarian
Article verified: Zhuravleva Isolda
Share information:
Previous articles
БМВ E53: Automatic gearbox
Next articles
Similar articles on other types of BMW cars:
Checking the level and replacing the oil in the automatic transmission BMW 3 Series E21 (1975-1983)
Replacing transmission fluid and automatic transmission filter BMW 5 Series E28 (1981-1988)
Replacing the centering bearing of the primary shaft of the gearbox BMW 5 Series E12 (1972-1981)
Drive shaft flange seals — replacement BMW 7 Series E32 (1986-1994)
Automatic Transmission Specifications BMW 7 Series E38 (1994-2001)
Automatic transmission control system BMW X3 E83 (2003-2010)
Link in different formats to this page
Visitor comments
No comments yet
- General information
- Manual
- Maintenance
- M54 petrol engine
- Engine repair
- Lubrication system
- Cooling system
- Supply system
- Injection system
- Exhaust system
- Engine electrics
- M62 petrol engine
- Engine repair
- Lubrication system
- Cooling system
- Supply system
- Exhaust system
- Engine electrics
- N62 petrol engine
- Engine repair
- Cooling and lubrication system
- Power and exhaust system
- Engine electrics
- Diesel engine M57
- Engine repair
- Lubrication system
- Cooling system
- Power and exhaust system
- Engine electrics
- Turbocharging system
- Transmission
- Clutch
- Mechanical gearbox
- Automatic gearbox
- Transfer case and cardan
- Chassis
- Brake system
- Steering
- Front suspension
- Rear suspension
- Wheels and tires
- Body
- Exterior
- Interior
- Doors and windows
- Repair and maintenance
- Heater and air conditioner
- Electrical equipment
- Equipment and devices
- Levers and switches
- Electrical circuits