
- Home
- BMW X5
- E53
- Body
- Heater and air conditioner
- Replacing the air conditioning compressor
Replacing the air conditioning compressor (BMW X5 E53)
Attention! When commissioning a new compressor, it is essential to comply with the following conditions:
- turn off the air conditioner, set all ventilation grilles on the front panel to the "Open" position, start the engine and let it idle;
- set the fan supply to at least 75%, turn on the air conditioner and let it run for at least 2-3 minutes at idle speed, exceeding the speed will lead to failure of the air conditioner compressor;
- if the air conditioner has been left open for more than 24 hours, replace its dehumidifier element;
- refrigerator oil is hygroscopic and must be stored in closed containers.
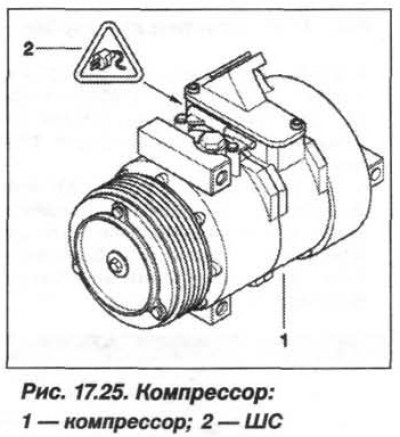
The design of the air conditioner compressor is shown in Figure 17.25.
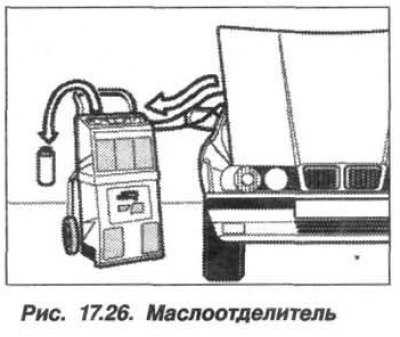
When the refrigerant is pumped out of the air conditioner, refrigeration oil comes out with it and is collected in the oil separators of the service unit (arrow, Fig. 17.26).
After pumping out the refrigerant, it is necessary to clean it in a service unit, as there may still be a mixture of refrigerant and oil in the oil separator.
During the cleaning process, the refrigerant completely turns into gas and only the refrigerant oil previously bound in the refrigerant remains in the oil separator. This amount (A) of refrigerant oil is measured and recorded.
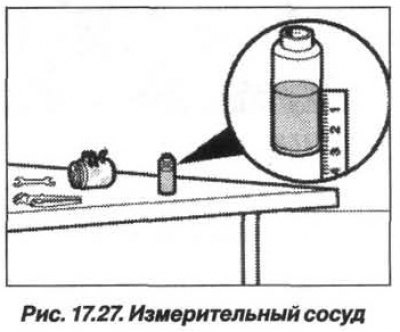
The remaining refrigeration oil in the compressor must be completely drained through the filler neck into a measuring vessel (fig. 17.27). Measure the collected amount of refrigeration oil (B) that still remains in the compressor. The refrigeration oil drained from the compressor and pumped out of the oil separator of the service unit is subject to disposal.
Depending on the type, a new compressor is filled at the factory with 120–200 g of refrigeration oil. Unscrew the filler cap and drain the oil contained in the compressor into a clean tank.
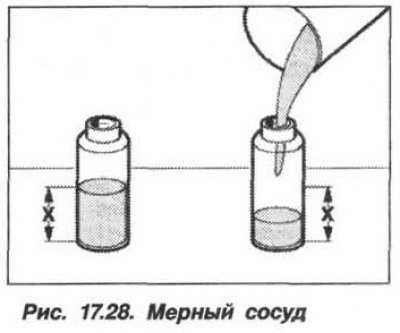
Pour into the measuring vessel an amount of new refrigeration oil equal to that remaining in the compressor (B), adding 10 g to it (fig. 17.28) to ensure sufficiency and pour this amount of oil into the new compressor. It is permissible to use oil drained from the new compressor.
Replace the sealing ring and tighten the filler cap to a torque of 29–31 N·m (2.9–3.1 kgf·m). The remainder of the new refrigeration oil can be drained into the spare oil tank of the service unit. When installing a new compressor, it is necessary to refill the system with the amount (A) of refrigeration oil previously pumped out before filling the air conditioner with refrigerant.
Replacement of the air conditioning compressor ("M54")
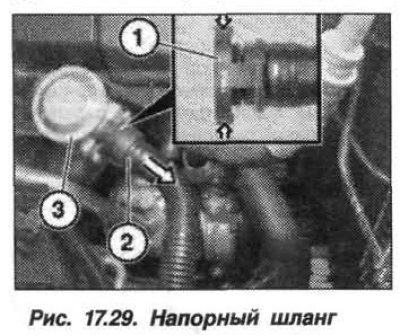
Removing the air conditioner compressor installed on a car with an M54 engine must be done in the following order. Pump out the refrigerant from the air conditioner. Compress the retaining ring (1, Fig. 17.29), disconnect the pressure hose (2) from the shut-off valve (3) in the direction indicated by the arrow and move it to the side.
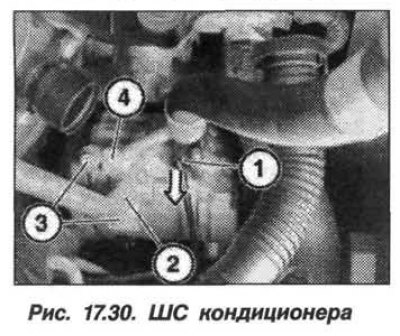
Disconnect the SS (1, Fig. 17.30) air conditioner in the direction indicated by the arrow. Loosen the bolts (3) and remove the pipes (2) and (4).
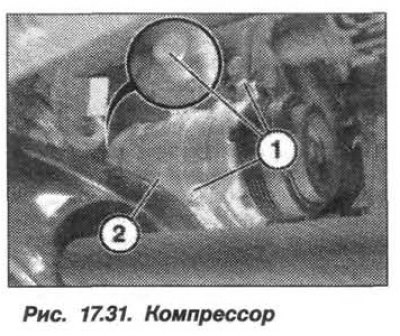
Remove the front engine accessory protection panel, the air conditioning compressor drive belt and take measures to prevent the compressor from falling (2, Fig. 17.31), unscrew the bolts (1) and remove the air conditioner compressor (2). The air conditioner compressor should be installed in the reverse order, while it is necessary to replace the pipeline sealing rings and tighten the pipeline fastening with a torque of 20 N·m (2.0 kgf·m).
Replacement of the air conditioning compressor ("M62")
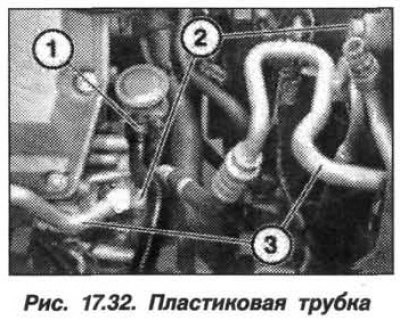
The removal of the air conditioner compressor installed on a car with the "M62" engine must be carried out in the following order. Pump out the refrigerant from the air conditioner, drain the coolant, remove the air conditioner compressor drive belt and the air filter housing.
Disconnect the plastic tube (1, Fig. 17.32) from the shut-off valve and from the pump and remove it. Unscrew the bolts (2) and remove the pipes (3). Disconnect the cooling system hose from the thermostat housing cover.
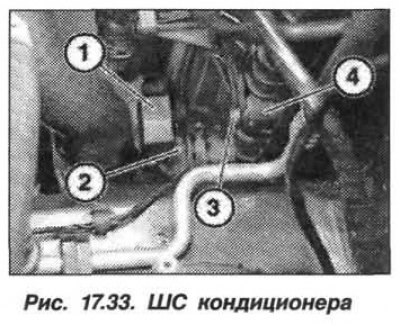
Disconnect the SS (1, Fig. 17.33) air conditioner. Disconnect the water hose (2) from the radiator of the cooling system and remove it. Unscrew the bolt (3) and disconnect the mounting plate (4) from the radiator.
Note: Cover the side member in the area of the air conditioner compressor with protective material.
Disconnect the SS (1, Fig. 17.34) from the air conditioner compressor. Take measures to prevent the compressor from falling, unscrew the bolts (2) and remove the air conditioner compressor (3) by moving it upwards.

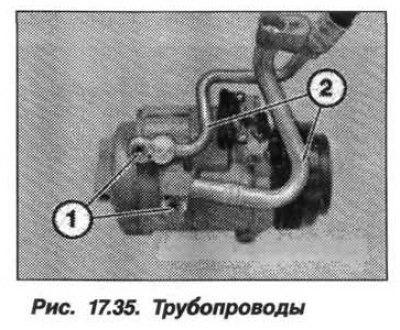
When replacing the air conditioning compressor, it is necessary to unscrew the bolts (1, Fig. 17.35) and disconnect the pipes (2).
The air conditioning compressor should be installed in the reverse order, while it is necessary to replace the pipeline sealing rings and tighten the pipeline fastenings to a torque of 20 N·m (2.0 kgf·m).
Air conditioning compressor replacement ("M57")
Caution! The air hoses to be installed must be dry and free of grease.
The removal of the air conditioner compressor installed on a car with the "M57" engine must be carried out in the following order. Pump out the refrigerant from the air conditioner. Remove the front panel of protection of the auxiliary mechanisms of the engine and the air conditioner compressor drive belt.
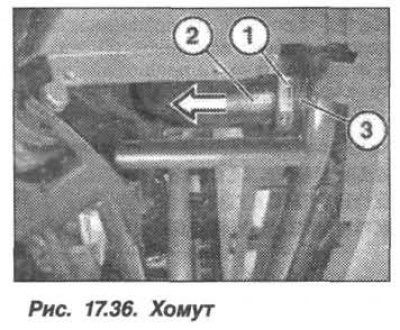
Loosen the clamp (1, Fig. 17.36), disconnect the lower pressure hose (2) from the charge air cooler (3) in the direction of the arrow and move it to the side. Remove the fan shroud and windshield washer reservoir and set it aside.
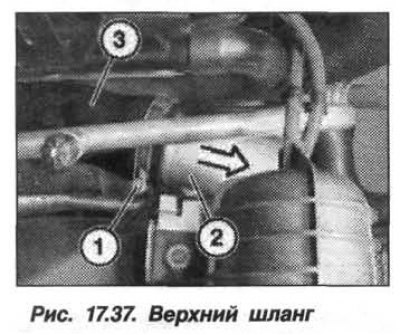
Loosen the clamp (1, Fig. 17.37), disconnect the pressure pipe (2) from the upper pressure hose (3) in the direction indicated by the arrow and remove it.
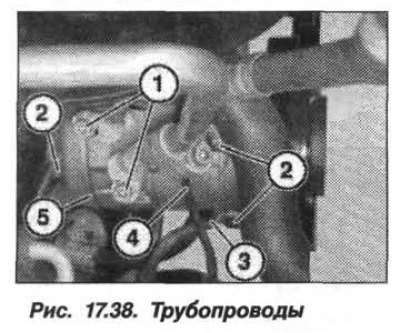
Remove the bolts (1, Fig. 17.38) and remove the pipelines. Disconnect the air conditioner compressor control SS (4). Take measures to prevent the compressor (5) from falling, unscrew the bolts (2) and remove the air conditioner compressor (5).
The air conditioner compressor should be installed in the reverse order, making sure that the air hoses are dry and free of grease. Replace the pipeline sealing rings and tighten the pipeline fastenings to a torque of 20 N·m (2.0 kgf·m).
This article is available at russian, bulgarian, belarusian, ukrainian, serbian, croatian, romanian, polish, slovak, hungarian
Article verified: Zhuravleva Isolda
Share information:
Previous articles
БМВ E53: Heater and air conditioner
Next articles
Similar articles on other types of BMW cars:
Replacing the V-belt of the air conditioning compressor (all models) BMW 3 Series E36 (1990-2000)
Tensioning the V-belt of the air conditioning compressor BMW 3 Series E30 (1982-1994)
Removal and installation the air conditioning compressor BMW 5 Series E28 (1981-1988)
Replacing the coolant BMW 5 Series E12 (1972-1981)
Removal and installation the air conditioning compressor BMW 7 Series E38 (1994-2001)
Replacing the oil filter (center bolt design) BMW 7 Series E32 (1986-1994)
Air conditioning compressor drive belt BMW X3 E83 (2003-2010)
Link in different formats to this page
Visitor comments
No comments yet
- General information
- Manual
- Maintenance
- M54 petrol engine
- Engine repair
- Lubrication system
- Cooling system
- Supply system
- Injection system
- Exhaust system
- Engine electrics
- M62 petrol engine
- Engine repair
- Lubrication system
- Cooling system
- Supply system
- Exhaust system
- Engine electrics
- N62 petrol engine
- Engine repair
- Cooling and lubrication system
- Power and exhaust system
- Engine electrics
- Diesel engine M57
- Engine repair
- Lubrication system
- Cooling system
- Power and exhaust system
- Engine electrics
- Turbocharging system
- Transmission
- Clutch
- Mechanical gearbox
- Automatic gearbox
- Transfer case and cardan
- Chassis
- Brake system
- Steering
- Front suspension
- Rear suspension
- Wheels and tires
- Body
- Exterior
- Interior
- Doors and windows
- Repair and maintenance
- Heater and air conditioner
- Electrical equipment
- Equipment and devices
- Levers and switches
- Electrical circuits