Cars Mazda Cars Mitsubishi Cars Toyota Cars Chevrolet Cars AvtoVAZ Cars Kia Cars Nissan
English Русский
Български
Беларускі
Український
Српски
Hrvatski
Română
Polski
Slovenský
Magyar
| Articles | Contacts | Sitemap |   
BMWman.ru


3 series   5 series   7 series   BMW X3   BMW X5   BMW X6

E53 (1999-2006)
  • Home
  • BMW X5
  • E53
  • Diesel engine M57
  • Engine repair
  • Removal and installation the engine

Removal and installation the engine (BMW X5 E53)

            0

Removing the engine from the car must be done with an assistant, in the following order. Prepare the devices "11.0.020" and "51.2.170", the awning (dense material) to close the body wings and disconnect the "–" terminal from the battery.

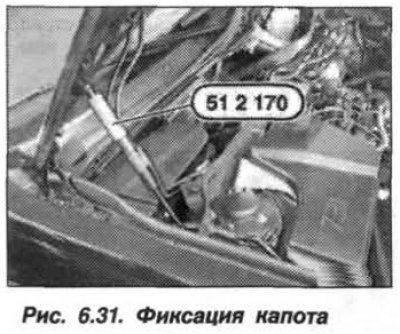
Fix the hood in the open position, for which, acting simultaneously on both sides, lift the locking brackets, simultaneously moving them upwards, and disconnect the dampers from the hood. Open the hood completely, install the devices "51.2.170" (Fig. 6.31) on the dampers and fix the hood with them.

Fix the hood in the open position, for which, acting simultaneously on both sides, lift the locking…


Drain the coolant and remove the radiator of the cooling system and the coolant supply hoses. Remove the intake manifold. Disconnect the engine wiring harnesses from the control electronics compartment and the body, move them to the side.

Remove the power steering pump, set it aside and secure it with a wire clamp in the engine compartment. Do not disconnect the pipes. Remove the vacuum receiver from the body, leave the pipes connected.

Disconnect the fuel lines from the high-pressure pump (HP) and the vacuum line from the brake booster. Remove the protective panels of the underbody, the engine compartment screen and the front panel of the protective crankcase of the BMW X5 E53 engine.


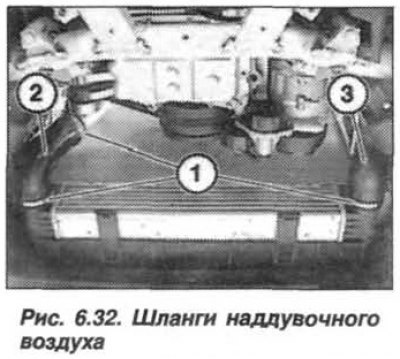
Loosen the clamps (1, Fig. 6.32), remove the hoses (2 and 3) connecting the supercharger radiator and its pipelines.

Loosen the clamps (1, Fig. 6.32), remove the hoses (2 and 3) connecting the supercharger radiator…


Remove the stiffening plate by unscrewing the bolts (1 and 2, Fig. 6.33).

Remove the stiffening plate by unscrewing the bolts (1 and 2, Fig. 6.33).


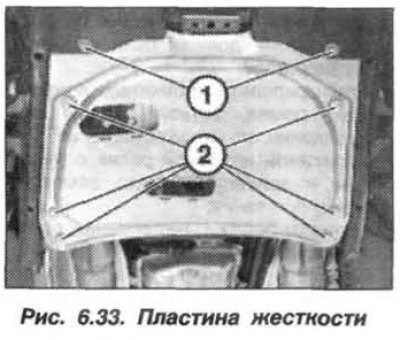
Attention! Driving the car without a stiffening plate is strictly prohibited. The stiffening plate is secured each time with new boots and nuts, which must be tightened in two stages, first with a torque of 56 N·m (5.6 kgf·m), then by turning it to an angle of 90°.


Disconnect the exhaust system from the exhaust manifold, remove the gearbox and front wheel drive shafts. Remove the alternator and air conditioner compressor drive belt. Remove the air conditioner compressor from the support bracket, move it to the side and secure it to the body with a wire clip. Leave the pipes connected.


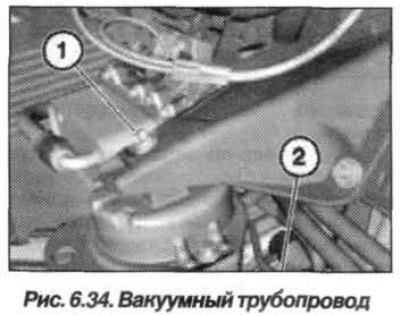
Disconnect the vacuum line (2, Fig. 6.34) from the engine mount cushion and remove the jumper between the engine and the body.

Disconnect the vacuum line (2, Fig. 6.34) from the engine mount cushion and remove the jumper…


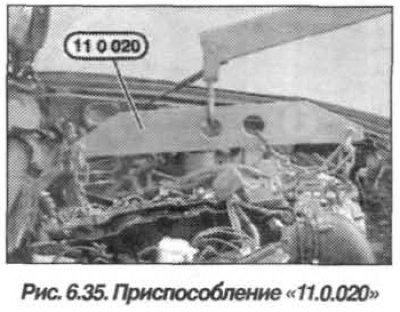
Install the device "11.0.020" (Fig. 6.35) on the lifting device (hoist, crane, lift). Install the rigging (chains of equal length) and hook them onto the engine lifting eyes. Raise the engine so that the chains are slightly taut.

Install the device «11.0.020» (Fig. 6.35) on the lifting device (hoist, crane, lift). Install the…


Attention! After replacing the ground tires, the nuts must be tightened before installing the gearbox.


Loosen the nuts of the ground bus on the engine support brackets on the left and right sides. Once again make sure that the engine is not connected to the engine compartment of the car in any way, and carefully remove the engine.

The engine installation should be carried out in the reverse order, while it is necessary.


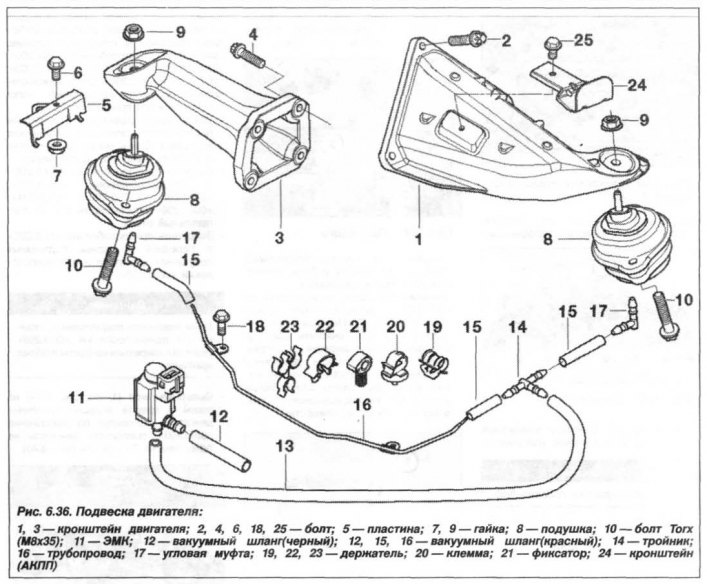
Tighten the nuts on the engine mount brackets immediately after installing the engine, since the engine may slip off the mount cushions when installing the gearbox. Nuts (9, see Fig. 6.36) tighten the bracket fastenings to the engine with a torque of 38 N·m (3.8 kgf·m), the cushion to the side member - 56 N·m (5.6 kgf·m) and the bracket to the engine - 42 N·m (4.2 kgf·m), after completing the installation of the engine, check their tightening.

Tighten the nuts on the engine mount brackets immediately after installing the engine, since the…


Before installing the boost air hoses, make sure they are clean and dry; if necessary, remove traces of moisture and grease with alcohol. Tighten the air duct hose mounting screws to a torque of 6.0 N·m (0.6 kgf·m).

This article is available at russian, bulgarian, belarusian, ukrainian, serbian, croatian, romanian, polish, slovak, hungarian
Article verified: Zhuravleva Isolda

Share information:
Previous articles
БМВ E53: Engine repair
Next articles

Replacing the compressor drive belt tensioner
Replacing the air conditioning compressor drive belt
Replacing the alternator drive belt tensioner
Valves and compensators — design description
Valve guide bushings — design description
Replacing the intake manifold
Replacing the cylinder head cover
Replacing the cylinder head gasket
Replacing the engine sump sealing gasket
Replacing the torsional vibration damper


Similar articles on other types of BMW cars:
Removal and installation the engine BMW 3 Series E21 (1975-1983)
Removal and installation the engine BMW 3 Series E30 (1982-1994)
Removal and installation the engine BMW 5 Series E12 (1972-1981)
Removal and installation the engine BMW 5 Series E34 (1988-1996)
Engine — removal and installation BMW 7 Series E32 (1986-1994)
Removal and installation the engine BMW 7 Series E38 (1994-2001)
Removal and installation the engine assembly BMW X3 E83 (2003-2010)
Link in different formats to this page


Visitor comments

No comments yet


How much 37 + 10 =


BMW E53 (1999-2006) 
  • General information
  • Manual
  • Maintenance
  • M54 petrol engine
  • Engine repair
  • Lubrication system
  • Cooling system
  • Supply system
  • Injection system
  • Exhaust system
  • Engine electrics
  • M62 petrol engine
  • Engine repair
  • Lubrication system
  • Cooling system
  • Supply system
  • Exhaust system
  • Engine electrics
  • N62 petrol engine
  • Engine repair
  • Cooling and lubrication system
  • Power and exhaust system
  • Engine electrics
  • Diesel engine M57
  • Engine repair
  • Lubrication system
  • Cooling system
  • Power and exhaust system
  • Engine electrics
  • Turbocharging system
  • Transmission
  • Clutch
  • Mechanical gearbox
  • Automatic gearbox
  • Transfer case and cardan
  • Chassis
  • Brake system
  • Steering
  • Front suspension
  • Rear suspension
  • Wheels and tires
  • Body
  • Exterior
  • Interior
  • Doors and windows
  • Repair and maintenance
  • Heater and air conditioner
  • Electrical equipment
  • Equipment and devices
  • Levers and switches
  • Electrical circuits
BMWman.ru © 2017-2026 · Mobile version · News and articles · Sitemap: EN BG BY UA RS HR RO PL SK HU · Feedback · Site search
3er E21 · 3er E30 · 3er E36 · 3er E46 [petrol] · 3er E46 · 5er E12 · 5er E28 · 5er E34 · 5er E39 · 7er E32 · 7er E38 · X3 E83 · X5 E53 ·
This site uses cookies 🍪, without them some features simply would not work.