
Cars Mazda Cars Mitsubishi Cars Toyota Cars Chevrolet Cars AvtoVAZ Cars Kia Cars Nissan
English Русский
Български
Беларускі
Український
Српски
Hrvatski
Română
Polski
Slovenský
Magyar
| Articles | Contacts | Sitemap |   
BMWman.ru


3 series   5 series   7 series   BMW X3   BMW X5   BMW X6

E53 (1999-2006)
  • Home
  • BMW X5
  • E53
  • Transmission
  • Mechanical gearbox
  • Replacing the gear shift lever

Replacing the gear shift lever (BMW X5 E53)

            0

Caution! Do not rotate the gearshift lever handle when removing it, otherwise the angular movement lock will be cut off.


The gear shift lever must be removed in the following order.

Prepare the "25.1.100" tool. Remove the gearshift lever head by forcibly moving it upwards. Slightly compress the cover frame and remove the cover from the central console. Remove the sound insulation (1, Fig. 8.20).
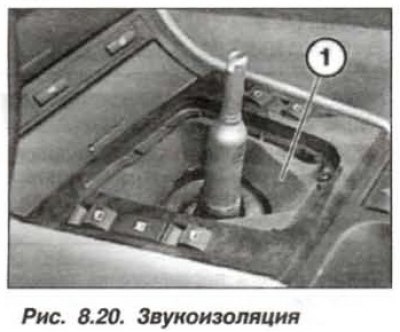
Prepare the «25.1.100» tool. Remove the gearshift lever head by forcibly moving it upwards.…


Remove the intermediate muffler, rear heat-insulating screen and right front heat-insulating screen. Unscrew the bolts (M12) securing the flexible coupling. Do not allow the propeller shaft to fall; perform the work with an assistant. Hold the propeller shaft and unscrew the nuts (see fig. 10.6) fastening the intermediate support from the bottom of the body. Bend the cardan shaft downwards by pressing on the intermediate support. Disconnect the cardan shaft from the flange of the secondary shaft of the manual transmission. Move it to the side and fasten it in a horizontal position under the bottom of the body using wire staples.
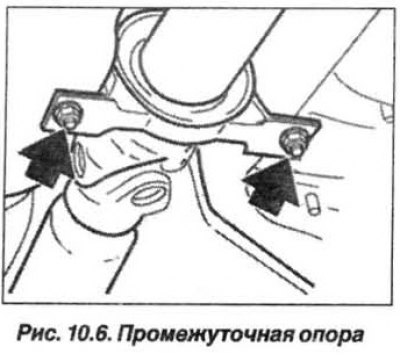
Remove the intermediate muffler, rear heat-insulating screen and right front heat-insulating…


Remove the screws (arrows, Fig. 8.21) vibration damper mounts and remove it.
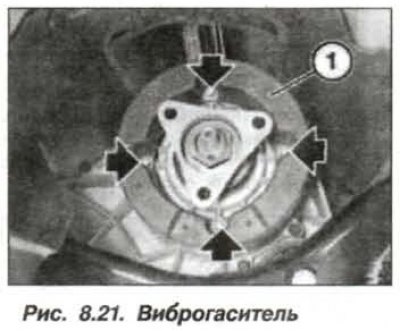


Remove the screws (arrows, Fig. 8.21) vibration damper mounts and remove it.


Remove the retainer (11, see Fig. 8.16), remove the washer and extract the PP drive rod (10).
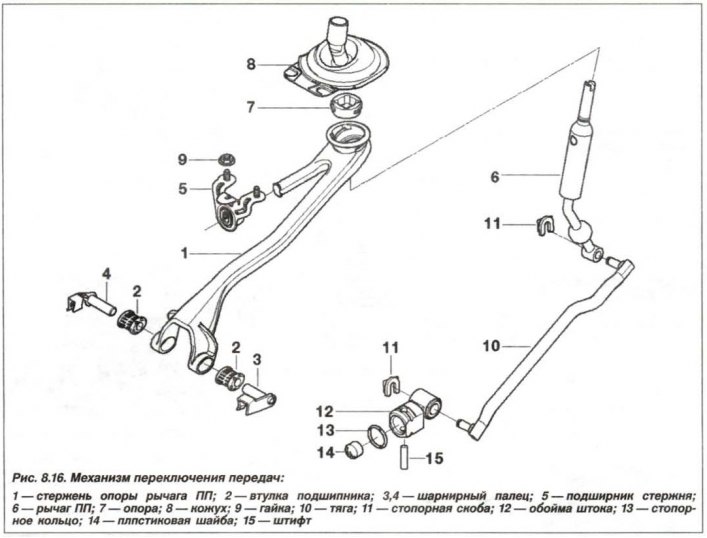
Remove the retainer (11, see Fig. 8.16), remove the washer and extract the PP drive rod (10).


Insert the "25.1.100" tool (Fig. 8.22) into the joint and turn it 90° counterclockwise. Press the bearing shells upwards out of the gearshift lever shaft.
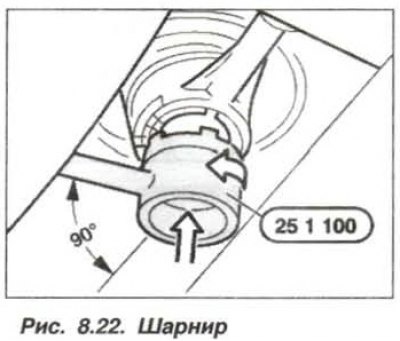
Insert the «25.1.100» tool (Fig. 8.22) into the joint and turn it 90° counterclockwise. Press the…


Remove the rubber boot from the body opening and pull it out together with the gear shift lever in an upward direction (Fig. 8.23).
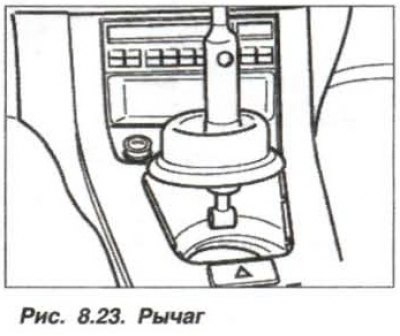


Remove the rubber boot from the body opening and pull it out together with the gear shift lever in…


The gear shift lever should be installed in the reverse order, while it is necessary to lubricate the spherical part of the gear shift lever with grease of the type "Circolight" and insert the shift lever into the support rod.

Align the bearing shells so that the arrows on the bearing are parallel to the vehicle's axis and the tabs holding the bearing are perpendicular to the vehicle's axis. Using a screwdriver, press the bearing shells into the support rod (arrow, Fig. 8.24). Press down on the protrusions until they lock into place with an audible click.
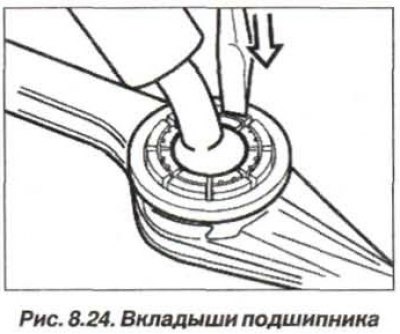
Align the bearing shells so that the arrows on the bearing are parallel to the vehicle's axis and…


Insert the rubber boot with the arrow pointing forward when looking in the direction of travel. Place the inner rubber boot on the cup of the shift lever support rod (lower arrows, Fig. 8.25). Insert the outer cover into the body opening (top arrows).
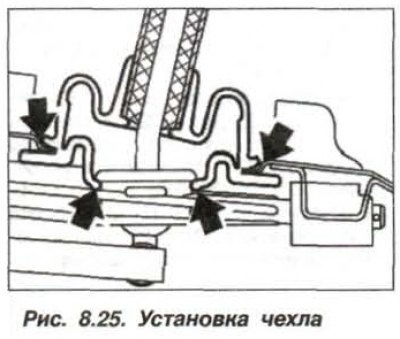


Insert the rubber boot with the arrow pointing forward when looking in the direction of travel.…


Lubricate the gear shift drive pin with grease of the type "Circolight". Tighten the vibration damper mounting bolts to a torque of 23 N·m (2.3 kgf·m).

Turn out the protective cover (1, Fig. 8.26) edges up and place it on the gearshift lever (2). Lower the edges of the protective cover so that the cover covers the gearshift lever and insert it into the center console.
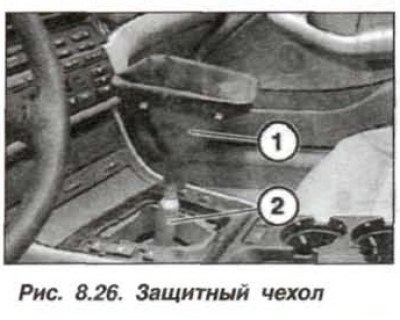
Turn out the protective cover (1, Fig. 8.26) edges up and place it on the gearshift lever (2).…


Before installing the handle, slide the protective cover down so that the locking groove is completely exposed. Install the head on the gearshift lever, align it and press it vertically with considerable force so that it clicks into place.

(The article text was copied from an online resource: www.bmwman.ru)

This article is available at russian, bulgarian, belarusian, ukrainian, serbian, croatian, romanian, polish, slovak, hungarian
Article verified: Zhuravleva Isolda

Share information:
Previous articles
БМВ E53: Mechanical gearbox
Next articles

Replacing the sealing ring of the gear selection rod of the manual…
Replacing the primary shaft seal of the S5D 280Z manual transmission
Replacing the secondary shaft seal of the manual transmission
Replacing the clutch release bearing guide bushing
Removal and installation of gearbox S5D 280Z
Replacing the gear selector rod sleeve
Replacing the gear shift lever support rod
Replacing the gear shift lever support
Replacing the transmission cross beam
Replacing the rubber-metal hinge of the manual transmission


Similar articles on other types of BMW cars:
Removal and installation the gear shift lever BMW 3 Series E30 (1982-1994)
Removal and installation the gear shift lever BMW 3 Series E36 (1990-2000)
Removal and installation the gear shift lever BMW 5 Series E34 (1988-1996)
Removal and installation the gear shift lever BMW 5 Series E39 (1995-2003)
Gear Shift Lever — Removal and Installation BMW 7 Series E32 (1986-1994)
Removal and installation gear shift drive components BMW 7 Series E38 (1994-2001)
Replacing the left or right steering gear bellows BMW X3 E83 (2003-2010)
Link in different formats to this page


Visitor comments

No comments yet


How much 31 + 30 =


BMW E53 (1999-2006) 
  • General information
  • Manual
  • Maintenance
  • M54 petrol engine
  • Engine repair
  • Lubrication system
  • Cooling system
  • Supply system
  • Injection system
  • Exhaust system
  • Engine electrics
  • M62 petrol engine
  • Engine repair
  • Lubrication system
  • Cooling system
  • Supply system
  • Exhaust system
  • Engine electrics
  • N62 petrol engine
  • Engine repair
  • Cooling and lubrication system
  • Power and exhaust system
  • Engine electrics
  • Diesel engine M57
  • Engine repair
  • Lubrication system
  • Cooling system
  • Power and exhaust system
  • Engine electrics
  • Turbocharging system
  • Transmission
  • Clutch
  • Mechanical gearbox
  • Automatic gearbox
  • Transfer case and cardan
  • Chassis
  • Brake system
  • Steering
  • Front suspension
  • Rear suspension
  • Wheels and tires
  • Body
  • Exterior
  • Interior
  • Doors and windows
  • Repair and maintenance
  • Heater and air conditioner
  • Electrical equipment
  • Equipment and devices
  • Levers and switches
  • Electrical circuits
BMWman.ru © 2017-2026 · Mobile version · News and articles · Sitemap: EN BG BY UA RS HR RO PL SK HU · Feedback · Site search
3er E21 · 3er E30 · 3er E36 · 3er E46 [petrol] · 3er E46 · 5er E12 · 5er E28 · 5er E34 · 5er E39 · 7er E32 · 7er E38 · X3 E83 · X5 E53 ·
This site uses cookies 🍪, without them some features simply would not work.