
Table of contents: Wheel alignment adjustment ↓ Wheel alignment adjustment ↓
Adjusting the front wheel alignment angles (BMW X5 E53)
The design of the front axle and steering allows the front wheel alignment to be adjusted using the "BMW Diagnostics" complex stand. Changing the wheel camber angle is always accompanied by a change in the positive wheel alignment. In this regard, it is necessary to first adjust the wheel camber. Wheel alignment angles must be adjusted in accordance with the stand manufacturer's instructions.
The camber and toe angles are interrelated, so adjusting the front wheel alignment angles should begin with setting the toe angle.
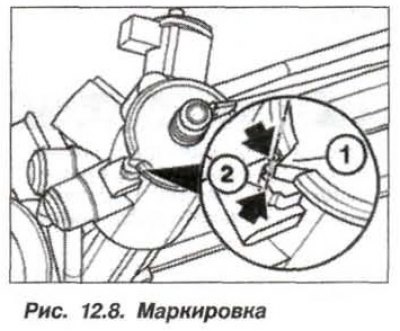
The positive wheel alignment adjustment must be carried out in the following order: Remove the side cover of the steering gear, set the wheels and steering gear to the position for driving straight ahead, with the markings on the cap (1, Fig. 12.8) and on the body (2) must match. Fix the steering wheel.
Clean the threads on the tie rod and loosen its lock nut (1, Fig. 12.9), while holding the steering rod end.
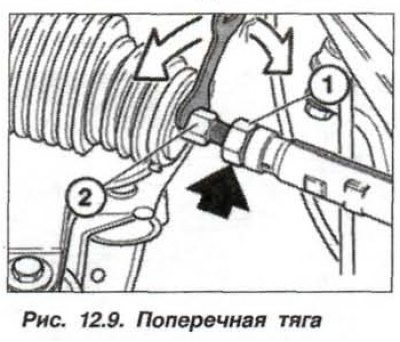
Turn the steering rod by the hexagon (2) to set the positive wheel alignment to 0°18'±10'. Make sure that the boot (3) on the rod does not twist. Tighten the lock nut (1) to a torque of 51 N·m (5.1 kgf·m) and, if necessary, restore the boot position.
The wheel camber angle adjustment must be carried out in the following order. Prepare the device "32.3.140", if there is a windshield washer reservoir on the right side, unscrew it, remove it from its place and move it to the side. Remove dirt in the area of the upper support of the shock absorber strut with compressed air. Raise the car, the wheels are suspended.
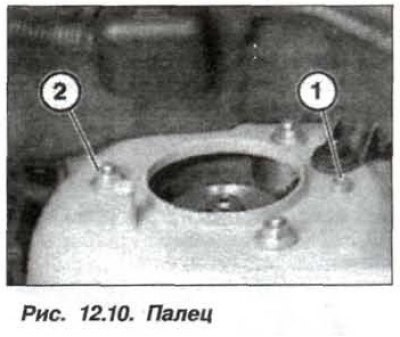
Remove the wheel well cap and remove the centering pin (1, Fig. 12.10) with a key, the pin cannot be reused. If the pin is plastic, it will break off. Loosen the nut (2) by one and a half turns.
Install the "32.3.140" device through the hole in the wheel arch onto the nut (2) securing the shock absorber strut (fig. 12.11).
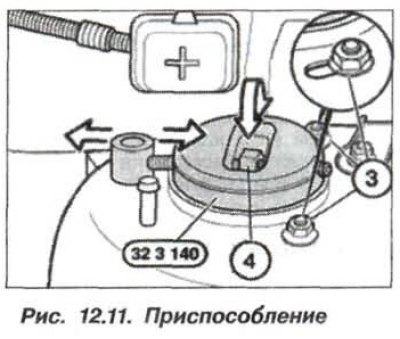
Replace the nuts (3) and screw them on until they touch the contact surface, without tightening. Lower the car onto the wheels. Turn the nut (4, arrow), set the camber angle to -12'±20'. The maximum change in camber angle is ±18°. Tighten the nuts (3) to a torque of 34 Nm (3.4 kgf·m), with a rod diameter of 21 mm, and remove the device.
Tighten the nut (2, see Fig.12.10) torque of 34 N·m (3.4 kgf·m), with a rod diameter of 21 mm, and install the cap on the wheel arch.
The camber and toe angles are interrelated, so adjusting the front wheel alignment angles should begin with setting the toe angle.
Wheel alignment adjustment
The positive wheel alignment adjustment must be carried out in the following order: Remove the side cover of the steering gear, set the wheels and steering gear to the position for driving straight ahead, with the markings on the cap (1, Fig. 12.8) and on the body (2) must match. Fix the steering wheel.
Clean the threads on the tie rod and loosen its lock nut (1, Fig. 12.9), while holding the steering rod end.
Turn the steering rod by the hexagon (2) to set the positive wheel alignment to 0°18'±10'. Make sure that the boot (3) on the rod does not twist. Tighten the lock nut (1) to a torque of 51 N·m (5.1 kgf·m) and, if necessary, restore the boot position.
Wheel alignment adjustment
Warning! It is strictly forbidden to correct changes in axle geometry caused by an accident by adjusting the camber angle of the wheels.
The wheel camber angle adjustment must be carried out in the following order. Prepare the device "32.3.140", if there is a windshield washer reservoir on the right side, unscrew it, remove it from its place and move it to the side. Remove dirt in the area of the upper support of the shock absorber strut with compressed air. Raise the car, the wheels are suspended.
Remove the wheel well cap and remove the centering pin (1, Fig. 12.10) with a key, the pin cannot be reused. If the pin is plastic, it will break off. Loosen the nut (2) by one and a half turns.
Install the "32.3.140" device through the hole in the wheel arch onto the nut (2) securing the shock absorber strut (fig. 12.11).
Replace the nuts (3) and screw them on until they touch the contact surface, without tightening. Lower the car onto the wheels. Turn the nut (4, arrow), set the camber angle to -12'±20'. The maximum change in camber angle is ±18°. Tighten the nuts (3) to a torque of 34 Nm (3.4 kgf·m), with a rod diameter of 21 mm, and remove the device.
Tighten the nut (2, see Fig.12.10) torque of 34 N·m (3.4 kgf·m), with a rod diameter of 21 mm, and install the cap on the wheel arch.
This article is available at russian, bulgarian, belarusian, ukrainian, serbian, croatian, romanian, polish, slovak, hungarian
Article verified: Zhuravleva Isolda
Share information:
Previous articles
БМВ E53: Steering
Next articles
Similar articles on other types of BMW cars:
Wheel alignment angles — basic information BMW 3 Series E46 (1998-2006, petrol)
Front Wheel Alignment Checking the Wheel Alignment BMW 3 Series E46 (1998-2006)
Checking and adjusting the front wheel alignment angles BMW 5 Series E12 (1972-1981)
Removal and installation, checking of front wheel bearings BMW 5 Series E34 (1988-1996)
Front wheel alignment angles BMW 7 Series E32 (1986-1994)
Car Wheel Alignment Angles — General Information BMW 7 Series E38 (1994-2001)
Adjusting the rear wheel alignment angles BMW X3 E83 (2003-2010)
Link in different formats to this page
Visitor comments
No comments yet
- General information
- Manual
- Maintenance
- M54 petrol engine
- Engine repair
- Lubrication system
- Cooling system
- Supply system
- Injection system
- Exhaust system
- Engine electrics
- M62 petrol engine
- Engine repair
- Lubrication system
- Cooling system
- Supply system
- Exhaust system
- Engine electrics
- N62 petrol engine
- Engine repair
- Cooling and lubrication system
- Power and exhaust system
- Engine electrics
- Diesel engine M57
- Engine repair
- Lubrication system
- Cooling system
- Power and exhaust system
- Engine electrics
- Turbocharging system
- Transmission
- Clutch
- Mechanical gearbox
- Automatic gearbox
- Transfer case and cardan
- Chassis
- Brake system
- Steering
- Front suspension
- Rear suspension
- Wheels and tires
- Body
- Exterior
- Interior
- Doors and windows
- Repair and maintenance
- Heater and air conditioner
- Electrical equipment
- Equipment and devices
- Levers and switches
- Electrical circuits