
- Home
- BMW X5
- E53
- M62 petrol engine
- Engine repair
- Replacing timing belt covers
Replacing timing belt covers (BMW X5 E53)
Replacing the left upper timing belt cover
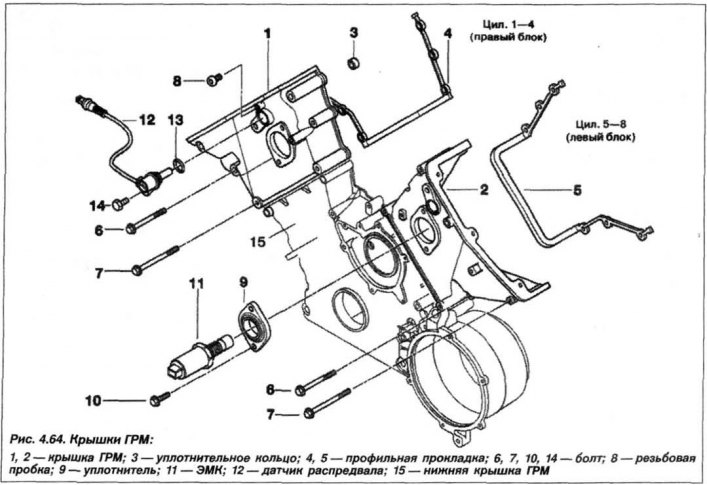
Removal of the left upper timing belt cover (Fig. 4.64) of the engine must be carried out in the following order.
Remove the left cylinder head cover, the fan drive clutch together with the impeller and the solenoid valve of the VANOS actuator.
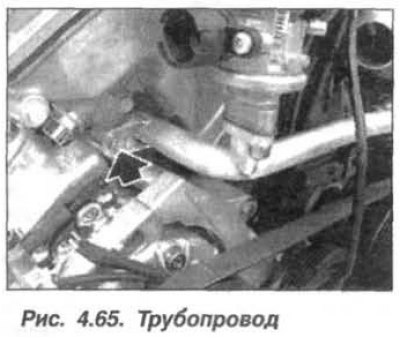
Disconnect the plug connector (SC) from the air supply shut-off valve, for purging the engine crankcase, from the left and right upper timing belt covers of the engine. Loosen the bolt (arrow, Fig. 4.65), disconnect the air supply line from the bracket and remove it.
Remove the bolts (6, 7, see Fig. 4.64) fastenings of the upper timing belt cover and remove it. Remove the profile rubber gasket (5).
The installation of the upper, left cover of the engine timing belt should be carried out in the reverse order, while it is necessary to clean the groove for the profile rubber gasket and the sealing surfaces from the remains of the old seal. The sealing surfaces must be clean from dirt and oil.
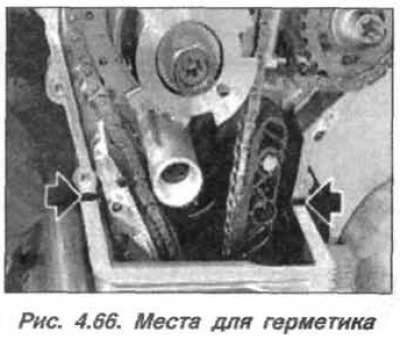
Apply to the mating surfaces of the parting plane between the cylinder head and the timing belt cover (arrows, Fig. 4.66) sealant layer type "Drei Bond 1209".
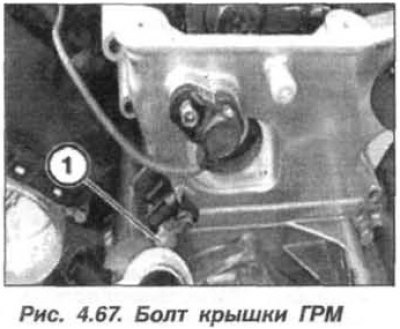
Insert the new profile rubber seal into the groove, paying particular attention to its correct installation. Install the bolt (1, see Fig. 4.67) into the timing belt cover, since it will be impossible to insert it later, and install the timing belt cover on the engine cylinder head.
Install the mounting bolts into the timing belt cover and tighten them by hand until they touch the engine cylinder head. Remove the outer and inner gaskets from the cylinder head cover.
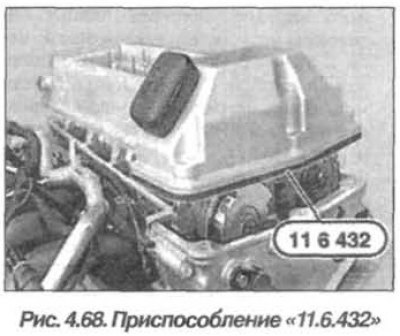
Insert the tool "11.6.432" (Fig. 4.68) from the kit "11.6.430" into the groove on the cylinder head cover and install the cover.
Put on the nuts (1, Fig. 4.69) and tighten them in several half-turn steps, with a final tightening torque for M7 nuts of 15 N·m (1.5 kgf·m), for M6 nuts of 10 N·m (1.0 kgf·m).
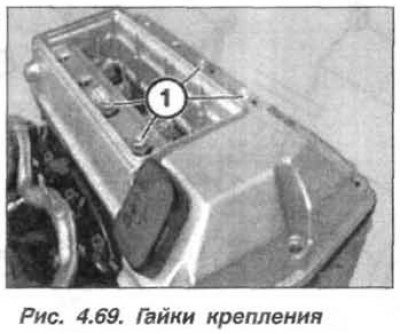
In this case, the timing cover is pressed by the head cover to the surface of the cylinder head.
Tighten the bolts (6, 7 see fig. 4.64) on the timing belt cover in two steps, crosswise, with a final tightening torque of 22 N·m (2.2 kgf·m) for M8 bolts, 15 N·m (1.5 kgf·m) for M7 bolts, and 10 N·m (1.0 kgf·m) for M6 bolts.
Remove the cylinder head cover and remove the tool "11.6.432" (see fig. 4.68). Install the solenoid valve of the VANOS actuator. Clean the sealing surfaces of the cylinder head, replace the O-rings of the additional air line, and, to facilitate their sliding, coat it with a thin layer of consistent grease. Continue assembling the engine.
Replacing the right upper timing belt cover
Removal of the right upper timing belt cover of the engine should be carried out in the same technological order, taking into account the following points.
After removing the right cylinder head cover, remove the chain tensioner plunger. Unscrew the bolts (arrows, Fig. 4.70) fastening the sealing flange, which is installed over the electromagnetic valve (EMV) and seals the timing belt cover.

Clean the EMC from dirt and remove the sealing flange.
If necessary, remove the camshaft position sensor or disconnect the camshaft position sensor on the cable box.
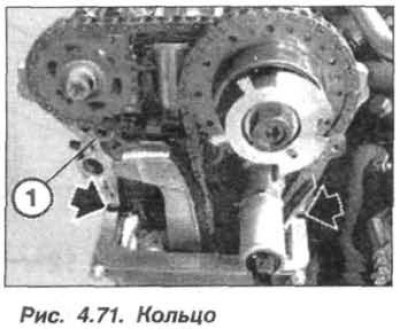
When installing the upper, right timing belt cover, the sealing ring in the oil supply channel should be replaced (1, Fig. 4.71) to the chain tensioner in the cylinder head.
Before installing the timing belt cover, you should press the tensioner bar towards the center and only then install the timing belt cover on the engine cylinder head.
When installing the right timing belt cover, use the "11.6.431" device from the "11.6.430" kit instead of the "11.6.432" device. Clean the EMC and the sealing surface.
Check and, if necessary, replace the sealing flange (1, Fig. 4.72).
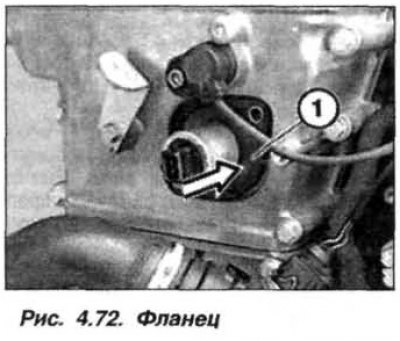
Lightly lubricate the inner surface of the sealing flange adjacent to the EMC with oil and carefully push the flange on. Insert and tighten the bolts for its fastening.
Continue assembling the engine.
Replacing the lower timing belt cover
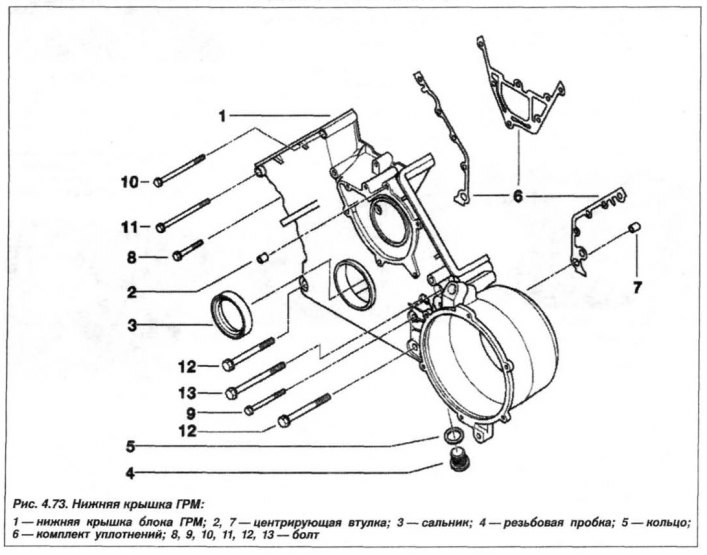
The design of the lower timing belt cover is shown in Figure 4.73.
The replacement of the lower timing belt cover must be carried out in the following order: Disconnect the "-" terminal from the battery, drain the coolant and send it for disposal.
Remove the right and left upper timing belt covers. Remove the vibration damper hub and remove the coolant pump together with the thermostat housing.
Attention! When removing a liquid-cooled generator from the engine, residual coolant will flow out of the timing belt cover and must be collected and disposed of.
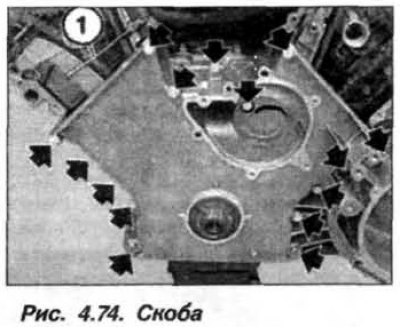
Remove the liquid-cooled generator, the upper part of the oil pan, press the tensioner bar against the drive chain and fix it in this position with a bracket (1, Fig. 4.74).
Unscrew the bolts (arrows) securing the lower timing belt cover to the cylinder block and remove it.
Clean the sealing surfaces on the lower timing cover and cylinder block using a hardwood scraper (beech, hornbeam or oak) and check the centering bushings for damage and correct installation.
Secure new sealing gaskets (6, see Fig. 4.73) on the cylinder block using a small amount of sealant such as "Drei Bond 1209", applied to the front and back surfaces of the gaskets in a thin layer.
Install the timing belt cover and screw in all the bolts (15 pcs.) securing it to the cylinder block. Pre-tighten the bolts to a torque of 5 N·m (0.5 kgf·m). Tighten all the bolts (M7) securing the timing belt cover to the cylinder block in a staggered pattern to a torque of 15 N·m (1.5 kgf·m).
Attention! When all the bolts are tightened, to check, tighten them again in a checkerboard pattern with a tightening torque of 15 N·m (1.5 kgf·m).
Replace the front crankshaft oil seal, the sealing ring of the threaded plug (M14x1.5) of the cooling system drain hole and tighten it to a torque of 25 N·m (2.5 kgf·m). Assemble the engine.
Fill with coolant. Remove air from the cooling system and check it for leaks.
This article is available at russian, bulgarian, belarusian, ukrainian, serbian, croatian, romanian, polish, slovak, hungarian
Article verified: Zhuravleva Isolda
Share information:
Previous articles
БМВ E53: Engine repair
Next articles
Similar articles on other types of BMW cars:
Replacing the V-belt of the air conditioning compressor (all models) BMW 3 Series E36 (1990-2000)
Accessory Drive Belt — Checking and Replacing BMW 3 Series E46 (1998-2006, petrol)
Replacing the engine timing belt BMW 5 Series E28 (1981-1988)
Replacing the camshaft drive belt of the 6-cylinder BMW «520» and… BMW 5 Series E12 (1972-1981)
Timing Chain Covers — Removal and Installation BMW 7 Series E32 (1986-1994)
Removal and installation timing chain covers BMW 7 Series E38 (1994-2001)
Lower timing belt cover BMW X3 E83 (2003-2010)
Link in different formats to this page
Visitor comments
No comments yet
- General information
- Manual
- Maintenance
- M54 petrol engine
- Engine repair
- Lubrication system
- Cooling system
- Supply system
- Injection system
- Exhaust system
- Engine electrics
- M62 petrol engine
- Engine repair
- Lubrication system
- Cooling system
- Supply system
- Exhaust system
- Engine electrics
- N62 petrol engine
- Engine repair
- Cooling and lubrication system
- Power and exhaust system
- Engine electrics
- Diesel engine M57
- Engine repair
- Lubrication system
- Cooling system
- Power and exhaust system
- Engine electrics
- Turbocharging system
- Transmission
- Clutch
- Mechanical gearbox
- Automatic gearbox
- Transfer case and cardan
- Chassis
- Brake system
- Steering
- Front suspension
- Rear suspension
- Wheels and tires
- Body
- Exterior
- Interior
- Doors and windows
- Repair and maintenance
- Heater and air conditioner
- Electrical equipment
- Equipment and devices
- Levers and switches
- Electrical circuits