Cars Mazda Cars Mitsubishi Cars Toyota Cars Chevrolet Cars AvtoVAZ Cars Kia Cars Nissan
English Русский
Български
Беларускі
Український
Српски
Hrvatski
Română
Polski
Slovenský
Magyar
| Articles | Contacts | Sitemap |   
BMWman.ru


3 series   5 series   7 series   BMW X3   BMW X5   BMW X6

E53 (1999-2006)
  • Home
  • BMW X5
  • E53
  • Body
  • Exterior
  • Replacing the front fender

Replacing the front fender (BMW X5 E53)

            0

Front wing (fig. 18.18) stamped, removable, attached to the body frame with self-tapping screws and Torx screws.

Front wing (fig. 18.18) stamped, removable, attached to the body frame with self-tapping screws and…


Attention! When replacing a wing, avoid damaging adjacent body elements.


The front wing replacement must be carried out in the following order. Apply the parking brake, loosen the wheel fastenings and place the car on stands or lift it on a lift. Fix the relative position of the wheel and its hub (paint, marker), remove the wheel from the side of the wing being replaced.

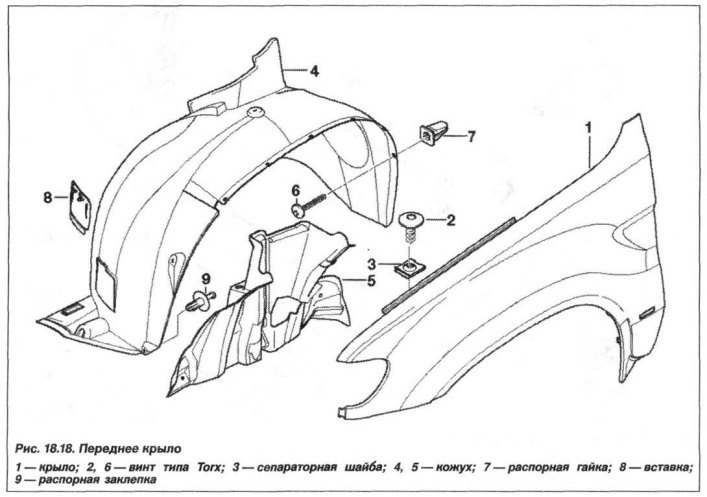
Raise and secure the hood in the open position, remove and, if necessary, replace the following parts:
  • front wheel arch trim;
  • front wheel arch cover;
  • lower trim on the headlight;
  • front additional direction indicator.

Open the door and through the slot from the inside of the car, unscrew the bolts (1, Fig. 18.19) fastening the wing to the front body pillar.

Open the door and through the slot from the inside of the car, unscrew the bolts (1, Fig. 18.19)…


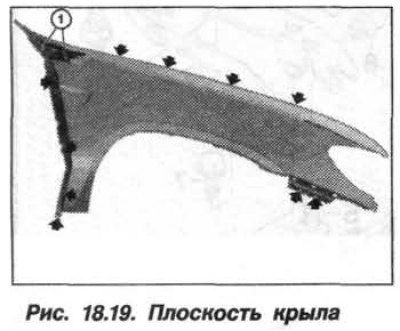
Loosen the bolt securing the front wing to the body frame (arrows, 10 pcs.) from the engine compartment side. When unscrewing the bolts, make sure not to lose the nut washers.


Using a marker, mark the position of the hinges on the hood and fix the position of the hood on the body with wooden blocks so that after removing the fasteners there is no damage to the windshield, hood, body parts and paintwork. Remove the hood as described below.

Attention! The wing sits firmly on the body thanks to its protective anti-corrosion layer and sealant. To remove the wing, it is necessary to heat the protective layer with an industrial hair dryer with a flat nozzle in the upper and rear (lower) sections of the wing from the bottom of the body.


Using a scraper, remove the protective coating by heating and separating it, section by section, from the area where the wing meets the body. Otherwise, the mating surfaces of the wing and body will be deformed. Remove the wing by separating it from the body using a sharp plastic tool inserted between the wing and the body.

The front wing should be installed in the reverse order, while it is necessary to clean the contact surfaces of the wing and the body from the remains of the anti-corrosion coating and, if necessary, straighten them. Restore the paintwork.

Place the wing in place and tighten the screws by hand. Make sure that the seal does not come out, especially in the area of the headlights. Install the hood (see below) and align the gap in the joint between the hood and the wing by moving the hood. The gap should be uniform along the entire length, measuring 4.0±0.75 mm. The plane of the hood may be recessed from the plane of the wing by no more than 1.0 mm.


Check the gap in the joint between the wing and the front door by moving the wing. The gap should be uniform along the entire length and 4.5±0.5 mm. The plane of the door should protrude above the surface of the wing by 1.0 mm.

Tighten the front wing mounting screws to a torque of 0.5 kgf·m (5 N·m). Restore the anti-corrosion coating of the body bottom and the inner surface of the wing.

Install the wheel on the hub according to the previously applied boundaries. When installing the wheel, the threads of the bolts and holes in the hubs must be dry.

The final tightening of the wheel mounting bolts should be carried out with the vehicle standing on its wheels. Tighten crosswise, with a torque of 14.0 kgf·m (140 N·m).

This article is available at russian, bulgarian, belarusian, ukrainian, serbian, croatian, romanian, polish, slovak, hungarian
Article verified: Zhuravleva Isolda

Share information:
Previous articles
БМВ E53: Exterior
Next articles

Replacing the rear bumper trim
Replacing the rear bumper
Rear bumper — design description
Replacing the cross beam of the cladding
Replacing the front bumper trim
Hood — removal, installation and adjustment
Removal and installation the outside rearview mirror
Removal and installation the exterior mirror housing
Tightening torques for body element connections


Similar articles on other types of BMW cars:
Replacing the front crankshaft oil seal and intermediate shaft oil… BMW 3 Series E21 (1975-1983)
Replacing the front brake hose BMW 3 Series E46 (1998-2006)
Replacing the front axle crossmember BMW 5 Series E12 (1972-1981)
Replacing the front oil seals BMW 5 Series E28 (1981-1988)
Replacing the oil filter (center bolt design) BMW 7 Series E32 (1986-1994)
Replacing the cabin filter (ventilation system) BMW 7 Series E38 (1994-2001)
Front ashtray (optional) BMW X3 E83 (2003-2010)
Link in different formats to this page


Visitor comments

No comments yet


How much 26 + 46 =


BMW E53 (1999-2006) 
  • General information
  • Manual
  • Maintenance
  • M54 petrol engine
  • Engine repair
  • Lubrication system
  • Cooling system
  • Supply system
  • Injection system
  • Exhaust system
  • Engine electrics
  • M62 petrol engine
  • Engine repair
  • Lubrication system
  • Cooling system
  • Supply system
  • Exhaust system
  • Engine electrics
  • N62 petrol engine
  • Engine repair
  • Cooling and lubrication system
  • Power and exhaust system
  • Engine electrics
  • Diesel engine M57
  • Engine repair
  • Lubrication system
  • Cooling system
  • Power and exhaust system
  • Engine electrics
  • Turbocharging system
  • Transmission
  • Clutch
  • Mechanical gearbox
  • Automatic gearbox
  • Transfer case and cardan
  • Chassis
  • Brake system
  • Steering
  • Front suspension
  • Rear suspension
  • Wheels and tires
  • Body
  • Exterior
  • Interior
  • Doors and windows
  • Repair and maintenance
  • Heater and air conditioner
  • Electrical equipment
  • Equipment and devices
  • Levers and switches
  • Electrical circuits
BMWman.ru © 2017-2026 · Mobile version · News and articles · Sitemap: EN BG BY UA RS HR RO PL SK HU · Feedback · Site search
3er E21 · 3er E30 · 3er E36 · 3er E46 [petrol] · 3er E46 · 5er E12 · 5er E28 · 5er E34 · 5er E39 · 7er E32 · 7er E38 · X3 E83 · X5 E53 ·
This site uses cookies 🍪, without them some features simply would not work.