
Table of contents: Crankshaft main bearing shells ↓ Connecting rod bearing shells ↓
- Home
- BMW X5
- E53
- Diesel engine M57
- Engine repair
- Replacing crankshaft bearing shells
Replacing crankshaft bearing shells (BMW X5 E53)
Crankshaft main bearing shells
The replacement of the crankshaft bearing shells must be carried out in the following order. Prepare the tools "00.2.590", "00.9.120" and "11.2.110". The engine is disassembled, the crankshaft and cylinder head are removed. The front timing belt unit, rear oil seal and oil pump are removed.
Attention!
- When replacing the bearings in the crankcase, install only bearings with a yellow mark.
- To check the radial clearance in the main bearings, use the old main bearing cap bolts.
- When checking the clearance in the bearings, do not allow the crankshaft or connecting rod to turn.
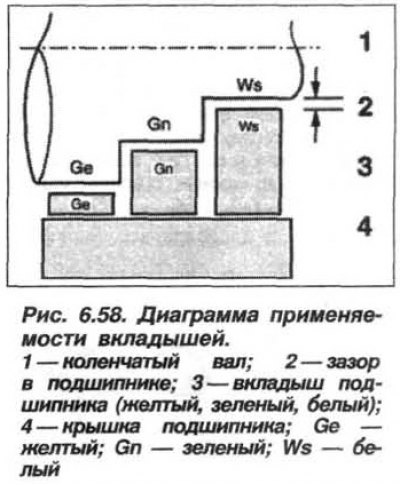
Pay attention to the markings (yellow, green or white) and the mark of the repair size of the crankshaft. The block bearing shells have similar markings.
Install the thrust bearing insert into the block, paying attention to the repair size of the main journals. In accordance with the diameter of the main journals, the crankshaft has a yellow, green or white marking.
The classification of bearing cap liners is marked on the crankshaft with yellow, green or white markings. Main bearing cap No.6 is a thrust bearing.
Check the radial clearance of the crankshaft main bearings using a plastic calibration wire of the type "Plastigage PG1", laid on the crankshaft journal cleaned of oil. The technology is similar to the engines "M54".. "N62".
The radial clearance should be within 0.020–0.055 mm for the thrust bearing and 0.019–0.052 mm for all other bearings.
If necessary, to adjust the radial clearance in the bearing, it is necessary to use new bearing shells or shells with a different color marking. The diagram of shell applicability is shown in Figure 6.58.
Tighten the main bearing cap bolts in the following order:
- tighten all main bearing cap mounting bolts from the middle to the edges with a torque of 22 N·m (2.0 kgf·m);
- unscrew the main bearing cap mounting bolts No.6;
- tap the rear and front ends of the crankshaft with a plastic-faced hammer to locate the thrust bearing;
- tighten the main bearing cap mounting bolts No.6 to a torque of 22 N·m (2.2 kgf·m);
- tighten all the main bearing cap mounting bolts from the middle to the edges at an angle of 90°, for which use the "11.2.110" or "00.9.120" tools.
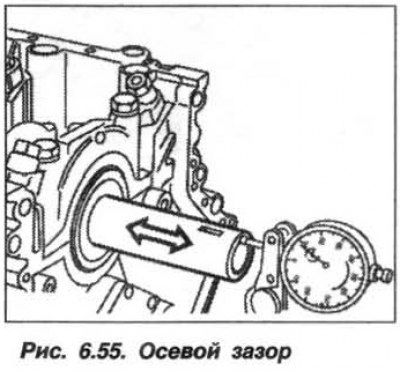
Check the crankshaft axial clearance (see fig. 6.55), the nominal value of which should be within 0.080–0.234 mm. If necessary, replace the thrust bearing shells, crankshaft and cylinder block.
Assemble the engine.
Connecting rod bearing shells
Attention! Connecting rod bearings are different from connecting rod cap bearings. Pay attention to crankshaft markings (repair dimensions).
Checking the radial clearance and replacing the crankshaft connecting rod bearing liners is carried out in the same way as replacing the main bearing liners, taking into account the following.
Prepare the equipment "00.2.590", "00.9.120" and "11.2.110" and remove all pistons. The connecting rod lower head caps and the connecting rod itself are matched as a pair and cannot be disassembled.
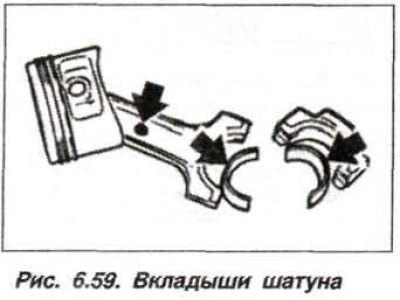
A standard insert of the Low version, red, is installed in the connecting rod cap. A wear-resistant insert marked "S" of the "High" version, blue, is installed in the lower head of the connecting rod. Insert one red and one blue insert into each connecting rod, regardless of the color marking of the connecting rod rod (arrows, Fig. 6.59).
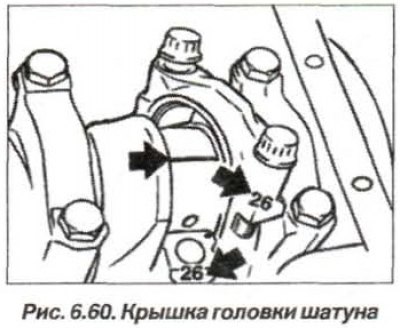
Install the pistons in the cylinder block and check the radial clearance between the liners and journals (Fig. 6.60), which should be within 0.019 - 0.052 mm for all connecting rod bearings. When checking the clearance, use the old connecting rod lower head cover fastening bolts. When checking, set the piston to the BDC position.
Check the gap to carry out the same way as the engines "M54".."N62", using the device "00.2.590" (Plastigage PG-1).
Bolt tightening order (old ones, just for checking) connecting rod bearing caps are as follows:
- tighten the bolts to 5.0 N·m (0.5 kgf·m);
- tighten the bolts to 20.0 N·m (2.0 kgf·m);
- tighten the bolts by an angle of 70° using the "00.9.120" tool.
Caution! When tightening the bolts, do not allow the connecting rod or crankshaft to turn.
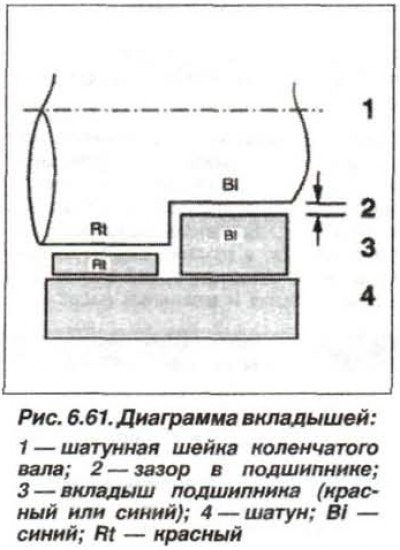
If necessary, to adjust the radial clearance in the bearing, use new bearing shells or shells with a different color marking. The diagram of shell applicability is shown in Figure 6.61.
Install the connecting rod caps. Wash the new connecting rod cap bolts of the old model in kerosene and lubricate them with engine oil. The new bolts have a permanent coating. Tighten the bolts as indicated above. Assemble the engine.
This article is available at russian, bulgarian, belarusian, ukrainian, serbian, croatian, romanian, polish, slovak, hungarian
Article verified: Zhuravleva Isolda
Share information:
Previous articles
БМВ E53: Engine repair
Next articles
Similar articles on other types of BMW cars:
Checking the clearance between the bearing shells and the main… BMW 3 Series E21 (1975-1983)
Crankshaft End Bearing — Replacement BMW 3 Series E46 (1998-2006, petrol)
Checking the clearance between the bearing shells and the main… BMW 5 Series E12 (1972-1981)
Replacing the rear crankshaft oil seal BMW 5 Series E28 (1981-1988)
Crankshaft — Installation and Checking of Main Bearing Oil Clearance BMW 7 Series E32 (1986-1994)
Replacing crankshaft seals BMW 7 Series E38 (1994-2001)
Replacing the intake camshaft BMW X3 E83 (2003-2010)
Link in different formats to this page
Visitor comments
No comments yet
- General information
- Manual
- Maintenance
- M54 petrol engine
- Engine repair
- Lubrication system
- Cooling system
- Supply system
- Injection system
- Exhaust system
- Engine electrics
- M62 petrol engine
- Engine repair
- Lubrication system
- Cooling system
- Supply system
- Exhaust system
- Engine electrics
- N62 petrol engine
- Engine repair
- Cooling and lubrication system
- Power and exhaust system
- Engine electrics
- Diesel engine M57
- Engine repair
- Lubrication system
- Cooling system
- Power and exhaust system
- Engine electrics
- Turbocharging system
- Transmission
- Clutch
- Mechanical gearbox
- Automatic gearbox
- Transfer case and cardan
- Chassis
- Brake system
- Steering
- Front suspension
- Rear suspension
- Wheels and tires
- Body
- Exterior
- Interior
- Doors and windows
- Repair and maintenance
- Heater and air conditioner
- Electrical equipment
- Equipment and devices
- Levers and switches
- Electrical circuits