
Caution: When reusing the timing chain, note the direction of its movement.
During installation, the boost air hoses must be dry and free of oil.
Protect the generator from contamination.
Remove the engine, oil pan, cylinder head, vibration damper and coolant pump. Replace the front crankshaft oil seal and remove the timing belt.
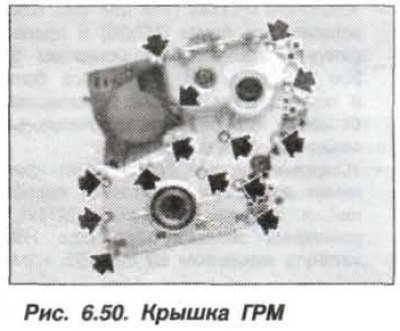
Remove the timing belt cover and coolant pump mounting bolts (14 pcs., arrows, Fig. 6.50) and carefully remove the timing belt cover.
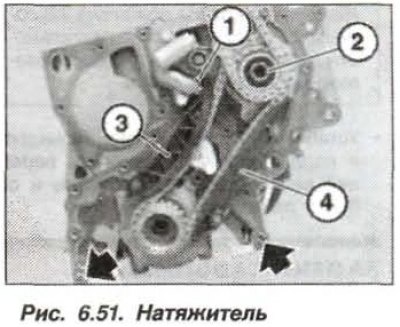
Mark the direction of movement of the camshaft drive chain and remove it. Press the lower tensioner bar (1, Fig. 6.51) and lock the chain tensioner using the device "11.3.340". Unscrew the nut (2) and remove the bar (3) of the chain tensioner from the hinge pin. Unscrew the bolt and remove the chain guide (4).
Mark the direction of movement of the high-pressure pump (HP) drive chain. Install the "13.5.191" type device on the HP drive sprocket and, by rotating its bolt, remove the HP drive sprocket with the drive chain. Remove both timing chain drive sprockets together with the chain.
Check the technical condition of the centering bushings (bottom arrows), replace them if necessary. Remove the sealing gasket and clean the sealing surfaces.
The installation of the front timing cover should be carried out in the reverse order, taking into account the direction of movement of the drive chains of the camshafts and the high-pressure fuel pump.
The new sealing gasket should be installed dry, in one piece, without crushing or bending it. When repairing the timing belt cover, it is necessary to cut the cover sealing gasket.
Before installing the front timing cover, install the drive chains. Apply a thin layer of sealant to the end points of the sealing gasket, on the right and left sides "Drei-Bond-1209". During installation, any position of the drive sprocket relative to the high-pressure fuel pump is allowed.
Install the timing belt cover (see fig. 6.50), insert all bolts (M7x38) and pre-tighten them to a torque of 5.0 N·m (0.5 kgf·m). Tighten all bolts in a crosswise order, moving from the center to the periphery, to a final torque of 15 N·m (1.5 kgf·m).
Install new bolts (M10) for fastening the torsional vibration damper and tighten them. Tighten the nut (M14x1.5) for fastening the high-pressure fuel pump sprocket to a torque of 65 N·m (6.5 kgf·m)
Note: Due to its precise fixation relative to the engine crankshaft, the front crankshaft oil seal should only be replaced after installing the cylinder head and engine oil pan. Failure to follow this sequence will result in oil leakage at this location.
Install the cylinder head and oil pan. Replace the front crankshaft seal and assemble the engine.