
Table of contents: Removal the cylinder head cover…↓ Removal the cylinder head cover seal…↓
- Home
- BMW X5
- E53
- N62 petrol engine
- Engine repair
- Replacing the cylinder head cover seals
Replacing the cylinder head cover seals (BMW X5 E53)
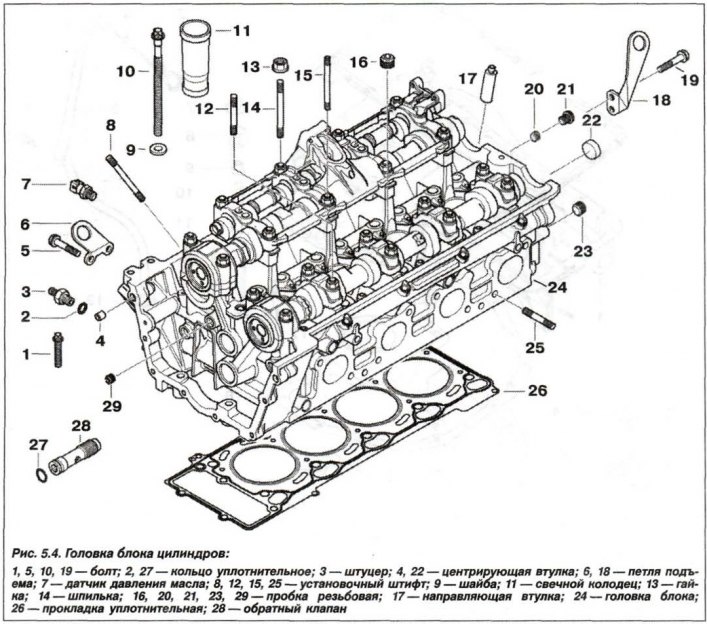
The design of the engine cylinder heads is shown in Figure 5.4.
Removing the cylinder head cover gasket on cylinder bank 5–8 must be done in the following order. Disconnect the "–" terminal from the battery. Remove the cover with the BMW emblem, decorative and soundproofing covers. Remove the central partition of the auxiliary engine compartment and the ignition coil cover.
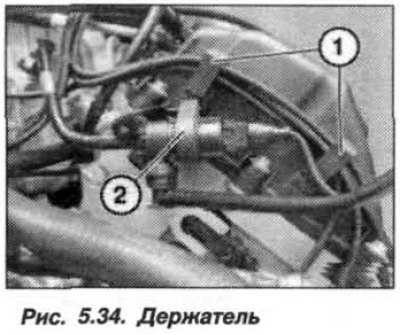
Release the holder (1, Fig. 5.34) wires together with the wires. Remove the fuel tank ventilation valve (2) from the holder.
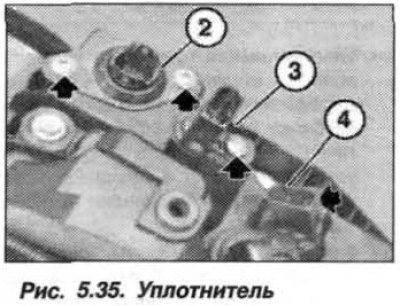
Unlock and disconnect the shock absorbers from the sensors. Unscrew the screws and remove the sealing element (2, Fig. 5.35). Remove the sensors (3 and 4). Remove the ignition coils.
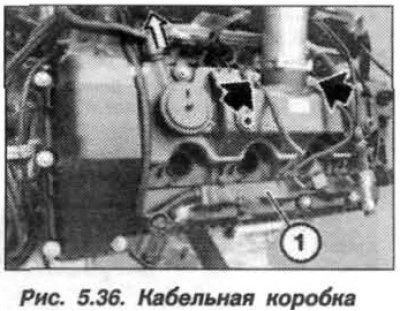
Disconnect both wires to "ground" (arrows, Fig. 5.36). Unlock and disconnect the vent hose. Open the cable box (1) and remove the cable from the holder. Remove the left eccentric shaft drive motor.
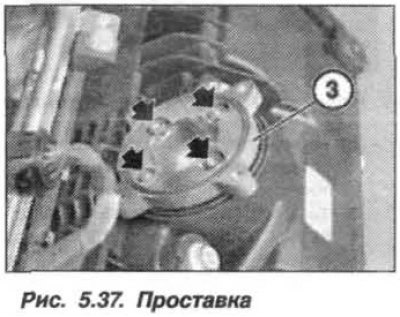
Remove the screws (arrows, Fig. 5.37) and remove the spacer (3) by moving it upwards.
Remove the branch pipe of the distribution line. Remove the oil dipstick. Mark the cylinder head cover mounting bolts, as they have different lengths.
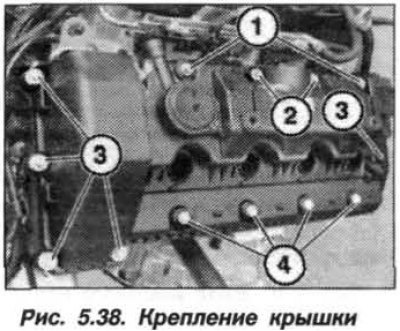
Loosen the bolts (1–4, Fig. 5.38) and remove the cylinder head cover.
The installation of the seal for the left cylinder head cover should be carried out in the reverse order, while it is necessary to clean the sealing grooves in the cylinder head cover.
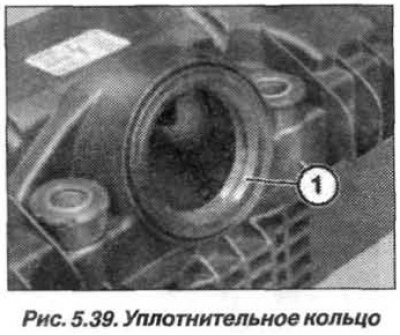
Replace the sealing ring (1, Fig. 5.39) under the spacer and press it into the cylinder head cover. Pay attention to the direction when installing the sealing ring of the spacer, the groove in the sealing ring should face outward.
Replace the sealing gasket. Loosely apply and align the sealing gasket along the groove in the cover. Fix the gasket in the rear, rounded corners and install it without tension in the groove of the cover. Replace the high-voltage terminals.
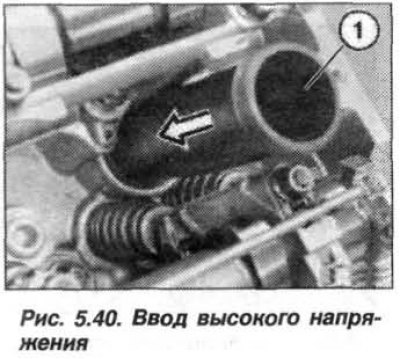
Lubricate the rubber seals on the inlet (1, Fig. 5.40) high voltage with grease to facilitate sliding and install them in the cylinder head. When installing the cylinder head cover, it is necessary to align the high voltage inputs flush with the cylinder head cover.
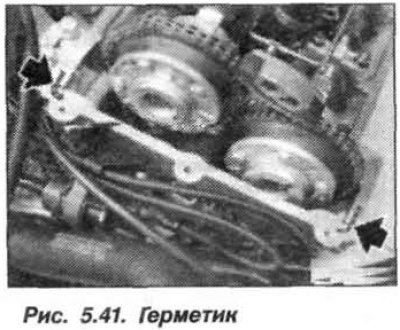
Clean the sealing surfaces from sealant residues and apply a sealant of the type to the joint surfaces of the parting plane "Drei Bond 1209" (arrow, Fig. 5.41).
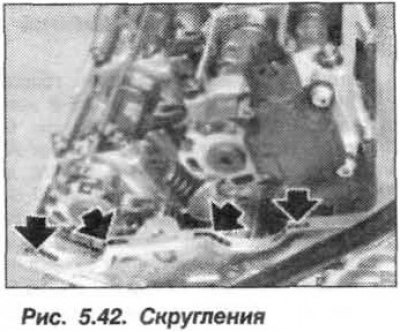
Clean the surfaces to be sealed from sealant residues and apply a uniform, thin layer of sealant such as "Drei Bond 1209" (arrows, Fig. 5.42).
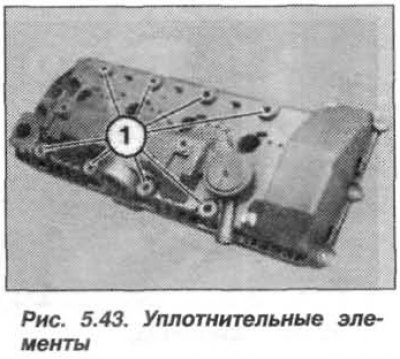
Replace sealing elements (1, Fig. 5.43). Pay attention to the correct position of the sealing gasket on the sides and on the back of the cylinder head.
The sealing gasket and the spacer bushings of the mounting bolts are interconnected. If the cylinder head cover was not sealed, the fault can only be eliminated with a new sealing gasket and new mounting bolts.
Replace bolts (3, see Fig. 5.38) cylinder head fastenings. Install without completely tightening the bolts (1, 2 and 3), position the cover and tighten the fastening bolts (1, 2 and 3) in a crosswise order from the middle to the edges.
Replace the sealing element (2, see Fig. 5.43) and sealing rings on the sensors (3 and 4).
Removing the cylinder head cover gasket on cylinder bank 1–4 must be carried out in the following order. Disconnect the "–" terminal of the battery. Remove the cover with the BMW emblem, decorative cover, soundproofing cover and central partition of the engine auxiliary mechanism compartment. Remove the control electronics compartment cover and compartment sealing gasket. Remove the ignition coil cover and air filter housing (without air intake casing), suction hose with air flow meter.
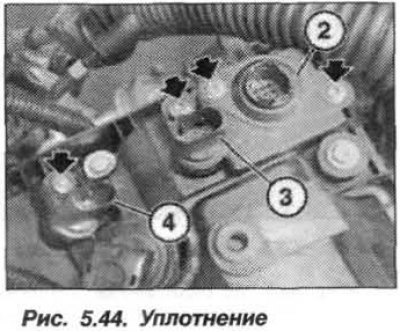
Unlock and disconnect the shock absorbers from the sensors, unscrew the screws and remove the shock absorber sealing element (2, Fig. 5.44). Remove the sensors (3 and 4) and ignition coils.
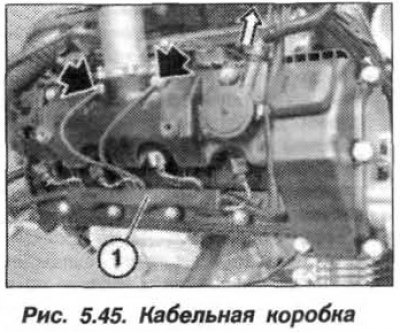
Disconnect both wires to "ground" (arrows, Fig. 5.45). Unlock and disconnect the vent hose. Open the cable box (1) and remove the cable from the holder. Remove the right eccentric shaft drive motor.
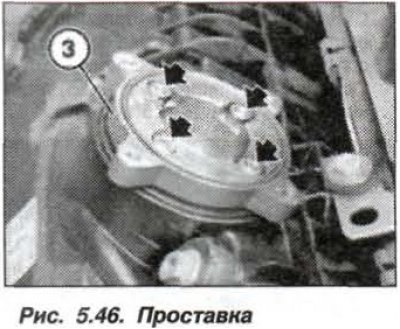
Remove the screws (arrows, Fig. 5.46) and remove the spacer (3) by moving it upwards.
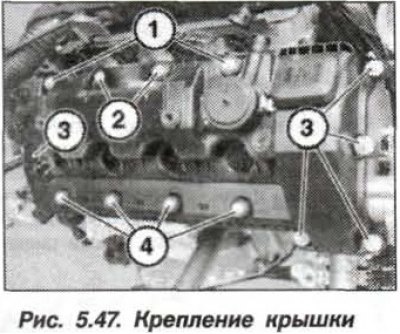
Remove the branch pipe of the distribution line. Mark the bolts of the cylinder head cover, as they have different lengths. Unscrew the bolts (1, 2, 3 and 4, Fig. 5.47) fasteners and remove the cylinder head cover.
The installation of the right cylinder head cover seal should be carried out in the reverse order, while it is necessary to follow the technology similar to that for the left cylinder block.
(The original material is located on the website BMWMan.ru)
Removal the cylinder head cover gasket on cylinder bank 5–8
Removing the cylinder head cover gasket on cylinder bank 5–8 must be done in the following order. Disconnect the "–" terminal from the battery. Remove the cover with the BMW emblem, decorative and soundproofing covers. Remove the central partition of the auxiliary engine compartment and the ignition coil cover.
Release the holder (1, Fig. 5.34) wires together with the wires. Remove the fuel tank ventilation valve (2) from the holder.
Unlock and disconnect the shock absorbers from the sensors. Unscrew the screws and remove the sealing element (2, Fig. 5.35). Remove the sensors (3 and 4). Remove the ignition coils.
Disconnect both wires to "ground" (arrows, Fig. 5.36). Unlock and disconnect the vent hose. Open the cable box (1) and remove the cable from the holder. Remove the left eccentric shaft drive motor.
Remove the screws (arrows, Fig. 5.37) and remove the spacer (3) by moving it upwards.
Remove the branch pipe of the distribution line. Remove the oil dipstick. Mark the cylinder head cover mounting bolts, as they have different lengths.
Loosen the bolts (1–4, Fig. 5.38) and remove the cylinder head cover.
Note: The cylinder head cover and cylinder head cover gasket are made of a material that can be adjusted to the contour of the cylinder head.
The installation of the seal for the left cylinder head cover should be carried out in the reverse order, while it is necessary to clean the sealing grooves in the cylinder head cover.
Replace the sealing ring (1, Fig. 5.39) under the spacer and press it into the cylinder head cover. Pay attention to the direction when installing the sealing ring of the spacer, the groove in the sealing ring should face outward.
Replace the sealing gasket. Loosely apply and align the sealing gasket along the groove in the cover. Fix the gasket in the rear, rounded corners and install it without tension in the groove of the cover. Replace the high-voltage terminals.
Lubricate the rubber seals on the inlet (1, Fig. 5.40) high voltage with grease to facilitate sliding and install them in the cylinder head. When installing the cylinder head cover, it is necessary to align the high voltage inputs flush with the cylinder head cover.
Clean the sealing surfaces from sealant residues and apply a sealant of the type to the joint surfaces of the parting plane "Drei Bond 1209" (arrow, Fig. 5.41).
Clean the surfaces to be sealed from sealant residues and apply a uniform, thin layer of sealant such as "Drei Bond 1209" (arrows, Fig. 5.42).
Replace sealing elements (1, Fig. 5.43). Pay attention to the correct position of the sealing gasket on the sides and on the back of the cylinder head.
Attention! The cylinder head cover mounting bolts are different, do not mix them up.
The sealing gasket and the spacer bushings of the mounting bolts are interconnected. If the cylinder head cover was not sealed, the fault can only be eliminated with a new sealing gasket and new mounting bolts.
Replace bolts (3, see Fig. 5.38) cylinder head fastenings. Install without completely tightening the bolts (1, 2 and 3), position the cover and tighten the fastening bolts (1, 2 and 3) in a crosswise order from the middle to the edges.
Replace the sealing element (2, see Fig. 5.43) and sealing rings on the sensors (3 and 4).
Removal the cylinder head cover seal on cylinder bank 1-4
Removing the cylinder head cover gasket on cylinder bank 1–4 must be carried out in the following order. Disconnect the "–" terminal of the battery. Remove the cover with the BMW emblem, decorative cover, soundproofing cover and central partition of the engine auxiliary mechanism compartment. Remove the control electronics compartment cover and compartment sealing gasket. Remove the ignition coil cover and air filter housing (without air intake casing), suction hose with air flow meter.
Unlock and disconnect the shock absorbers from the sensors, unscrew the screws and remove the shock absorber sealing element (2, Fig. 5.44). Remove the sensors (3 and 4) and ignition coils.
Disconnect both wires to "ground" (arrows, Fig. 5.45). Unlock and disconnect the vent hose. Open the cable box (1) and remove the cable from the holder. Remove the right eccentric shaft drive motor.
Remove the screws (arrows, Fig. 5.46) and remove the spacer (3) by moving it upwards.
Remove the branch pipe of the distribution line. Mark the bolts of the cylinder head cover, as they have different lengths. Unscrew the bolts (1, 2, 3 and 4, Fig. 5.47) fasteners and remove the cylinder head cover.
Note: The cylinder head cover and cylinder head cover gasket are made of a material that can be adjusted to the contour of the cylinder head.
The installation of the right cylinder head cover seal should be carried out in the reverse order, while it is necessary to follow the technology similar to that for the left cylinder block.
(The original material is located on the website BMWMan.ru)
This article is available at russian, bulgarian, belarusian, ukrainian, serbian, croatian, romanian, polish, slovak, hungarian
Article verified: Zhuravleva Isolda
Share information:
Previous articles
БМВ E53: Engine repair
Next articles
Similar articles on other types of BMW cars:
Removal and installation the cylinder head / replacing the sealing… BMW 3 Series E46 (1998-2006)
Removal and installation the cylinder head cover BMW 3 Series E30 (1982-1994)
Removal and installation the cylinder head cover BMW 5 Series E34 (1988-1996)
Removal and installation the cylinder head / replacing the cylinder… BMW 5 Series E39 (1995-2003)
Cylinder Head Cover — Removal and Installation BMW 7 Series E32 (1986-1994)
Removal and installation the cylinder head cover BMW 7 Series E38 (1994-2001)
Cylinder head BMW X3 E83 (2003-2010)
Removal and installation the cylinder head / replacing the sealing… BMW 3 Series E46 (1998-2006)
Removal and installation the cylinder head cover BMW 3 Series E30 (1982-1994)
Removal and installation the cylinder head cover BMW 5 Series E34 (1988-1996)
Removal and installation the cylinder head / replacing the cylinder… BMW 5 Series E39 (1995-2003)
Cylinder Head Cover — Removal and Installation BMW 7 Series E32 (1986-1994)
Removal and installation the cylinder head cover BMW 7 Series E38 (1994-2001)
Cylinder head BMW X3 E83 (2003-2010)
Link in different formats to this page
Visitor comments
No comments yet
- General information
- Manual
- Maintenance
- M54 petrol engine
- Engine repair
- Lubrication system
- Cooling system
- Supply system
- Injection system
- Exhaust system
- Engine electrics
- M62 petrol engine
- Engine repair
- Lubrication system
- Cooling system
- Supply system
- Exhaust system
- Engine electrics
- N62 petrol engine
- Engine repair
- Cooling and lubrication system
- Power and exhaust system
- Engine electrics
- Diesel engine M57
- Engine repair
- Lubrication system
- Cooling system
- Power and exhaust system
- Engine electrics
- Turbocharging system
- Transmission
- Clutch
- Mechanical gearbox
- Automatic gearbox
- Transfer case and cardan
- Chassis
- Brake system
- Steering
- Front suspension
- Rear suspension
- Wheels and tires
- Body
- Exterior
- Interior
- Doors and windows
- Repair and maintenance
- Heater and air conditioner
- Electrical equipment
- Equipment and devices
- Levers and switches
- Electrical circuits